
You can create tables directly in Word, of course, but if your tables consist of more than a few rows or columns, you’ll probably find it simpler to build them in Excel and then transfer them to your Word documents. You can use either of the following methods to move a worksheet range from Excel into Word:
Copy the Excel data to the Clipboard, and then use Paste or Paste Special in Word to paste the table in the format of your choice, with or without a link to the source data.
On the Insert tab in Word, click Object. The Object command in Word works just like its counterpart in Excel. (See Embedding and Linking with the Object Command on page 958.)
If you copy an Excel worksheet range to the Clipboard and then paste that range into Word (using either the Paste command or its keyboard shortcut, Ctrl+V), the options menu that appears below the lower-right corner of the pasted data, shown in Figure 32-1, provides quick access to the formatting options you’re most likely to want. These options are as follows:
Keep Source Formatting Word receives the data as a block of HTML and creates a table, preserving the fonts, alignment properties, numeric formatting, text color, and shading of your original. In most but not all cases, this option (the default) is an adequate way to create a table in Word that matches the appearance of your Excel data. After you perform the paste, if you click the pasted data, a Table Tools tab appears on the ribbon in Word, and you can use commands on the Design and Layout tabs to alter the appearance of the table in Word.
Use Destination Styles The data becomes a table in Word, but Word formats it as if you had created the table directly in Word.
Link & Keep Source Formatting Same as Keep Source Formatting but adds a link.
Link & Use Destination Styles Same as Use Destination Styles but adds a link.
Picture Word turns the pasted table into a picture and makes picture-formatting functionality available. You might choose this format if you want to add some pizzazz to your numbers—for example, shadows, reflections, borders with rounded corners, and so on.
Keep Text Only If you select this option, Word does not create a table. Instead, it simply pastes each cell’s contents in the current default font, separating cells with single tab characters. You might find this option useful if you’re simply copying a single column from Excel. Where multiple columns are involved, the Keep Text Only choice sometimes produces a misaligned hash in Word.
The options menu provides two Link & Keep commands to link your Word table (in either Excel format or Word format) to its source in Excel. These are equivalent to selecting Paste Special and selecting the Paste Link option. We discuss these options later in this chapter. (See Paste-Linking an Excel Table into Word on page 969.)
Caution
Don’t close your Excel document before pasting. If you copy data from Excel to the Clipboard and then close the Excel document, your options for pasting into Word are considerably diminished. The default paste format changes from HTML to rich-text format (RTF), and the options to link your Word document to its source in Excel disappear.

The options menu that appears when you paste Excel data includes only the most commonly used formatting options. These will probably meet your needs in most cases. However, you sometimes might find the HTML badly rendered in Word. This has been known to happen, for example, when pasting from documents in older Excel file formats, but most of these problems appear to have been solved in Excel 2007 and 2010. If your Excel table (or any other pasted data) does arrive with formatting distortions in Word, all is not lost. Erase the pasted data in Word, and then try again using the Paste Special command in Word. (On the Home tab in Word, click the small arrow below Paste, and then click Paste Special.) Figure 32-2 shows this dialog box as it appears when your Excel document is still open. (If you close the Excel document, fewer options are available.)

With almost any of the formats displayed in the Paste Special dialog box, you can either paste or paste-link. We’ll look at the latter operation in Paste-Linking an Excel Table into Word on page 969. First, we’ll describe the available paste formats:
Microsoft Excel Worksheet Object
Formatted Text (RTF) and HTML Format
Unformatted Text and Unformatted Unicode Text
Picture (Windows Metafile), Bitmap, and Picture (Enhanced Metafile)
Pasting using the Worksheet Object format provides a completely faithful replication of the appearance of your Excel table—including any graphical elements that happened to be within your Excel selection. It also lets you edit the pasted table using Excel commands and features rather than Word ones. For example, if you want to apply a custom numeric format to your data after pasting it as an object into Word, you can do that by double-clicking the object. When you do this, the user interface of Word temporarily merges with Excel, as shown in Figure 32-3. After you edit the object and click any other part of the Word document, the Excel ribbon is replaced by the Word ribbon, and the worksheet column and row headings disappear.

Figure 32-3. When you double-click an embedded Excel object, the Word ribbon is temporarily replaced by the Excel ribbon, letting you use Excel formatting and editing features to modify the object.
Note
When you double-click an embedded Excel object that includes graphical elements, Word might truncate those elements temporarily. When you return to the regular Word interface, however, Word will fully restore your graphical elements.
An important peculiarity to note about Excel objects embedded in Word documents is that Excel embeds the entire workbook, not only the selection you copied to the Clipboard. The sheet tabs at the bottom of the Excel object shown in Figure 32-3 illustrate this point. Although the editing window that appears in Word when you double-click the Excel object has the same dimensions as the original selection in Excel, you can scroll to any part of the current worksheet and even switch to another worksheet in the same workbook. When you return to Word (by clicking away from the embedded object), Word treats any scrolling you do as an edit to the embedded object. If you switch from Sheet1 to Sheet2 while you’re editing, you’ll see Sheet2 when you return to your Word document.
The RTF and HTML formats preserve the font and numeric formatting of your Excel selection. They differ in the way they preserve that formatting. RTF (Rich Text Format) is a method of encoding formatting information that has been available for a long time in Microsoft Office and other kinds of documents. HTML (HyperText Markup Language) is the newer, default format for pasting into Word (the format you get if you press Ctrl+V), and it’s the language that renders web pages in your browser. Both formats generate tables in Word, maintaining the cell alignment you had in Excel and allowing for manipulation via the Table commands in Word. Neither format includes graphical elements that are part of your Excel selection.
HTML is more likely than RTF to render the formatting of your Excel selection accurately. But you might want to experiment to see which format suits your purposes more effectively. If you don’t like the results you get, undo it and try again with a different format.
Use Unformatted Text and Unformatted Unicode Text when you do not want your Clipboard data to become a table in Word. Both formats transfer data from the Clipboard as though you had typed it in your Word document. They use tab characters between the columns of your original Excel selection and return characters at the ends of lines. Ordinarily, the result is that data that was aligned neatly in Excel is no longer aligned in Word. Use the Unicode format if your data includes characters outside the regular ANSI range—for example, characters from non-Latin alphabets. Otherwise, it doesn’t matter which of these two formats you use.
The Picture (Windows Metafile), Bitmap, and Picture (Enhanced Metafile) formats produce more or less faithful graphical representations of your original Excel selection (including any graphical elements associated with it). Because the results are pictures, not tables, you can modify them with the picture-formatting features in Word.
Of the three available picture formats, Bitmap usually provides the most faithful replication of original appearances—at the cost of additional file size. For tables not accompanied by graphical elements, the Picture (Windows Metafile) format is usually more than adequate. Experiment to see which works best for you.
You can paste-link any of the formats shown in Figure 32-2 and described in the preceding sections by selecting Paste Link in the Paste Special dialog box. When you do this, Word creates a field that references the source of your Excel data. The field is a code (comparable to an external-reference formula in Excel) that tells the application how to update the data if you request a manual update. The code also tells the application how to locate the data for editing if you double-click the linked information in your Word document. You can see the code by clicking the File tab in Word, clicking Options, selecting the Advanced category, and then selecting the Show Field Codes Instead Of Their Values check box, located in the Show Document Content section. Figure 32-4 shows the cryptic result, which you probably don’t want to leave like this in your Word document.

Figure 32-4. The Show Field Codes Instead Of Their Values option hides the objects while revealing the underlying links.
Links from Excel into Word are automatic by default, which means that anytime the Excel source is changed, the Word document is automatically adjusted. You can switch to manual linking by going to the Links dialog box shown in Figure 32-5. To get there, right-click the Excel table in the Word document, click Linked Worksheet Object, and then click Links.
If you’re using manual updating, you can also force an update by clicking Update Now in the Links dialog box. A simpler way to update your table is to select it and press F9.

Figure 32-5. In the Links dialog box in Word, you can switch between manual and automatic updating, modify the link specifications, or break the connection.
Tip
INSIDE OUT Link to Named Ranges
It is extremely important to make sure that Word identifies the source of an Excel link by means of a range name, not by an ordinary range reference. Otherwise, if the source table changes location for any reason (for example, if someone inserts or deletes a few rows), the link will no longer reference the original table. At best, you’ll have a blank table in your Word document. At worst, you’ll have the wrong table.
If the worksheet range has a name at the time you copy it to the Clipboard, Word will reference it by name when you perform your paste-link. If it is not named, Word will reference it by cell address using R1C1 notation. If you subsequently assign a name to the range in Excel and perform a manual update, Word will continue to reference it by address, not by name. If you have inadvertently linked to a range address instead of a range name, the simplest way to fix the problem is to remove the linked data, be sure the source range is named, and then re-create the link.
An alternative way to create a link between a Word document and an Excel document is to use a hyperlink. With an Excel range on the Clipboard, you can click the Home tab in Word, click the arrow below the Paste command, and then click Paste Special. The Paste Special dialog box displays the usual list of formats, but the Word Hyperlink option appears only if you select the Paste Link option, as Figure 32-6 shows.

Figure 32-6. Word Hyperlink appears as an option in Word’s Paste Special dialog box only if you select the Paste Link option.
After you paste in Word Hyperlink format, every character in the pasted range is underlined like a hyperlink; Ctrl+click any part of it to take you to the source data. The principal disadvantage of using hyperlinks instead of paste-linking is that hyperlinks don’t get updated when the source changes. A hyperlink can make it easy for you or another user to find your way back to the data source, but it provides no assurance that your Word document is faithful to the source.
The Clipboard methods just described are fine for importing existing Excel tables into Word documents. If you’re creating a table from scratch, you have the option of using an alternative method—by clicking the Object command on the Insert tab in Word. When you do this, the Object dialog box appears. On the Create New tab, select Microsoft Excel Worksheet (you might need to scroll down the list a bit), and then click OK. Word displays a window into a blank Excel worksheet, as Figure 32-7 shows.
Here you can create your table by taking advantage of all the formatting and calculation tools in Excel. When your table is ready for inclusion in your Word document, click outside the Excel window. The result is an Excel object embedded in your Word file—exactly what you get if you create the table initially in Excel, copy it to the Clipboard, and then choose Microsoft Excel Worksheet Object from the Paste Special dialog box in Word.
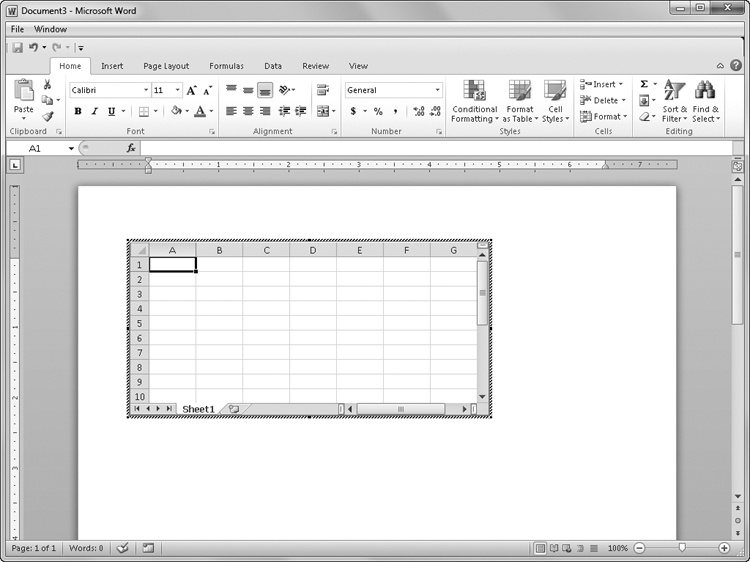
Figure 32-7. When you select Microsoft Excel Worksheet on the Create New tab in the Object dialog box in Word, a window into Excel appears in your Word document.
Tip
INSIDE OUT Resizing the Embedded Object
The table that Word embeds using the Object command has the same row and column dimensions as the Excel window in which you create the table. That is, empty cells are embedded along with populated ones. If you have to scroll to populate certain cells, some of your Excel table will not be embedded. You might need to adjust the size of the Excel window so that it includes all the rows and columns you want to see in Word. As long as the Excel window is active (you can still see the Excel ribbon commands), dragging the handles of the embedded object resizes the worksheet object, increasing or decreasing the number of rows and columns visible. However, if you drag the object handles when Excel controls are not visible (you are back to editing in Word), dragging the handles stretches or shrinks the size of the image rather than adding or subtracting rows and columns.