
The Quick Access Toolbar may be small, but you can pack a lot of tools onto it. If you are stuck using a small screen, or if you prefer an uncluttered workspace, you can set up the Quick Access Toolbar as a sort of “ribbon lite” to help free up some screen real estate.
When you first start Excel, the Quick Access Toolbar appears above the ribbon, as shown in Figure 3-10. You can change this so that the toolbar appears below the ribbon. Click the Customize Quick Access Toolbar button (the little arrow at the right end of the toolbar), and click Show Below The Ribbon. When you do, the name of the command changes appropriately, as shown in Figure 3-11.


Moving the Quick Access Toolbar below the ribbon offers you a couple of advantages. First, it’s closer to the action on the worksheet. Second, more space is available for additional tools, which we discuss in depth in Adding Tools to the Toolbar. The drawback to placing the toolbar below the ribbon is that it takes space away from the worksheet; conversely, the advantage of leaving it at the top of the screen is that it can occupy unused space on the title bar.
You get three tools to start with on the Quick Access Toolbar—Save, Undo, and Redo. These are undeniably heavily used commands, but you perform other tasks often too and might like to have them just a click away, readily available regardless of which ribbon tab is currently visible. It’s easy to customize the toolbar, and you have a couple of ways to do it.
If you find yourself continually returning to the same tab on the ribbon and using a particular command, you might consider adding it to the Quick Access Toolbar. The easiest way to do this is to right-click the command to display the shortcut menu shown in Figure 3-12.
In Figure 3-12, we added the Switch Windows command to the Quick Access Toolbar by right-clicking the command and clicking Add To Quick Access Toolbar. A button then appears on the toolbar that looks similar to the command on the ribbon. Each new button you add appears to the right of the previous button. Not all toolbar buttons are easy to identify, but you can always rest the pointer on a button to display a ScreenTip explaining its function, as shown at the bottom of Figure 3-12. If you add a lot of buttons, these ScreenTips are indispensable.

You can remove tools from the Quick Access Toolbar by using the same technique you use to add them. Right-click any tool on the toolbar, and click Remove From Quick Access Toolbar.
You can add virtually any command or group to the Quick Access Toolbar by using the right-click technique, but if you want to dig in and really create an organized toolbar, you should use the Excel Options dialog box. Right-click the toolbar, and click Customize Quick Access Toolbar to open the Quick Access Toolbar category in the Excel Options dialog box, shown in Figure 3-13.
As you can see in Figure 3-13, the list on the right shows the buttons currently visible on the toolbar. The controls here work just like the Customize Ribbon category—select any item on the left side, and then click the Add button to add it to the list on the right. Select any item on the right side, and click the Remove button to get rid of it; when you select an item, you can click the up and down arrows to reposition the item in the list. You can always click the Reset button if you want to discard all your changes and return to the original configuration.

Figure 3-13. The Quick Access Toolbar category in the Excel Options dialog box is the command center for the Quick Access Toolbar.
Notice in Figure 3-13 that Separator is the first item in the list on the left. This item is first in each command category, and with it you can insert small vertical bars on the Quick Access Toolbar to visually separate groups of related commands. You can add separators and move them up and down the list on the right side of the dialog box, just as you do with commands. (This item is not available for ribbon customization because you create groups first instead of using separators.)
The items in the Choose Commands From drop-down list include an eponymous item for each of the command tabs visible on the ribbon, plus all the other contextual tabs that appear on the ribbon only when an object is selected, as shown in Figure 3-14. Choose any item from the drop-down menu, and the corresponding list of commands appears in the list below.

Figure 3-14. Each item in the Choose Commands From drop-down list corresponds to a tab on the ribbon.
Tip
INSIDE OUT Create a Mini-Ribbon
Here is a trick you can use if it just seems like too much bother to click those tabs at the top of the ribbon, or you just want to maximize screen space. Saving a click here and there can make quite a difference if you do a lot of repetitive work. The following illustration shows the Quick Access Toolbar loaded with buttons that correspond to every group on every default tab on the ribbon, which is minimized (double-click any ribbon tab to toggle its display):

The toolbar shown here includes only buttons that correspond to the command groups (not individual commands) on every default tab. Notice that clicking the Page Setup button displays a drop-down list of commands identical to those in the ribbon group of the same name on the Page Layout tab. To customize the toolbar this way, use the Excel Options dialog box. Although you can build a similar toolbar using the right-click approach, using the dialog box offers the advantage of being able to insert separators between groups of buttons.
It is certainly possible to load more buttons onto the Quick Access Toolbar than can fit across the screen, even if you move the toolbar below the ribbon. If this happens, a More Controls button appears at the right end of the toolbar, looking like a fast-forward button (>>). As shown in Figure 3-15, clicking More Controls displays the hidden controls on a drop-down toolbar.

Note that when the More Controls button appears, the Customize Quick Access Toolbar button (the downward-pointing arrow) that usually appears at the right side of the toolbar moves to the “overflow” area of the toolbar.
Right-click any button on the ribbon, click Customize Quick Access Toolbar, and click the Choose Commands From drop-down list. You’ll see a special option listed there: Macros. Macros are sequences of commands you can create to help perform repetitive tasks. When you select the Macros option, nothing appears on the left side of the dialog box unless a macro-enabled workbook is open and the workbook actually contains macros. All the macros available appear here. Figure 3-16 shows the Customize Quick Access Toolbar list containing a single macro that has been added to the toolbar.

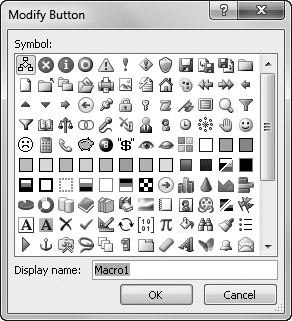
You might notice that the Modify button below the list is active when you add a macro to the list on the right side of the dialog box. By clicking it, you can modify the button image displayed on the toolbar if the default image doesn’t do it for you. In case you are wondering, you can modify only custom macro buttons, which is why the Modify button is not available when you select built-in commands. When you click the Modify button, the Modify Button dialog box appears, as shown in Figure 3-17, and allows you to select a different image.
Note
For more information about macro-enabled workbooks, see Saving Files on page 49. For more information about macros and VBA, see Chapter 27.
In the Quick Access Toolbar category of the Excel Options dialog box, the default setting in the Customize The Quick Access Toolbar drop-down list is For All Documents. In this case, Excel saves the configuration of the Quick Access Toolbar when you exit the program. If you want to go back to the way things were, click the Reset menu and choose Reset Only The Quick Access Toolbar or Reset All Customizations (which resets both the ribbon and the Quick Access Toolbar).
If you want to save your custom toolbar so that you can use it again later, there are two ways to do it. The Import/Export button allows you to save or retrieve a special file containing all your customizations (both toolbar and ribbon). Figure 3-9 on page 92 shows a version of the File Open dialog box that appears when you click Import Customization File from the Import/Export menu, displaying files with the extension .exportedUI.
The second way to save a custom toolbar is to attach it to a workbook. To do so, right-click any button or tab, and click Customize Quick Access Toolbar. In the Excel Options dialog box, click the Customize Quick Access Toolbar drop-down list, as shown in Figure 3-18.
You’ll find both a customizations file—MiniRibbon.exportedUI—and a file with an attached toolbar—Ribbon Group Toolbar.xlsx— with the other examples on the companion Web site.
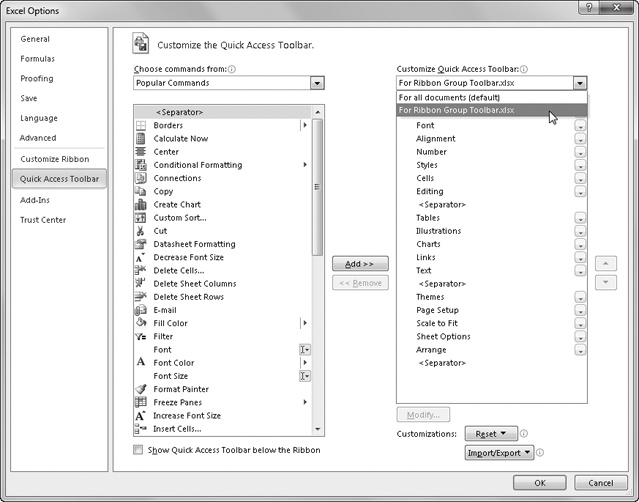
Figure 3-18. You can configure a custom version of the Quick Access Toolbar that travels with a workbook.
The drop-down list shows two items: For All Documents and For <the active workbook name>. If you select the active workbook, the command list starts out blank, and you can begin adding items from the list on the left. (Even though the list starts out blank, the default tools—Save, Undo, and Redo—always appear at the left end of your custom bar.) Any commands you add to the active workbook’s toolbar are relevant only to the active workbook; they are saved with the workbook and reappear on the toolbar the next time you open the workbook. To remove a custom toolbar configuration from a workbook, select its name in the Customize Quick Access Toolbar drop-down list, and click the Reset button.
Now that you’ve thoroughly scrambled the Quick Access Toolbar, perhaps you’re experiencing a bit of remorse. Don’t worry—it’s easy to return it to normal.
Restoring the toolbar Select Quick Access Toolbar in the Excel Options dialog box, click the Reset button, and select either Reset Only Quick Access Toolbar or Reset All Customizations (which also resets the ribbon). Click Yes to confirm the restoration, and then click OK.
Removing individual buttons On the Quick Access Toolbar, right-click the button you want to remove and then click the Remove From Quick Access Toolbar command, as shown in Figure 3-19.

Tip
INSIDE OUT What Happened to My Custom Toolbars?
Custom toolbars you created and attached to workbooks in versions of Excel prior to 2007 are still accessible, though you might not think so at first glance. If you open an old workbook with attached toolbars, the toolbars won’t appear on the screen. But look at the Add-Ins tab on the ribbon. You might not have seen the Add-Ins tab before, but click this tab, and there they are—your custom toolbars. The following graphic shows an example of way too many custom toolbars on the Add-Ins tab:

So, all your hard work creating custom toolbars is not lost—provided you attached them to workbooks. After you open a workbook containing attached toolbars, the toolbars continue to appear on the Add-Ins tab each time you start Excel. To get rid of them, right-click any toolbar (each toolbar is a group on the Add-Ins tab), and close it by using the Delete Custom Toolbar command. If the custom toolbar is the only item on the Add-Ins tab, the Add-Ins tab disappears as well.
The following are a few more customization options that are quite helpful. Unless otherwise noted, you can find these options by clicking the File menu, clicking Excel Options, and then selecting the General category.
Show Mini Toolbar On Selection controls the display of the Mini toolbar whenever you right-click a cell or object where its formatting tools are applicable, as shown in Figure 3-20.
Enable Live Preview allows you to simply rest the pointer on many palette items to show what the effect would look like, without even clicking.
Color Scheme offers several optional “skin” colors; that is, the background color of the program itself, visible in the title bar, formula bar, Quick Access Toolbar, ribbon, sheet tabs, scroll bars, and headings.
ScreenTip Style offers three options that apply to the pop-up label that appears when you rest the pointer on any item on the toolbar or the ribbon. You can choose to see only a small label with the name of the item, a larger ScreenTip that includes a description, or no label at all. (For more information, see Enhancing Accessibility on page 107.)
Note
For more information about fonts and formatting and live preview, see Chapter 9.
