
What would a CRM system be without reports? Business Contact Manager includes a range of predefined reports that you can use as is or customize to suit specific needs. There are reports for accounts, business contacts, business projects, opportunities, leads, and marketing campaigns, as well as activity reports by account, business contact, and opportunity.
To create a report, click the Business Contacts Manager menu, choose Reports, and then choose the report category and specific report you want to view. A report window opens and displays the report, as shown in Figure 19-33.
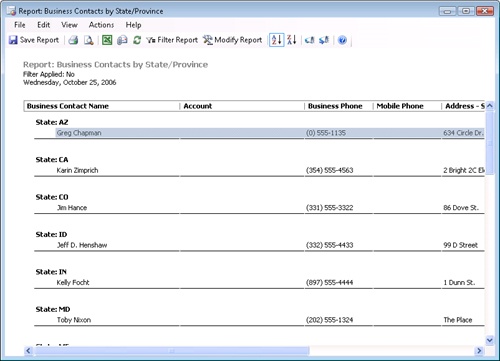
Figure 19-33. Business Contact Manager includes several reports for analyzing information in your database.
The report window shows the first page of the report. You can scroll through the report using the scrollbars or sort the report using the ascending or descending sort button on the toolbar to change the order of information displayed.
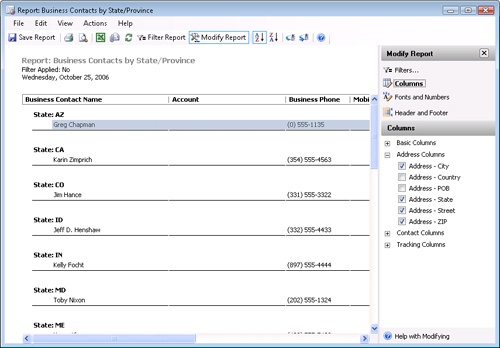
You can modify reports to change the way they appear or change the information displayed in them. For example, you might want to make relatively minor changes, such as changing the report title, adding other information to the header, or turning off page numbers. Or you might want to make more extensive changes, such as changing which columns of information are displayed in the report.
Click the Modify Report button on the toolbar to open the Report dialog box shown in Figure 19-34. The toolbar contains several options that control the information that appears in the report, such as the Filter Report, Modify Report, and sort order buttons. You can also use the results of the report to start a marketing campaign by clicking one of the Open Marketing Campaign buttons. The Modify Report pane provides the following options to control which information is displayed:
Columns. This option enables you to select the specific columns of information that is shown in the report.
Fonts And Numbers. You can select the fonts used for Column Labels, Row Labels, Report Body text, Subtotal, and Total.
Header And Footer. This option enables you to control what information is displayed in the headers and footers in the report. You can set the Company Name, Company URL, Report Title, Subtitle, Filter Text, Date Created, Notes, and Footer; and you can select the font for each of these items.
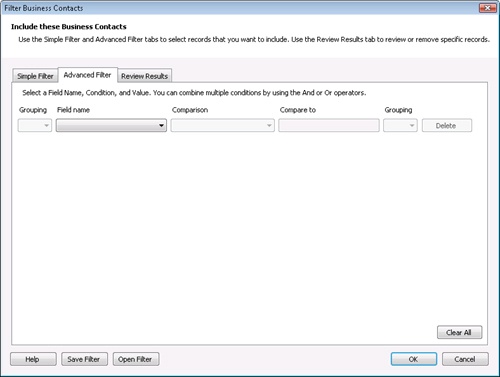
You can filter the reports to change which of the possible range of items are displayed in the report. For example, assume that you open the Business Contacts By State/Province report and want to view the entries that have a Contact Status of Active. To filter the report based on this criterion (or any other criteria), select the Filter Report button on the report toolbar, and clear the Inactive check box under Contact Status (see Figure 19-35). The Simple Filter tab provides a number of additional predefined filters, such as which items to include, payment status, rating, source of lead, and to whom it is assigned. For more detailed specification of a filter based on fields and criteria you select, click the Advanced Filter tab. To preview the effect of your filter, click the Review Results tab.

To further refine the filtering of report information, you can use the Advanced Filter tab (see Figure 19-36) to select which records are included in the report and to set up filters that include or exclude information. The capability to filter the report is an important tool to tailor the information included in the report. You’ll find that setting filters is easy, particularly if you have used the filter capabilities in Outlook 2007 views, which are similar.
Note
You can use AND or OR logic for a filter condition. Choose AND when you want the condition to apply in addition to the previous conditions; for example, to display contacts with names that start with B and who are located in Texas. Use OR to display contacts with names that start with B or who live in Texas. In this example, if you used the OR logic, a contact would appear in the report if the last name started with B, or lived in Texas, or both.
The following example filters the business contacts to include only those contacts with last names that start with B and a home state of TX.
Choose Business Contact Manager, Reports, Business Contacts, Quick Business Contacts List to create a phone list report.
In the report window, click Filter Report on the toolbar, and then click the Advanced Filter tab.
In the Field Name drop-down list, select Last Name, choose Begins With from the Comparison drop-down list, and enter B in the Compare To text box.
Accept the logical operator AND; in the second row Field Name list, choose Home State/Province. In the Comparison drop-down list choose Equals, and then enter TX in the Compare To text box.
Click OK to refresh the report based on the new filter criteria.
After you create a report, you can print it, but you might also want to save the report to disk so you can edit it, send it to someone else, or put it in on a Web site. Business Contact Manager can save reports only as a .bcr (a Business Contact Manager Report) format. However, you can export the report to Excel 2007 format. You can also send the report to someone else in e-mail as an Excel 2007 worksheet.
To save a report as an Excel 2007 file, click the Excel icon (Export To Excel) on the Report toolbar, and Business Contact manager opens a new Excel 2007 worksheet containing the report information. To save this worksheet to disk, click the Microsoft Office Button, select Save As, specify a file name, and then click Save.
To send the report in e-mail as an Excel file, click the icon on the toolbar that looks like a paper clip and envelope (with a ScreenTip that displays Send E-Mail With Report As Excel Attachment). Business Contact Manager opens a new e-mail message and attaches the report as an Excel (.xls) file.
At some point, you will probably want to print a report. Business Contact Manager gives you the capability to print reports, although the options are somewhat limited. To print a report, open the report; modify it as needed; and choose File, Print or click the Print button on the toolbar. Business Contact Manager opens a standard Print dialog box you can use to select a printer and set the number of copies to print. Just click OK to print the report to the selected printer.