
You can easily insert hyperlinks to Web sites, e-mail addresses, network shares, and other items in a message. When you type certain kinds of text in a message, Outlook 2007 automatically converts the text to a hyperlink, requiring no special action from you. For example, if you type an e-mail address, an Internet URL, or a Universal Naming Convention (UNC) path to a share, Outlook 2007 converts the text to a hyperlink. To indicate the hyperlink, Outlook 2007 underlines it and changes the font color.
When the recipient of your message clicks the hyperlink, the resulting action depends on the type of hyperlink. With an Internet URL, for example, the recipient can go to the specified Web site. With a UNC path, the remote share opens when the recipient clicks the hyperlink. This is a great way to point the recipient to a shared resource on your computer or another computer on the network.
You have another option for inserting a hyperlink in a message:
Position the insertion point where you want to insert the hyperlink.
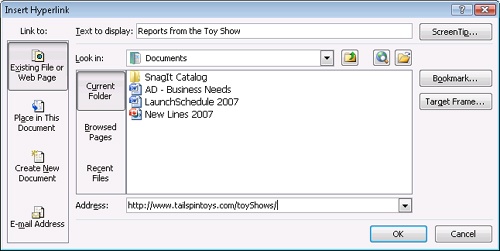
On the Insert tab, in the Links group, click Hyperlink to display the Insert Hyperlink dialog box, shown in Figure 9-31. (If you select text to use for the link, that text is automatically inserted in the Text To Display box.)
The options displayed in the Insert Hyperlink dialog box vary according to the type of hyperlink you’re inserting, as explained in the following sections.
To insert a hyperlink to a file or Web page, select Existing File Or Web Page in the Link To bar. Then provide the following information in the Insert Hyperlink dialog box:
Text To Display. In this box, type the text that will serve as the hyperlink in the message. Outlook 2007 underlines this text and changes its color to indicate the hyperlink.
Look In. In this area, you can specify the location that Outlook 2007 should display the contents of. You can choose from these options:
Current Folder. If you are linking to a file, select Current Folder, and then use this drop-down list to locate and select the file on the local computer or on the network.
Browsed Pages. To insert a hyperlink to a page you’ve recently viewed in your Web browser, click Browsed Pages. The document list in the dialog box changes to show a list of recently browsed pages.
Recent Files. If you want to insert a hyperlink to a file you’ve used recently, click Recent Files to view a list of most recently used files in the document list of the dialog box.
Address. Type the local path, the Internet URL, or the UNC path to the file or Web site in this box.
ScreenTip. Click this button to define an optional ScreenTip that appears when the recipient’s mouse pointer hovers over the hyperlink (when viewed in Microsoft Internet Explorer® version 4.0 or later).
Bookmark. Click this button to select an existing bookmark in the specified document. When the recipient clicks the hyperlink, the document opens at the bookmark location.
Target Frame. Click this button to specify the browser frame in which you want the hyperlink to appear. For example, choose New Window if you want the hyperlink to open in a new window on the recipient’s computer.
Troubleshooting
Recipients of your messages can’t access linked files
If you’re setting up a hyperlink to a local file, bear in mind that the recipient probably won’t be able to access the file using the file’s local path. For example, linking to C:DocsPolicies.doc would cause the recipient’s system to try to open that path on his or her own system. You can use this method to point the recipient to a document on his or her own computer. However, if you want to point the recipient to a document on your computer, you must either specify a UNC path to the document or specify a URL (which requires that your computer function as a Web server).
The form of the UNC path you specify depends on the operating system of the recipient. In Microsoft Windows 2000 and later versions, you can specify a deep UNC path, such as \<server><share><subfolder><sub-subfolder><document>.doc, where <server> is the name of the computer sharing the resource, <share> is the share name, <subfolder> is the name of a folder in the path to the file, and <document> is the name of the document to open. Microsoft Windows® 95, Microsoft Windows 98, Microsoft Windows Me, and Microsoft Windows NT® are limited to \<server><share><document>. In order for the deep hyperlink to work properly, however, the recipient must be using Windows 2000 or later.
If you click Place In This Document in the Link To bar, the Insert Hyperlink dialog box changes, as shown in Figure 9-32. The Select A Place In This Document area shows the available locations in the open document: headings, bookmarks, and the top of the document. Select the location to which you want to link, provide other information as necessary (the text to display in the hyperlink, for example, or perhaps a ScreenTip), and then click OK.

If you select Create New Document in the Link To bar of the Insert Hyperlink dialog box, you can specify the path to a new document and choose to either edit the document now or insert the hyperlink for later editing. You’ll most often use this method for inserting hyperlinks in a Word 2007 document rather than in an e-mail message.
If you select E-Mail Address in the Link To bar, you can easily insert an e-mail address as a hyperlink in a message. When recipients click the hyperlink, their e-mail programs will open a new e-mail message addressed to the person you have specified in the hyperlink. Although you can simply type the e-mail address in the message and let Outlook 2007 convert it to a mailto: link, you might prefer to use the Insert Hyperlink dialog box instead. As Figure 9-33 shows, you can use this dialog box to enter an e-mail address or select from a list of e‑mail addresses you have recently used on your system and to specify the subject for the message.

To remove a hyperlink, right-click the hyperlink, and then choose Remove Hyperlink on the shortcut menu. Outlook 2007 retains the underlying text but removes the hyperlink.
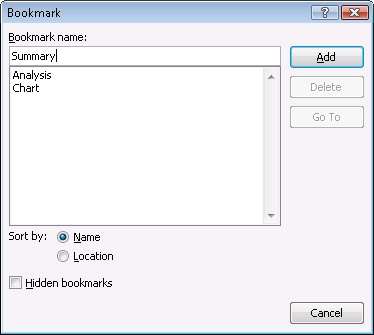
A bookmark is an internal reference used to locate a specific place in a document and link to it by name. When you insert a bookmark in Outlook 2007, it is then available in the Insert Hyperlink dialog box as a linkable location. This is particularly useful if you have a lengthy e-mail message, or one with sections or illustrations that you want the reader to be able to find quickly. To insert a bookmark in a message, follow these steps:
With a message open, select the text (or picture, chart, and so on) that you want the bookmark to reference. On the Insert tab, in the Links group, click Bookmark.
In the Bookmark dialog box, shown in Figure 9-34, enter a name in the Bookmark Name box, click Add, and then click OK.
To remove a bookmark, on the Insert tab, in the Links group, click Bookmark. Select the bookmark you want to remove, click Delete, and then click Close.