
Although some people use Microsoft® Office Outlook® 2007 only for e-mail, the majority of people use all the personal information manager (PIM) features the program has to offer. Because a PIM is only as good as its ability to help you search for and organize data, Office Outlook 2007 offers a solid selection of features to help you do just that.
This chapter shows you how to perform simple and advanced searches to locate data. You’ll learn how to search using Instant Search as well as the Find A Contact feature and Advanced Find. This chapter also explores various ways you can organize your Outlook 2007 data—for example, by creating additional folders for storing specific types of messages.
Microsoft redesigned the search functionality used by Windows Vista™ and the 2007 Microsoft Office system with a focus on performance and ease of use. The resulting Instant Search feature of the Microsoft Office system provides a simple, unified search interface that is the same across all of the Outlook 2007 folders. Instant Search relies on the Windows Vista Windows Desktop Search, which indexes Outlook 2007 mail folders to deliver search results faster.
Searching in Outlook 2007 is as simple as typing your search terms in the Instant Search box at the top of the Inbox. Outlook 2007 displays results as you type, automatically filtering out older results when there are a large number of items. To focus searches, Outlook 2007 searches only the folder that you have open, although you can easily choose to search all of your folders instead.
When you start a search, you first determine the scope of your search. Outlook 2007 sets the search scope as the folder that is selected in the Navigation Pane. To change the search scope, you click a different folder in the Navigation Pane.
As you type text in the Instant Search box, the search results are displayed in the pane below the Instant Search box. To refine your search and get fewer results, type more text. To widen your search, delete some text. You can also build custom queries based on a wide range of criteria.
Note
If you prefer to use the tools provided in earlier versions of Microsoft Outlook, you still can. Advanced Find and the Find A Contact feature remain available as options for those who prefer a familiar interface.
Note
Instant Search requires Windows Desktop Search, which is part of Windows Vista and is available as a download for Microsoft Windows® XP. For more information about Windows Desktop Search, you can visit the Windows Desktop Search site at www.microsoft.com/windows/desktopsearch/.
While the default configuration of Instant Search should work in most circumstances, you might need to fine-tune things just a bit to optimize Instant Search for how you use Outlook 2007. Using Instant Search might require configuring a few different options, most of which are found in Outlook 2007, although a few options are set with Indexing Options in the Control Panel.
You turn Instant Search on and off differently depending on whether you are using Windows Vista or Windows XP.
Enabling Instant Search on a Computer Running Windows Vista. Instant Search is enabled by default on computers running Windows Vista. If you have turned Instant Search off, you can enable it by clicking the arrow next to the Instant Search box and then selecting Search Options. Under Index Messages In These Data Files, select the files you want Instant Search to index and search. You must exit and restart Outlook 2007 for this change to take effect.
Enabling Instant Search on a Computer Running Windows XP. On computers running Windows XP, you are prompted to download the Windows Desktop Search software the first time you start Outlook 2007. Once the software is downloaded and installed, you must restart Outlook 2007 to complete the installation process and use Instant Search.
If you have chosen not to install Windows Desktop Search and enable Instant Search, you can always change your mind. To turn on Instant Search, click the Click Here To Enable Instant Search option under the Instant Search box.
Note
Microsoft must validate your copy of Windows XP before you are allowed to download Windows Desktop Search. If you have not yet installed the validation ActiveX® control, you will be prompted to install it. Right-click the information bar, and then choose Install. A security warning dialog box will appear; click Install again. Once the ActiveX control is installed, you will be returned to the download screen.
Note
If your computer is running Windows XP and you have not downloaded the Windows Desktop Search software, you are prompted repeatedly to install it. If you don’t want to see these prompts, you can disable them. To do so, on the Tools menu, choose Options. Choose Other, and then click Advanced Options. In the Advanced Options dialog box, clear the Show Prompts To Download Windows Desktop Search check box, and then click OK.
Disabling Instant Search. To turn off Instant Search, click the arrow next to the Instant Search box, and then select Search Options. Under Index Messages In These Data Files, deselect all of the files. You must exit and restart Outlook 2007 for this change to take effect.
You can determine the initial scope of searches as well as how Outlook 2007 handles results in the Search Options dialog box.
To configure Instant Search, follow these steps:
Click the arrow next to the Instant Search box, and then select Search Options. (You can also select Tools, Options, and then on the Preferences tab, click Search Options.)
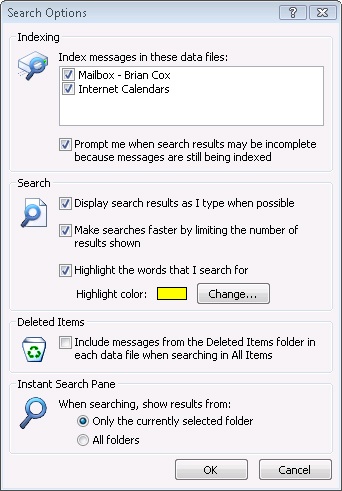
In the Search Options dialog box, shown in Figure 33-1, configure the search settings as described here.
To specify which Outlook 2007 data files are indexed, and thus searched using Instant Search, under Index Messages In These Data Files, select the files you want indexed and deselect those you do not.
To have Outlook 2007 show you search results as you type, in the Search area, select Display Search Results As I Type When Possible. If this option is cleared, Outlook 2007 does not start searching until you click the Search button or press Enter.
When your search has a large number of results, Outlook 2007 by default limits the number of items it displays by filtering for the most recent. To view all results of your searches, no matter the number, clear the Make Searches Faster By Limiting The Number Of Results Shown check box.
To have Outlook 2007 highlight your search terms where they appear in the results, select Highlight The Words That I Search For. You can also set the highlight color.
If you want Outlook 2007 to search mail items that have been moved to the Deleted Items folder but not yet actually deleted, select Include Messages From The Deleted Items Folder In Each Data File When Searching In All Items.
To set the default scope of Instant Search, under When Searching, Show Results From, choose either Only The Currently Selected Folder or All Folders.
Click OK when you have finished configuring the Instant Search options.
If you have multiple Outlook 2007 data files, you can tell Outlook 2007 to include only specific data files in an Instant Search without removing them from the list of files that are indexed. This allows you to stop a file from being searched without having to re-create the index for the file when you want it included again—a much faster option. You might use this technique to segregate project or client files, or perhaps to exclude a large archive file from searches most of the time, yet be able to easily include the file when you need to.
To change which data files Outlook 2007 searches, follow these steps:
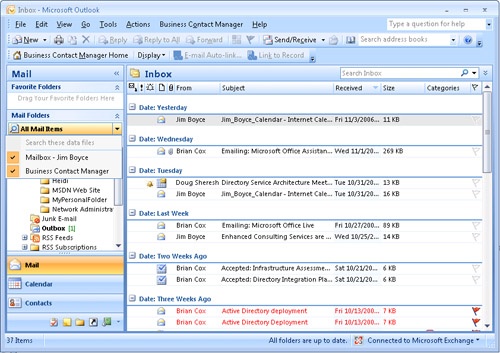
In the Navigation Pane, under Mail Folders, click the arrow next to All Mail Items, as shown in Figure 33-2.
Select the Outlook 2007 data files that you want included in searches by default. At least one data file must be selected, but you can choose additional files to search as well.
You can also specify whether your Outlook 2007 files are indexed in the Indexing Options item in the Control Panel. For information about using Indexing Options, see "Configuring Indexing Options" later in this chapter.
Instant Search looks at most fields of Outlook 2007 items when performing searches, making it easy for you to find what you are looking for. This means that you can type almost anything that you think might be in the item you’re looking for, even if the item is in an attachment. To search for a message or other Outlook 2007 item, follow these steps:
Click in the Instant Search box (or press Ctrl+E), and then type your search text.
Outlook 2007 will display the search results as you type, with the search terms highlighted. To narrow the search results, type more text. To widen the results, delete some text.
If you do not see the items you want, you can broaden your search scope by clicking the arrow next to the Instant Search box and then selecting Search All Folders. You can also click the Try Searching All Folders link in the results pane.
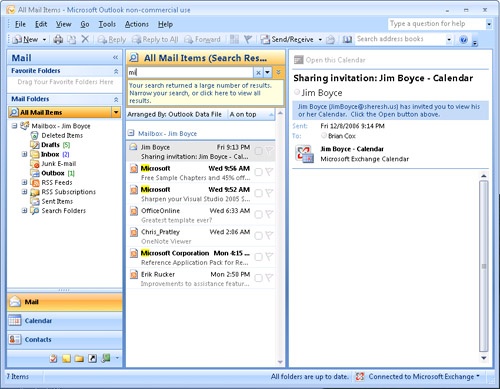
If your search returns a large number of results, Outlook 2007 might display only the most recent results. If you see a message in the InfoBar similar to the one shown in Figure 33-3, click it to show all results, including the older items.
To clear the search and start over, click the X to the right of the Instant Search box.
To repeat a search you have performed recently, click the arrow next to the Instant Search box, and then choose Recent Searches. Select the search you want to repeat in the list.
Note
You might find that the results of some of your searches include an item that really doesn’t seem to belong there, and in which you can’t find the words you searched for. This might be because the item has an attachment that contains the search term.
Troubleshooting
You don’t get any search results
If you repeatedly get fewer results than you expect, or you get no results at all, you should try disabling Instant Search and repeating the search. If you do get results with Instant Search disabled, you might be having problems with Windows Desktop Search indexing.
Check your indexing status by clicking the arrow next to the Instant Search box and selecting Indexing Status. If a message appears stating that Outlook 2007 is currently indexing your files, note the number of items remaining to be indexed. Check back in a while to see whether the numbers are different. If the numbers are unchanged, you should rebuild the index. For information about rebuilding the index, see "Configuring Indexing Options" later in this chapter.
The Query Builder shows you a number of extra fields that you can search within to refine your search results. Each type of folder (Mail, Contacts, and so on) displays the most commonly used fields for that type of folder, so each one shows a different list of fields by default. You can also add fields, even those in custom forms, to the Query Builder to support searches for exactly the data you want.
To display the Query Builder, click the Expand The Query Builder button next to the Instant Search box. This will open a pane showing the default fields for that type of folder, as shown in Figure 33-4.
If you want to show additional fields, click Add Criteria, and then select the fields in the list. To add a field from a custom form, click the form name, and then click the field name.

To add a custom form to the Query Builder list, follow these steps:
Click the Expand The Query Builder button.
Click Add Criteria, and then click Add Form.
In the Select Enterprise Forms For This Folder dialog box, choose the type of forms you want to select from.
In the list in the left pane, select the form you want to add, and then click Add. Repeat this for each form you want to add. (To display form groups by category, select Show Categories.)
Click Close.
If Outlook 2007 is still indexing files, your search results might be empty or incomplete. If your mail files have not been indexed completely, when you perform a search, Outlook 2007 displays a message, as shown in Figure 33-5, explaining that the search results might be incomplete.
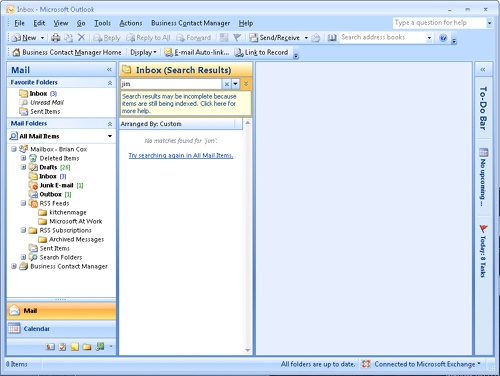
Figure 33-5. A message is displayed telling you that your search results might be incomplete until your mail files are fully indexed.
If you click the message in the InfoBar, a message box will be displayed, as shown in Figure 33-6, telling you how many items remain to be indexed.

Note
When you are using Instant Search and your mail files are not completely indexed, Outlook 2007 should display a warning that your search results might be incomplete. This warning might have been disabled in the Search Options dialog box (and sometimes simply fails to appear), making it seem as if you have no matching items when you actually do.
While indexing is generally self-maintaining, you can control some settings using the Indexing Options item in Windows Control Panel. Indexing Options is part of the System And Maintenance group.
To verify that your Outlook 2007 files are being indexed, follow these steps:
Click the Start button, and then click Control Panel.
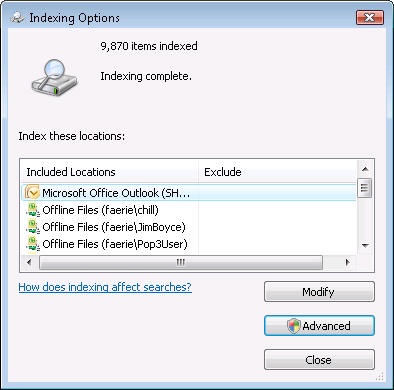
Click Systems And Maintenance, and then click Indexing Options. In the Indexing Options dialog box, shown in Figure 33-7, verify that your Outlook 2007 files are listed in the Included Locations list.
If your Outlook 2007 files are not listed, click Modify to display the Indexed Location dialog box. Under Change Selected Locations, select the Microsoft Office Outlook check box to include the files in the locations that should be indexed. (Outlook 2007 files belonging to other users are visible but are disabled.) Click OK.
Troubleshooting
Troubleshooting indexing problems
You might need to rebuild the index due to problems such as empty search results when you know that there are items that match your search. Rebuilding an index takes a while, perhaps even several hours, and is significantly slower if you are also using the computer at the same time. Because of this, you will want to rebuild the index only when you are experiencing ongoing problems with Instant Search and preferably when you will be away from the computer for a while.
You can rebuild the search index by opening the Indexing Options item in Control Panel and then clicking Advanced. Under Troubleshooting, click Rebuild. Once the index is rebuilt, restart Outlook 2007 to have it use the new index.
If this does not resolve your problems, the next step is to restore the original index settings and re-create the indexes. To do this, open the Indexing Options item in Control Panel, and then click Advanced. Under Troubleshooting, click Restore Defaults. This will remove any custom settings you configured and delete existing index information. When the computer is restarted, Windows will delete the index and rebuild it using the default configuration. Like rebuilding the index, this operation takes a considerable amount of time, so you should do it only when you really need to and can afford the impact on your computer’s performance.