
Before you can become proficient at using Outlook 2007, you need to be familiar with its standard views and other elements of its interface. This section introduces you to the Outlook 2007 standard views and includes information about how to work with these views and customize them to meet your needs.
Outlook 2007 provides default views of its standard folders as well as one additional view that is a summary of your schedule, tasks, and e-mail for the current day—Outlook Today. To switch to Outlook Today view if you are working in another folder, click the root folder of your mail store in the Navigation Pane. For example, click Personal Folders if your Outlook 2007 data is stored in a personal folders (.pst) file, or click Mailbox if your data is stored in an Exchange Server mailbox. Figure 4-1 shows a typical Outlook Today view. In the Calendar area on the left, Outlook 2007 summarizes your schedule for the current day, showing each appointment with time and title. You can easily view the details of a particular appointment by clicking the appointment time or title to open it.
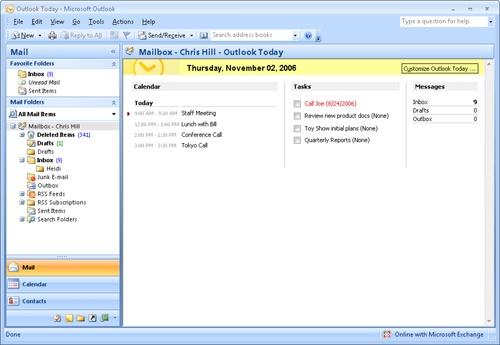
In the Tasks area, Outlook Today lists your tasks for the current day, including overlapping tasks with a duration of more than one day. The list includes a title and completion date for each task, along with a check box. You can mark the task as completed by selecting the check box; doing so crosses out the task in the list. If the check box is cleared, the task is incomplete.
In the Messages area, Outlook Today lists the number of messages in your Inbox, Drafts, and Outbox folders. If the number appears in bold, the associated folder contains unread messages.
Note
For details on customizing the Outlook Today view to display additional information (including the use of HTML code in such customization), see Chapter 26.
The Inbox displays your default message store, as shown in Figure 4-2. For example, if you use an Exchange Server account and store your data on the computer running Exchange Server, the Inbox view shows the Inbox folder on that computer. If you’ve configured Outlook 2007 to deliver messages to a local store (such as a .pst file), the Inbox view shows the contents of the Inbox folder in that store.
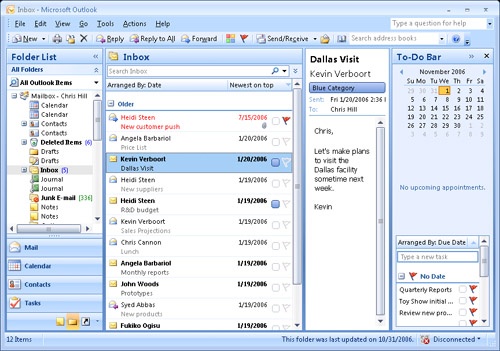
As you can see in Figure 4-2, the Inbox view shows the message header for each message, including such information as sender, subject, and date and time received in various columns. These columns are not always visible, however, because the default configuration includes the Reading Pane on the right in the Outlook 2007 window, which hides many of the columns on a typical display. If you turn off the Reading Pane or move it to the bottom of the window, you can view the message header columns.
You can easily sort messages by clicking on the column header for the column you want to use as the sort criterion. For example, to quickly locate messages from a specific sender, you can click the From column header to sort the list alphabetically by sender. To switch between ascending and descending sort, simply click the column header again. An up arrow next to the column name indicates an ascending sort (such as A to Z), and a down arrow indicates a descending sort (such as Z to A).
Note
To learn how to add and remove columns and change their appearance and order, see "Customizing the Inbox View" later in this chapter.
By default, Outlook 2007 shows the following columns in the Inbox view when the Reading Pane is either off, displayed at the bottom of the window, or taking a minimal amount of space on the right in the window:
Importance. This column indicates the level of importance, or priority, that the sender has assigned to a message—Low, Normal, or High. A high-priority message is accompanied by an exclamation point, whereas a down arrow marks a low-priority message. No symbol is displayed for a message of normal importance.
Icon. The Icon column indicates the type of message and its status. For example, unopened messages are accompanied by a closed envelope icon, and opened messages are accompanied by an open envelope icon.
Attachment. The Attachment column displays a paper clip icon if the message includes one or more attachments. Right-click a message and choose View Attachments to view the attachments, or simply double-click an attachment in the Reading Pane.
Caution!
Although Outlook 2007 provides protection against viruses and worms by preventing you from opening certain types of attachments, this is no guarantee against infection. Your network administrator might have modified the blocked attachments lists, or you might have modified your blocked attachments list locally, to allow a specific attachment type susceptible to infection to come through. So you should still exercise caution when viewing attachments, particularly from unknown sources. It’s a good practice to save attachments to disk and run a virus scan on them before opening them.
From. This column shows the name or address of the sender.
Subject. This column shows the subject, if any, assigned by the sender to the message.
Received. This column indicates the date and time that Outlook 2007 received the message.
Size. This column indicates the overall size of the message, including attachments.
Categories. This column shows the color indicators for color categories assigned to the message..
Flag Status. In this column, you can flag messages for follow-up action. For example, you can flag a message that requires you to place a call, to forward the message, or to respond at a particular time. You specify the action, date, and time for follow-up.
Note
For detailed information about flagging messages for follow-up and other ways to manage and process messages, see "Flagging and Monitoring Messages and Contacts" in Chapter 10.
Another part of the Inbox view is the Reading Pane, which appears on the right in the Inbox view. You can use the Reading Pane to preview messages without opening them in a separate window. The scroll bar on the right of the Reading Pane lets you scroll through the message. The top of the Reading Pane presents information about the message, such as sender, recipient, subject, and attachments.
You can double-click most of the items in the Reading Pane header to see detailed information about the items. For example, you can double-click the name of the sender to display information about the sender, as shown in Figure 4-3. Use this method to quickly copy contact information about the sender from the message to your Personal Address Book. You can also double-click attachments to open them. Right-clicking an item opens its shortcut menu, on which you can choose a variety of actions to perform on the item—for instance, you can right-click an attachment and choose Save As to save the attachment to disk. Experiment by right-clicking items in the Reading Pane to see which actions you can take for specific items.

Figure 4-3. After you double-click a sender’s address in the Reading Pane, Outlook displays information about the sender.
Note
The information that Outlook 2007 displays when you double-click the name of the sender of an e-mail message in the Reading Pane depends on whether the sender is in your Contacts folder, in the Global Address List (GAL; Exchange Server accounts), or not in either.
Note
If a message has been flagged for follow-up, information about the follow-up (the specific action, the date due, and so on) also appears in the Reading Pane header.
Note
To turn the Reading Pane on or off, choose View, Reading Pane, and then choose Right, Bottom, or Off. To change the location of the Reading Pane, choose View, Reading Pane, and then choose Right or Bottom.
Note
For detailed information about using and customizing the Reading Pane in various folders, see "Using the Reading Pane" later in this chapter.
The AutoPreview feature also allows you to preview your messages. With message folders such as the Inbox, AutoPreview displays the first few lines of a message below its message header in the main folder window. This leaves you free to preview the first few lines of a message without opening the message or even selecting it. You can use AutoPreview in conjunction with or instead of the Reading Pane.
Note
For additional information about configuring and using AutoPreview, see "Using AutoPreview" later in this chapter.
Outlook 2007 offers a wealth of settings that you can use to control messaging. In addition, you also have quite a bit of control over the appearance of the Inbox and other message folders. For example, you can change the column headings included in the Inbox or add and remove columns. The following sections explore specific ways to customize the Inbox (which apply to other message folders as well).
Note
For detailed information about configuring messaging and other options, see "Configuring Outlook Options" later in this chapter.
By default, Outlook 2007 displays only a small subset of the available fields for messages. You can add columns for other fields, such as CC or Sensitivity, to show additional information. However, the Inbox behaves differently depending on the location of the Reading Pane. In most cases, when the Reading Pane is positioned on the right side of the window, the Inbox includes only four columns. The first column shows the sender and message subject. The other three columns list the message received date, color category, and flag status.
Outlook 2007 also provides two column headers above these columns that you can use to change views or change sort order. For example, the default view is Arranged By: Date. You can click this header to choose a different property by which to group the view.
The other column header is either Newest On Top or Oldest On Top, depending on whether the folder is sorted in ascending or descending order. You can click this column to switch between the two.
The number of columns in the message pane depends on the amount of space available in the window. The more space available, the more columns Outlook 2007 displays. For example, continue to drag the left edge of the Reading Pane to the right, and Outlook 2007 eventually shows additional columns. You have to experiment with the size of the Reading Pane to find a layout that suits you, because the amount of available space depends on your system’s display resolution. Or simply position the Reading Pane at the bottom of the window to maximize the amount of space available for message pane columns.
To add and remove columns, follow these steps:
Open the folder you want to modify, right-click the column header bar, and choose Field Chooser to display the Field Chooser dialog box, shown in Figure 4-4.
Locate the name of the field you want to add, and then drag the field from the Field Chooser dialog box to the desired location on the column header bar. Outlook 2007 displays a red arrow at the top of the column header bar to indicate where the column will be inserted.
Add other fields as necessary.
To remove a field, drag the field from the column header bar.
Close the Field Chooser dialog box.
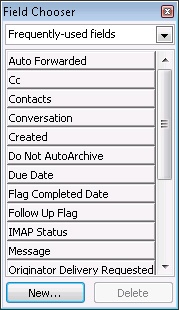
You can choose other types of fields by selecting a type from the drop-down list at the top of the Field Chooser dialog box. You can also use this dialog box to create custom fields.
Outlook 2007 also provides another method for adding and removing columns in message folders:
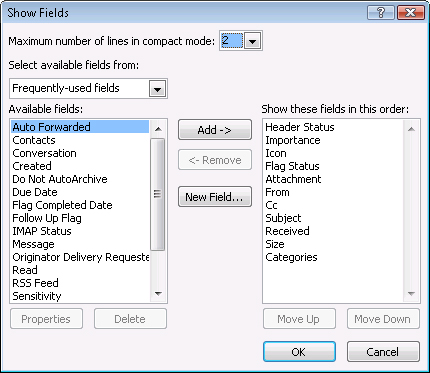
Choose View, Current View, Customize Current View, and then click Fields to display the Show Fields dialog box, as shown in Figure 4-5.
To add a column, select the field in the Available Fields list, and then click Add.
To remove a column from the folder view, select the field in the Show These Fields In This Order list, and then click Remove.
Click OK to have your changes take effect.
Click OK to close the Custom View dialog box.
In a message folder, Outlook 2007 displays columns in a specific order by default, but you can easily change the order. The simplest way is to drag a column header to the desired location. You also can right-click the column header bar, choose Customize Current View, click Fields to display the Show Fields dialog box (shown earlier in Figure 4-5), and then use the Move Up and Move Down buttons to change the column order.
Outlook 2007 uses a default set of names for the columns it displays in message folders. However, you can change those column names—for example, you might want to rename the From column to Sender.
To change a column name, follow these steps:
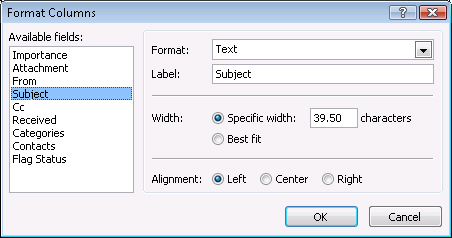
Right-click the column header bar, and then choose Format Columns to display the Format Columns dialog box, shown in Figure 4-6. If the Format Columns command is not available because of the Reading Pane’s location and width, choose View, Arrange By, Custom, and then click Format Columns.
In the Available Fields list, select the field for which you want to change the column header.
In the Label box, type the label you want displayed in the column header for the selected field.
Repeat steps 2 and 3 for the other fields you want to change.
Click OK to apply the changes.
Click OK to close the Custom View dialog box.
Note
Three columns will not allow you to change the label: Importance, Flag Status, and Attachment. However, you can switch between using a symbol or text in the Importance and Flag Status columns. You can change the Attachment column to display either a paper clip icon or the text True/False, On/Off, or Yes/No, depending on whether the message has an attachment.
If a column isn’t wide enough to show all the information for the field or if you need to make room for more columns, you might want to change the column width. The easiest way to change the width of a column is to drag the edge of the column header in the column header bar to resize it. Alternatively, you can right-click the column header bar, choose Format Columns, and specify a column width in the Format Columns dialog box (shown earlier in Figure 4-6).
By default, all the columns are left-aligned in message folders, including the Inbox. You can, however, configure the alignment to display the columns as left-justified, right-justified, or centered. For example, you might want to change the format for the Size column to show only numbers and then display the column right-justified. Simply right-click the column header bar and choose Format Columns, or choose View, Arrange By, Custom and then click Format Columns. In the Format Columns dialog box (shown earlier in Figure 4-6), select the column to change, and then under the Alignment option, select Left, Center, or Right, depending on the type of justification you want.
Each default column in a message folder displays its data using a particular format. For example, the From column shows only the sender, not the recipient. Although in most cases, the specified recipient is you, that isn’t the case when the message you’ve received is a carbon copy. You might then want to change the data format of the From column to also display the person specified in the To field of the message. Other columns also offer different formats. For example, you can change the data format used by time and date fields such as Received or Sent to show only the date rather than date and time.
To change the data format used for a particular column, right-click the column header bar and choose Format Columns, or choose View, Arrange By, Custom and then click Format Columns. In the Format Columns dialog box (shown earlier in Figure 4-6), select the column for which you want to change the format, and then select the format in the Format drop-down list. The available formats vary according to the field selected.
Outlook 2007 offers many ways to organize and display your data. A good example of this flexibility is the option of grouping messages based on a hierarchy of criteria. For example, you might want to group messages in your Inbox first by subject, then by sender, and then by date received, as shown in Figure 4-7.
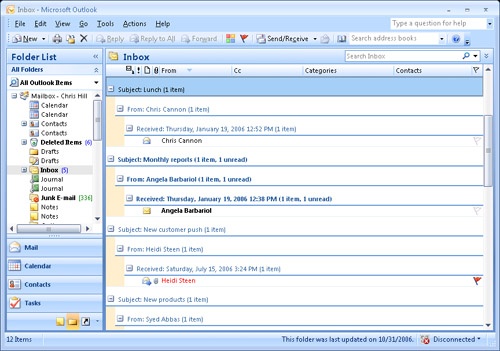
To organize your messages based on a particular column, you can simply right-click the column and choose Group By This Field. If the folder is showing the Arranged By column, click this column, and then choose the field by which you want to group the messages.
For more complex groupings, follow these steps:
Right-click the column header bar, and then choose Group By Box to display the Group By box above the column header bar.
To set up a grouping, drag a column header from the column header bar to the Group By box.
To set up an additional level of grouping, drag another column header to the Group By box. Repeat this process until you have as many levels of grouping as you need.
To remove a grouping, drag the column header from the Group By box to the desired location on the column header bar.
To hide or show the Group By box, right-click the column header bar, and then choose Group By Box again. To expand or collapse your view of a group of messages, click the plus sign (+) or minus sign (–) next to the group or message.
Note
For a detailed explanation of grouping and sorting, along with several other topics that will help you organize your data, see "Grouping Messages by Customizing the Folder View" in Chapter 10.
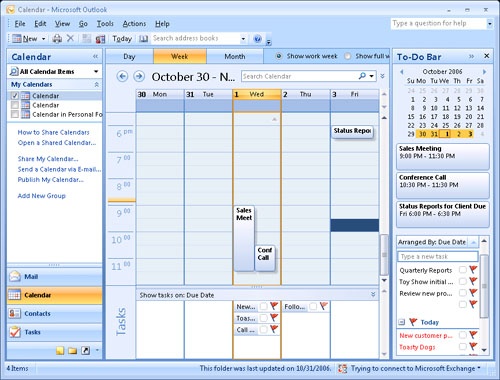
In the Calendar folder, you can look at your schedule in several different ways. By default, Calendar view shows the current day’s schedule as well as the Date Navigator (a monthly calendar) in the upper-left corner of the Navigation Pane. It also shows the To-Do Bar, which displays tasks that overlap or fall on the current day, as shown in Figure 4-8. With the To-Do Bar turned on, the Date Navigator moves to the upper-right corner of the To-Do Bar. You can configure the To-Do Bar to show other tasks as well. In addition, the Daily Task List can appear at the bottom of the window in Day and Week views.

Figure 4-8. The default Calendar view shows your schedule and the Date Navigator, but you can also view tasks, as shown here.
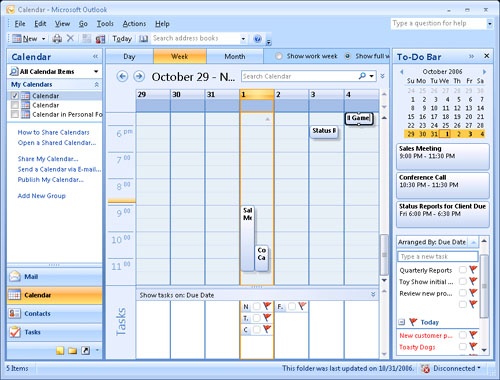
Your schedule shows the subject for each scheduled item—a brief description of a meeting or an appointment, for example—next to its time slot, blocking out the time assigned to the item. Items that overlap in the schedule are displayed side by side, as shown in Figure 4-9.

Calendar view by default shows only the subject for each item scheduled in the period displayed. You can open the item to modify it or view details about it by double-clicking the item, which opens its form, as shown in Figure 4-10.

You can add an item to your schedule using one of these methods:
Double-click the time slot of the start time you want to assign to the item.
Right-click a time slot, and then choose the type of item to create (an appointment, a meeting, or an event).
Select a time slot, and then choose File, New to select the item type.
Click the arrow next to New on the Standard toolbar, and then select the item type.
The first method opens an appointment form. The form opened by the other three methods depends on the type of item you select.
It is also easy to change the start or end time for an item in the schedule. To move an item to a different time without changing its duration, simply drag the item to the new time slot. To change the start or end time only, position the mouse pointer on the top or bottom edge of the item, and then drag it to the desired time.
Like the Inbox and other message views, Calendar view has a Reading Pane that lets you preview appointments and other items in your schedule without opening them. To turn the Reading Pane on or off, choose View, Reading Pane, and then choose either Right, Bottom, or Off. Click the item to display it in the Reading Pane, as shown in Figure 4-11. To display more or less information in the pane, drag the edge of the Reading Pane to resize it. You can also make other changes to the displayed item—such as subject and times—through the Reading Pane.

The Task List displays a list of your tasks in the To-Do Bar. You can turn the Task List on or off in the To-Do Bar. If the To-Do Bar is not shown, click View, To-Do Bar, and then click Normal or Minimized. By default, the Task List shows the tasks for the current day. As you can in the Inbox and other views, you can change the options and the items displayed in the To-Do Bar: right-click the To-Do Bar column header bar, and then choose the items you want to include, or choose Options to customize how these items are displayed.
Note
For more information about the To-Do Bar and the features Outlook 2007 provides for working with and assigning tasks, see Chapter 22.
The monthly calendars in the upper-right area of the To-Do Bar are collectively called the Date Navigator. When the To-Do Bar is hidden, the Date Navigator appears at the top of the Navigation Pane.
The Date Navigator is useful not only as a calendar but also as a way to provide a fast glance at which days include appointments. Days with a scheduled item appear in bold, and those without scheduled items appear in a normal font. You can view a particular day by clicking it. Click the arrow at the left or right of the Date Navigator to change which months are displayed. You can also click and hold on the column header bar above either month to choose from a shortcut menu which month to view.
You can change the number of months displayed by the Date Navigator by resizing the Reading Pane, resizing the Calendar pane, changing the width of the Navigation Pane or the To-Do Bar, or changing the font used by the Date Navigator. Assign a smaller font to show more months. (For details on how to change the Date Navigator’s font, see "Setting Advanced Options" later in this chapter.)
Although the default Calendar view shows only the subject for a scheduled item, you can configure the view to show additional detail—or you can change the view completely. For example, you can switch from a daily view to one that shows the work week, the calendar week, or the month. You can see examples of Work Week view in Figure 4-12, Week view in Figure 4-13, and Month view in Figure 4-14. To select a particular view, click the Day, Week, or Month button above the Calendar pane. Or choose View, and then choose Day, Work Week, Week, or Month, according to the type of view you want.

You have additional options for viewing your schedule in the Calendar folder. Choose View, Current View, and then choose one of the following to change the view:
Day/Week/Month. Shows the item title only in each view (Day, Work Week, Week, or Month).
Day/Week/Month With AutoPreview. Includes AutoPreview in Day and Work Week views. With AutoPreview, Outlook 2007 displays as much of the data for the item as possible in the current view.
All Appointments. Shows all appointments.
Active Appointments. Shows only active appointments.
Events. Shows only events.
Annual Events. Shows only annual events.
Recurring Appointments. Displays recurring appointments.
By Category. Displays scheduled items grouped according to their assigned categories.
Outlook Data Files. Displays items organized by the Outlook 2007 data file in which they are stored.
Note
For additional information about customizing the way Outlook 2007 displays information in the various calendar views, see Chapter 20.
The Contacts folder stores all your contact information. By default, the Contacts folder displays the Business Cards view, shown in Figure 4-15, which shows the name for each contact along with other selected fields (address and phone number, for example). You can view the details for a contact by double-clicking the contact’s business card, which opens the contact form, shown in Figure 4-16. Using this form, you can view or make changes to the contact’s data or perform other tasks, such as calling the contact, generating a meeting request, or viewing a map of the contact’s address. If you have a large number of contact entries stored in the Contacts folder, you can click the buttons at the right edge of the view to select which portion of the contacts list to show.

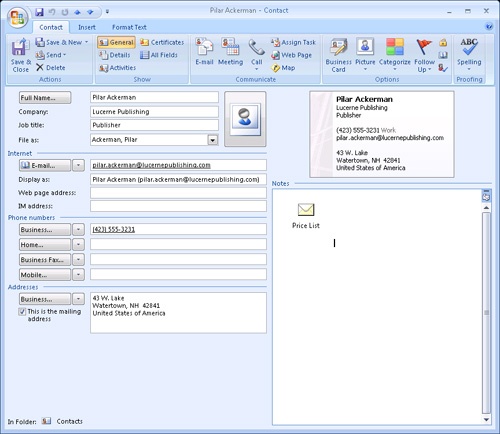
Note
For a detailed discussion of working with contacts, including the actions you can take with the contact form, see Chapter 18.
Outlook 2007 offers several other ways to view the contents of your Contacts folder. Choose View, Current View, and then choose one of the following commands to change the view:
Business Cards. Shows the contact information as a virtual business card.
Address Cards. Displays the name of each contact along with address and telephone information.
Detailed Address Cards. Shows additional detailed information for each contact, including the person’s title, the company the person works for, personal notes, and more.
Phone List. Displays the contacts as a phone list.
By Category. Groups contacts by their assigned categories.
By Company. Groups contacts by the company with which they’re affiliated.
By Location. Groups contacts by country or region.
Outlook Data Files. Groups contacts by the Outlook 2007 data file (*.pst) in which the contacts are stored.
Adding contact entries to your Contacts folder is easy: choose File, New and then choose Contact, or click New on the toolbar. Either action opens the contact form, in which you enter the contact’s data.
Like other views in other folders, the view in the Contacts folder can be customized to suit your needs and preferences. For example, you can adjust the view to display additional fields of information or to remove fields you don’t need. You can sort the view based on specific contact criteria or group similar items together based on multiple criteria. For details about customizing the Contacts view, see Chapter 18.
The Tasks folder contains your task list. The default Tasks view, shown in Figure 4-17, lists each task in a simple list with subject, due date, and status. Double-click an existing task to open the task form, which displays detailed information about the task, including due date, start date, status, notes, and so on, as shown in Figure 4-18. To add a new task to the list, double-click a blank list entry to open a new task form, where you can enter all the details about the task.


The task list shows tasks that you have assigned to others as well as those tasks assigned to you (by yourself or by others). These assignments can be one-time or recurring, and the list shows both in-progress and completed tasks. Additionally, any messages that you have flagged for follow-up appear in your task list.
Like other Outlook 2007 views, Tasks view provides a Reading Pane that you can use to view details for a task without opening the task item. To display the Reading Pane, choose View, Reading Pane, and then specify the location (either Right or Bottom). AutoPreview is also available in the Tasks folder; it displays notes about the task below the task name, as shown in Figure 4-19. To enable AutoPreview, click View, AutoPreview.
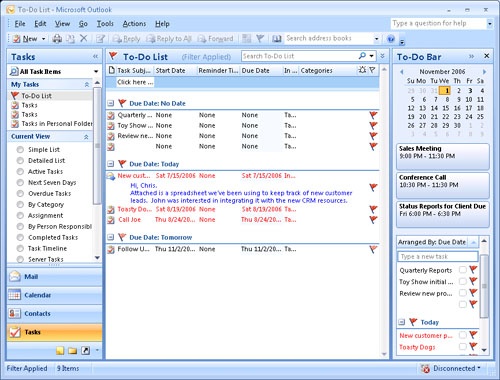
Figure 4-19. AutoPreview displays additional information about a task below the task name in the list.
You can customize the view in the Tasks folder in a variety of ways—adding and removing columns, changing column names, or organizing tasks by category or other properties, to list a few. To customize the columns, right-click the column header bar, and then choose Format Columns. The resulting dialog box allows you to select the format for each column, change the name, apply alignment, and so on. To change the order of columns in the view, simply drag the column headers into the desired positions, resizing as needed.
You can also organize your task list in various ways. You can click column headers to sort the columns in ascending or descending order, and you can group the columns based on a particular field or group of fields, just as you can in the Inbox and other Outlook 2007 folders.
You can also choose View, Current View and then choose one of the following commands to change the Tasks view:
Simple List. Shows whether the task has been completed, the task name, the folder location of the task, and the due date.
Detailed List. Shows status, percent complete, and categories in addition to the information displayed in Simple List view.
Active Tasks. Displays tasks that are active.
Next Seven Days. Displays tasks scheduled for the next seven days.
Overdue Tasks. Displays incomplete tasks with due dates that have passed.
By Category. Organizes the task list by the categories assigned to tasks.
Assignment. Shows the tasks assigned to specific people.
By Person Responsible. Groups the view according to the person responsible for the various tasks.
Completed Tasks. Shows only completed tasks.
Task Timeline. Displays a timeline of all tasks.
Server Tasks. With Exchange Server accounts, helps you view assigned tasks.
Outlook Data. Files Displays tasks organized by Outlook 2007 data file location.
To-Do List. Displays tasks in the To-Do List with a Reading Pane.
Note
For more information about customizing the view in the Tasks folder, see "Working with Tasks in the Tasks Folder" in Chapter 22.
With its Notes feature, Outlook 2007 helps you organize your thoughts and tasks. Each note can function as a stand-alone window, allowing you to view notes on your desktop outside Outlook 2007. The Notes pane provides a look into your Notes folder, where your notes are initially stored. From there, you can copy or move your notes to other locations (such as the desktop) or create shortcuts to them. By default, the initial Notes pane displays the notes as icons, with the first line of the note serving as the title under the note’s icon, as shown in Figure 4-20.

As it does for other options, Outlook 2007 offers several other ways to view notes. You can select a view by choosing it in the Current View section in the Navigation Pane. You can also choose View, Current View, and then choose one of the following:
Icons. Displays an icon for each note, with the first line of the note serving as the icon’s description (the default view).
Notes List. Displays the notes as a line-by-line list.
Last Seven Days. Resembles Notes List view but restricts the display to only the past seven days and is based on the current date.
By Category. Groups the notes by their assigned categories.
Outlook Data Files. Groups the notes by Outlook 2007 data file location.
You can show the Reading Pane in the Notes folder, displaying the text of a note when you click it in the list. You can also use AutoPreview in Notes List and Last Seven Days views to automatically display the contents of each note. To view the Notes List and Last Seven Days options, choose View, Current View, and then make your selection.
You can customize the views in the Notes folder the same way you can in other folders. You can, for example, drag columns to rearrange them, resize columns, change column names and other properties, add other fields, and group notes based on various criteria.
Note
For a detailed explanation of how to work with the Notes folder, see Chapter 24.
The Deleted Items folder contains Outlook 2007 items that you have deleted, and it can include all the Outlook 2007 item types (such as messages, contacts, and appointments). The Deleted Items folder offers a way for you to recover items you’ve deleted, because the items remain in the folder until you manually delete them from that location or allow Outlook 2007 to clean out the folder. When you delete an item from the Deleted Items folder, that item is deleted permanently.
You can configure Outlook 2007 to automatically delete all items from the Deleted Items folder when you exit Outlook 2007. To do so, choose Tools, Options, and then click Other. Select the Empty The Deleted Items Folder Upon Exiting check box, and then click OK.
You might want to change the default Outlook 2007 view based on your type of work and the Outlook 2007 folders you use most. Or you might want to use a particular view as the initial view because it presents the information you need right away each morning to start your workday.
You can designate any of the Outlook 2007 folders as your startup view. To do so, follow these steps:
In Outlook 2007, choose Tools, Options.
Click the Other tab, and then click Advanced Options.
Next to the Startup In This Folder text box, click Browse, and then select the folder you want to see by default when Outlook 2007 starts. Click the Mailbox or Personal Folders branch if you want to specify Outlook Today as the default view.
Click OK, and then click OK again to close the Options dialog box.