
Because Outlook 2007 is a complex application with a broad range of capabilities, you have many options for controlling the way it looks and functions. This portion of the chapter is designed to help you configure Outlook 2007 to perform the way you need it to.
Each of the following sections describes a tab in the Outlook 2007 Options dialog box, providing an overview of the features listed on that tab. Because many of the options in this dialog box are best understood in the context of the feature they control, you’ll find more detail about individual options in chapters that focus on a particular Outlook 2007 feature (messaging or scheduling, for example); be sure to consult the cross-references to the applicable chapters for more information.
To open the Options dialog box described here, start Outlook 2007, and then choose Tools, Options.
The Preferences tab in the Options dialog box, shown in Figure 4-29, lets you configure general settings for all the Outlook 2007 primary functions, from e-mail to scheduling to contact management.
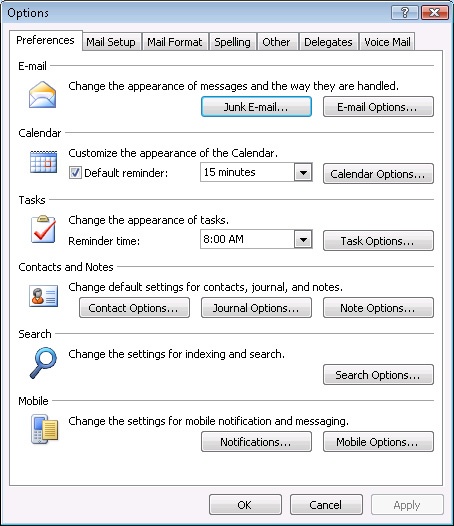
Figure 4-29. Use the Preferences tab in the Options dialog box to configure a broad range of general options.
Each of the option groups on the Preferences tab controls how a specific Outlook 2007 component works. The following list helps you locate specific settings:
E-Mail. You can specify how Outlook 2007 handles messages—for example, whether Outlook 2007 keeps a copy of sent items, saves unsent messages, or includes original message content in replies and forwards. You can also configure the Outlook 2007 junk e-mail filter settings. Chapter 8, provides extensive coverage of e-mail configuration options. Chapter 12 explains how to block junk e-mail, and Chapter 10, explains how to filter and sort messages in other ways.
Calendar. You can control the look of the Outlook 2007 calendar by, for example, defining the work week, changing the workday start and end times, changing the appearance of the Date Navigator, or setting background color. See Chapter 20, for a discussion of options for the Calendar folder.
Tasks. You can set the color for completed and overdue tasks, set up reminders for tasks with due dates, and configure other task-related settings. Chapter 22, covers task options in detail.
Contacts And Notes. You can control the way names are displayed in the Contacts folder, check for duplicate contact entries, configure journal options, and set other options for storing and managing your contact information. See Chapter 19, for a complete explanation. You can also, for example, set the color, size, and font used for notes. Chapter 24, covers options for notes.
Search. Set options to control the way Outlook 2007 indexes and searches information and displays search results.
Mobile. Configure settings for Mobile Service options (text messaging).
On the Mail Setup tab, shown in Figure 4-30, you’ll find additional settings that control e-mail accounts and Outlook 2007 messaging functions. For example, you can use the Mail Setup tab to create or modify e-mail accounts and configure how and when Outlook 2007 sends and receives messages.

The following list describes the major areas on the Mail Setup tab and directs you to the chapter in which those settings are discussed:
E-Mail Accounts. These settings allow you to add, remove, or configure e-mail accounts. See Chapter 3, and Chapter 7, to learn how to configure e-mail accounts.
Send/Receive. You can define groups of accounts, which Outlook 2007 then uses to determine when to process messages for specific accounts. You can configure settings separately for each group, providing a high degree of control over when and how Outlook 2007 processes messages. See Chapter 8, for information about send/receive groups and send/receive options.
Data Files. These settings let you add, remove, and configure information stores (data files) for Outlook 2007, including setting up offline access. See Chapter 2, to learn how to manage data files.
Dial-Up. Here you can configure a handful of settings that determine how Outlook 2007 handles dial-up connections for sending and receiving messages.
Use the Mail Format tab, shown in Figure 4-31, to control the way your messages look and how you compose those messages. For example, you can use the Mail Format tab to specify either Word 2007 or Outlook 2007 as the default e-mail editor, to choose between plain-text and rich-text options, and to set international formatting options.
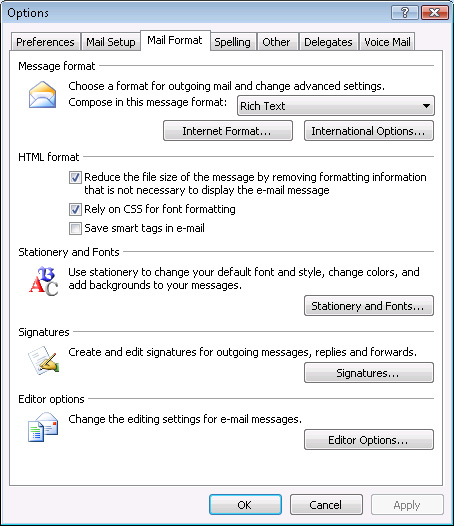
Figure 4-31. Use the Mail Format tab to select the default e-mail editor, mail format, and other properties.
The following list summarizes the option groups on the Mail Format tab. For details about the various settings in each group, consult Chapter 8.
Message Format. With these settings, you can choose among HTML, plain text, and rich text for outgoing messages; specify the default e-mail editor; specify the default e-mail viewer for rich-text messages; configure Internet and international options for messages; and set up other messaging features.
HTML Format. Set options that determine how Outlook 2007 handles HTML formatting and content for messages.
Stationery And Fonts. You can set default stationery (background) for messages, manage stationery, and specify font settings.
Signatures. These settings direct Outlook 2007 to add a text signature to all new messages and to replies and forwards. You can configure the two categories of messages separately. (Note that these signatures are different from digital signatures, which allow you to validate the authenticity of and encrypt messages.) Outlook 2007 also has the ability to assign specific signatures to each e-mail account.
Editor Options. Change options for the general Outlook 2007 interface (such as color scheme and ScreenTip style).
The Spelling tab, shown in Figure 4-32, lets you specify how spelling should be checked in Outlook 2007. The following sections summarize by function the settings available on this tab.
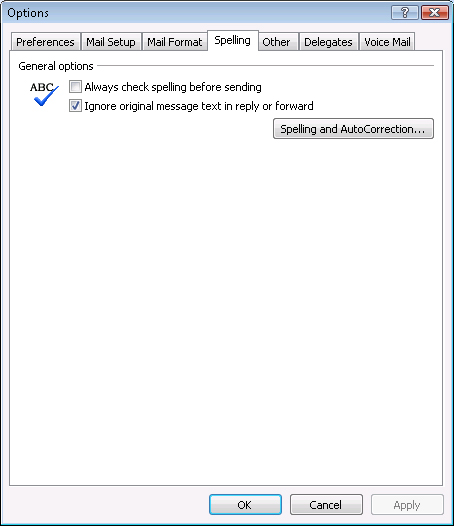
The General Options area of the Spelling tab allows you to set general guidelines for the spelling checker. The two options are:
Always Check Spelling Before Sending. Select this option to have Outlook 2007 automatically check spelling before you send a message. You also can check spelling manually.
Ignore Original Message Text In Reply Or Forward. Selecting this option specifies that Outlook 2007 will check spelling only in your message text, not in the original message text included in a reply or forward.
Click the Spelling And AutoCorrection button on the Spelling tab to display the following options, which affect all Microsoft Office system programs:
AutoCorrect Options. Click this button to specify how Outlook 2007 formats and corrects text as you type.
Ignore Words In UPPERCASE. You can instruct the spelling checker to skip words that appear in all uppercase letters. This option is useful, for example, if your document contains numerous acronyms and you don’t want the spelling checker to waste time checking them.
Ignore Words That Contain Numbers. When you select this option, the spelling checker will not attempt to check the spelling of words that include numbers, such as some342.
Ignore Internet And File Addresses. When you select this option, the spelling checker will not check URLs or file names, such as fileforchris.doc.
Flag Repeated Words. Selecting this check box underlines repeated words, even when they are spelled correctly.
Enforce Accented Uppercase In French. This option alerts you to French words that contain uppercase letters that are missing an accent mark.
Suggest From Main Dictionary Only. When you select this option, words from only the main dictionary that is built into the spelling checker are suggested. Words from your custom dictionaries are not included in the list of suggested words when you check the spelling of a document.
Custom Dictionaries. Click this button to load customized dictionaries.
Check Spelling As You Type. With this option selected, Outlook 2007 checks spelling as you type messages or any other text in Outlook 2007 and offers suggestions.
Use Contextual Spelling. When you select this check box, Outlook 2007 also examines the context of a sentence to determine the use of correctly spelled but misused words—for example, their instead of there.
Mark Grammar Errors As You Type. When you choose this option, Outlook 2007 underlines grammatical errors with green wavy lines.
Check Grammar With Spelling. By selecting this check box, you instruct Outlook 2007 to check grammar at the same time as spelling.
Show Readability Statistics. If you select this check box, Outlook 2007 displays information about the reading level of the document after completion of spelling and grammar checks.
Outlook 2007, like other Microsoft Office system applications, supports AutoCorrect, a feature that allows Outlook 2007 to correct common spelling and typing errors and to replace characters with symbols. You also can use AutoCorrect as a shortcut, which means that you can type a small string of characters and have those characters replaced by a longer string. For example, if you frequently type the words Windows Vista, you might set up AutoCorrect to replace your shorthand typed phrase vst with Windows Vista. See the Inside Out sidebar in the "Setting Advanced Options" section later in this chapter for a handy use for smart tags and AutoCorrect entries.
Clicking AutoCorrect Options in the Editor Options dialog box displays the AutoCorrect dialog box, shown in Figure 4-33. You can use this dialog box to add new AutoCorrect entries or change existing entries. Click Exceptions to specify exceptions to AutoCorrect rules.

When Outlook 2007 is checking spelling in a document and finds a word it considers misspelled, the program gives you the option of adding the word to a custom dictionary. This option lets you specify the correct spelling of words not found in the Outlook 2007 standard dictionary. For example, you might want to add your name to the custom dictionary if Outlook 2007 doesn’t recognize its spelling. You can also add the correct spelling of special words or terms you use often to the custom dictionary.
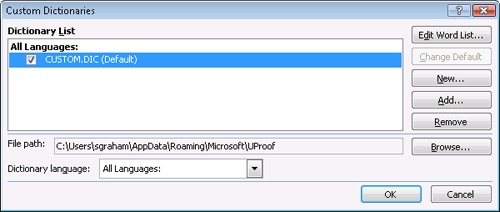
Click the Custom Dictionaries button located in the Editor Options dialog box to open the custom dictionary. The Custom Dictionaries dialog box appears. To add new items to your dictionary, click Edit Word List. Type a new word and click Add, or select an existing word and click Delete. The custom dictionary file is stored in the Application DataMicrosoftUProof folder of your profile folder (which varies according to your operating system).
You can also add other dictionaries to Outlook 2007. To add a new dictionary, follow these steps:
Open the Custom Dictionaries dialog box, shown in Figure 4-34, as outlined earlier.
Click Add.
Browse to the desired dictionary file (*.dic), and then click Open. Click OK to close the dialog box.
Click OK to close the Editor Options dialog box.
The Other tab, shown in Figure 4-35, provides a selection of settings that apply to various aspects of Outlook 2007. The following sections explain how to configure specific features and behavior using this tab.
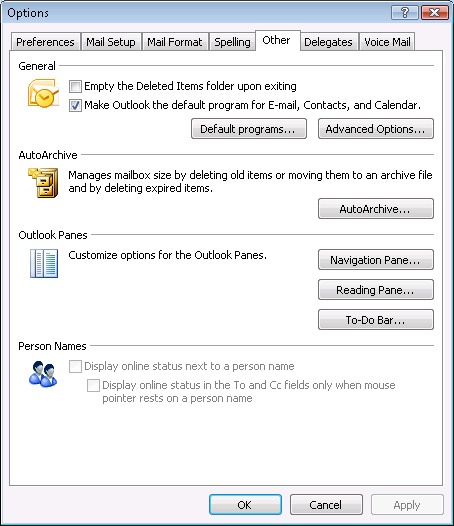
One setting on the Other tab lets you specify that Outlook 2007 is the default application for creating and viewing e-mail, contacts, and calendar items. Select the Make Outlook The Default Program For E-Mail, Contacts, And Calendar check box if you want Outlook 2007 to start when you open e-mail messages, contact entries, or calendar data from other sources.
You can use the Other tab to specify how Outlook 2007 processes deleted items. The first of the following two options is located on the Other tab; click Advanced Options to access the second.
Empty The Deleted Items Folder Upon Exiting. Select this check box to have Outlook 2007 automatically delete all items from the Deleted Items folder when you exit the program. This action permanently deletes the items.
Warn Before Permanently Deleting Items. Click Advanced Options and select this option if you want Outlook 2007 to warn you before it permanently deletes items from the Deleted Items folder.
The options accessed by clicking AutoArchive on the Other tab let you control how Outlook 2007 archives data, processes deleted and expired items, and implements other backup properties, such as the retention policy. See Chapter 30, for more information about backup and archival options and procedures for Outlook 2007.
Clicking Reading Pane on the Other tab provides access to options that specify the way the Reading Pane functions. These options are explained in detail earlier in this chapter; see "Using the Reading Pane."
Click the Navigation Pane button to specify which items appear in the Navigation Pane and their displayed order. For example, if you use the Contacts folder more than the Calendar folder, you might want to move the Contacts folder icon higher in the Navigation Pane.
Click the To-Do Bar button on the Other tab to set options for the To-Do Bar that control which items appear in the To-Do Bar (Date Navigator, appointments, and Task List).
Use the Person Names area on the Other tab to configure MSN® Messenger and use instant messaging (sending or receiving pop-up messages in communication with other users).
The Other tab of the Options dialog box lets you access a set of special advanced options for configuring Outlook 2007. Click Advanced Options on the Other tab to display the Advanced Options dialog box, shown in Figure 4-36. You can use the options in this dialog box to configure various aspects of Outlook 2007 behavior and appearance, as described in the following list:
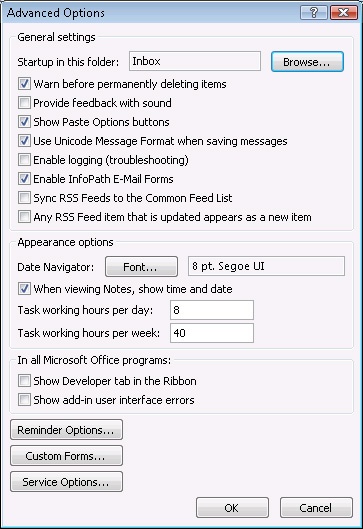
Startup In This Folder. This option lets you specify which folder Outlook 2007 opens by default when you start the program. Click Browse to select the folder.
Warn Before Permanently Deleting Items. Enable this option to have Outlook 2007 display a warning before it permanently deletes items.
Provide Feedback With Sound. You can direct Outlook 2007 to play a sound when you perform actions such as opening a file or deleting a message.
Show Paste Options Buttons. When this option is selected, Outlook 2007 displays a smart tag when you paste data from the Clipboard, allowing you to change the paste format and other paste options. This method of changing these options is faster than using the Edit menu.
Use Unicode Message Format When Saving Messages. Use the Unicode character set when saving messages to disk.
Enable Logging (Troubleshooting). This option allows Outlook 2007 to log e-mail event status to the OPMLog.log file, which is located in the Temp folder of your profile folder.
Enable InfoPath E-Mail Forms. This option allows the controls of a Microsoft Office InfoPath® form to function when received as an e-mail message.
Sync RSS Feeds To The Common Feed List. Enable this option to synchronize Really Simple Syndication (RSS) feeds to a common list on the computer running Exchange Server.
Any RSS Feed Item That Is Updated Appears As A New Item. Select this option to have updated RSS items appear as new items in your Inbox or designated folder.
Date Navigator. Click Font to select the font used by the Date Navigator. Changing the font changes not only the appearance of the Date Navigator but also the number of months displayed. Make the font smaller to show more months or larger to show fewer months.
When Viewing Notes, Show Time And Date. You can have Outlook 2007 display the time and date a note was created or last modified at the bottom of the note.
Task Working Hours Per Day and Task Working Hours Per Week. These two options define your work week for managing tasks. The default settings are 8 hours and 40 hours, respectively.
Show Developer Tab In The Ribbon. Include in the Ribbon the Developer tab, which gives you quick access to the Microsoft Visual Basic® Editor, macro security settings, and other developer-related features.
Show Add-In User Interface Errors. Display errors related to Microsoft Office system program add-ins.
Note
The Advanced Options dialog box includes three buttons at the bottom that let you configure a variety of options. Some of these buttons and their options are covered in the following sections. See Chapter 28, for information about configuring custom forms.
The Reminder Options button in the Advanced Options dialog box opens a simple Reminder Options dialog box that offers two options for configuring Outlook 2007 reminders:
Display The Reminder. Choose this option to have Outlook 2007 display reminders in the Reminders window when they come due.
Play Reminder Sound. Choose this option to have Outlook 2007 play a sound when a reminder comes due, and choose the sound file you want Outlook 2007 to use.
Clicking Custom Forms in the Advanced Options dialog box displays the Custom Forms Options dialog box, where you can configure two options:
Temporary Storage For Forms. Set the maximum space (in KB) on the hard disk for storage of forms.
Allow Forms That Bypass Outlook. Permit forms to run that bypass the Outlook 2007 security model.
Clicking Service Options in the Advanced Options dialog box displays the Service Options dialog box, shown in Figure 4-37. This dialog box provides access to two configuration pages.

Figure 4-37. Use the Service Options dialog box to configure customer feedback and offline editing options.
Customer Feedback Options. The Customer Feedback Options area allows you to enable or disable participation in Microsoft’s Customer Experience Improvement Program. When this option is enabled, Microsoft Office system applications submit information about your system and the way you use your applications to Microsoft over the Web, along with information about errors you encounter. Participation is disabled by default. Participating can provide Microsoft with useful information that could ultimately lead to better software, but you can leave this option disabled if you don’t want your usage information shared or if providing this information isn’t practical because you use a dial-up Internet connection. You can also disable this function in networks with widespread Microsoft Office system deployment to reduce network traffic and reduce data outflow.
Offline Editing. The Offline Editing area has two simple configuration options. The first, Server Drafts Location, allows you to set the file location of the server drafts. The second, Offline Editing Options For Document Management Server Files, specifies where such files would be stored for an application, such as Microsoft Office SharePoint® 2007.
The Delegates tab in the Options dialog box lets you specify other people who have delegate access to your folders and can send items on your behalf (meeting requests, for example). See Chapter 35, for detailed information about using delegation and specifying delegates.
The Voice Mail tab appears in the Options dialog box if you are using an Exchange Server account for which Unified Messaging is enabled. The options on the Voice Mail tab let you specify a variety of options that control how you access your mailbox from a phone and how voice mail is handled.
The options on the Voice Mail tab include:
Telephone Access Numbers. Specifies the number you use to access voice-enabled features of your Exchange Server mailbox.
Reset PIN. Click to reset the personal identification number (PIN) for your voice-enabled mailbox.
Choose The Folder To Read When Accessing E-Mail Messages From A Phone. Click Change Folder to choose the mail folder from which you want to listen to mail messages when calling in to the server.
Play On Phone Number. Specifies the phone number you use to listen to voice messages as an alternative to playing those messages in Outlook 2007.
Voice Mail Greeting. Choose this option to have Exchange Server use your regular greeting for callers.
Out Of Office Voice Mail Greeting. Choose this option to have Exchange Server use your Out Of Office greeting for callers.
Call. Click to call the Play On Phone Number when you need to play or record a greeting.
Send An E-Mail Message To My Inbox When I Miss A Phone Call. Use this option to receive an alert in your Inbox when you miss a call.