
One of the most difficult parts of managing a project is communicating with the people associated with a task or a set of tasks. If your company uses e-mail messages or the Internet, you can integrate the Outlook 2007 communication features with Project 2007 to help you effectively communicate with resources about task responsibilities.
With Office Project Server 2007, you can use Project 2007 to send messages to workgroup system members, also called teams. Workgroups can then use Project 2007 to assign tasks, send and receive task updates, accept or decline task assignments, and submit status reports. Team members can delegate tasks to other team members.
In addition to the collaborative features of Project Server 2007, members of a team can use e-mail messages, the Web, or both to exchange Project 2007 information. Project 2007 files can include hyperlinks to other supporting documents so that resources can quickly and easily access related documents. These documents might include a Microsoft Office Word 2007 document describing the project in detail, a cost-analysis worksheet in Office Excel 2007, or a related Web site you can view in Microsoft Internet Explorer®.
Note
The following section shows how to use the Outlook 2007 e-mail features to send and receive messages concerning task assignments, reporting status, and reporting updates. It’s assumed that the workgroup functionality of Project 2007 is installed on your and your recipients’ computers. To learn more about how to do this, consult the documentation that accompanies the Project 2007 and Project Server 2007 software.
Note that because e-mail systems and networks differ, the specific steps and features shown in this section might not work for your organization. Consult your network or e-mail administrator to find out whether your e-mail or local area network (LAN) system can use the Project 2007 communication features.
Before you can assign tasks to other team members using the Project 2007 collaboration feature, you must configure Project 2007 to allow delegation of tasks. In addition, your Project Server 2007 must be configured to allow delegations. If you are not sure you can delegate tasks or if you have problems after following these steps, contact your system administrator for more information about your particular organization’s server. In addition to setting up the server information, you must ensure that your tasks have resources assigned to them.
To allow team members (and yourself) to assign tasks to other team members, do the following:
Start Project 2007 if it is not already started.
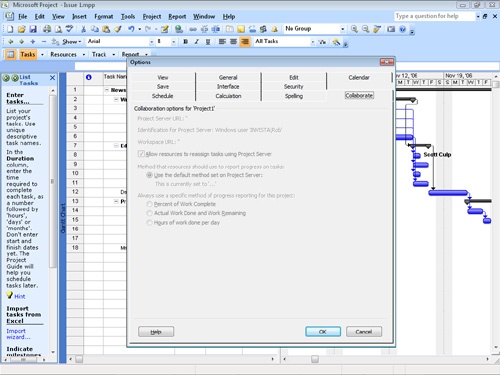
Choose Tools, Options to open the Options dialog box.
Click the Collaborate tab.
From the Collaborate Using drop-down list, select Office Project Server 2007.
Type the path (Uniform Resource Locator [URL]) to the computer running Project Server 2007 (see Figure 38-9).
Click Test Connection if you want to confirm that you typed the correct URL and that the server is working correctly.
Select the Allow Resources To Delegate Tasks Using Project Server check box.
Configure other settings on this tab as needed. For more information, see the Project 2007 documentation.
Click OK to save your settings.
To delegate or publish tasks to other members, do the following:
Select the task you want to publish.
Right-click and choose Publish New And Changed Assignments.
Click OK when prompted to save the project.
Click Make Site Trusted if you need to specify that the server to which you are publishing is a trusted server. Note that if you are publishing to a Web site URL, you must make the Internet site trusted from within Internet Explorer before using Project 2007 to publish tasks.
After your project gets under way, you will have slips in the schedule, updates to tasks, and other events that require you to modify your Project 2007 file. When these events occur, you need to update your team members appropriately, which you can do by using the Publish New And Changed Assignments feature, as follows:
Project 2007 is designed to work with Outlook 2007 tasks. You can create a task in Outlook 2007 and then import that task into a project you are working on. This way, you do not have stray tasks in Outlook 2007 that should really be part of a project file. To import an Outlook 2007 task into a project, do the following:
Open Outlook 2007 and click the Task icon.
Create a new task and save it (see Figure 38-10).
Switch to Project 2007.
Choose Tools, Import Outlook Tasks.
Click Allow Access For 5 Minutes and click Yes if Outlook 2007 warns that another program is attempting to access e-mail addresses from your computer.
Select the check box next to the task you want to import in the Import Outlook Tasks dialog box, shown in Figure 38-11.
Click OK.


If necessary, you can move the task to another row and indent it under another task.
One way you might want to share a Project 2007 file is to send it as a project file using Outlook 2007 e-mail. Recipients can then save the file to disk and open it in Project 2007, which enables them to view, modify, or print the Project 2007 file. Of course, everyone who receives the file must have Project 2007 installed on their computers.
To send a Project 2007 file this way, do the following:
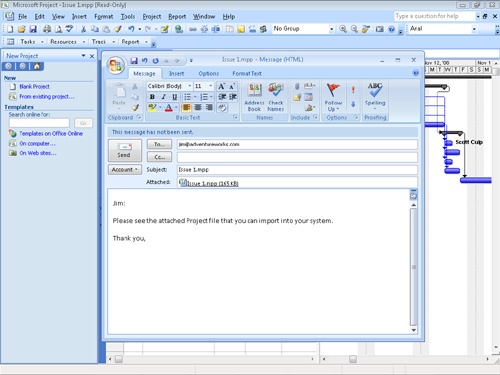
In Project 2007, choose File, Send To, Mail Recipient (As Attachment) to display the message form (see Figure 38-12).
In the To box, type an e-mail address (or click To to access your address book). Add as many recipients as needed.
In the Subject box, type a subject. By default, Project 2007 uses the file name as the subject.
In the message area, type a message.
Click Send.
You can also use Outlook 2007 to route a Project 2007 file. With routing, you send a file sequentially from one team member to the next or to all team members at one time. Use the former method if you want only one version of the file to be seen by all team members in the routing slip list. In this way, one member can review and modify the file before sending it to the next person on the routing slip. Use the latter method if you want all individuals to review and modify the file and return it directly to you.
Note
One downside of routing a file to a list of team members sequentially is that if someone in the routing list is out of the office for an extended time, your routed file could get stuck in that person’s Inbox until they return, delaying any work you want to do on the file.
To route a Project 2007 file, follow these steps:
In Project 2007, choose File, Send To, Routing Recipient to display the Routing Slip dialog box.
Click Address to display the Address Book dialog box.
Select the recipients, and then click OK. The addresses are added to the To list, as shown in Figure 38-13.
Click the up and down Move arrows to move recipients’ locations in the list, specifying the order in which you want them to receive the routing slip. If you want everyone to receive a copy simultaneously, select the All At Once option at the bottom of the dialog box.
In the Subject box, type a subject.
In the Message text area, type a message.
If you want the Project 2007 file returned to you after all recipients have received it, select the Return When Done check box.
If you want Outlook 2007 to send you an e-mail notification each time the file is routed to the next recipient, select the Track Status check box. This process enables you to keep track of where the file is in the routing sequence.
When you’re ready to start routing the file to specified recipients, click Route. If you receive a message telling you that another program is attempting to access your e-mail addresses, click Yes to continue. Outlook 2007 routes the file to the recipients.

If a Project 2007 file is routed to you, you must forward it to the next person in the list.
To forward a Project 2007 file, follow these steps:
Open Outlook 2007 and view the routed message.
Double-click the Microsoft Project icon in the e-mail message to display the Project 2007 file.
In Project 2007, view and modify the project as needed.
Choose File, Save to save your changes.
In Project 2007, choose File, Send To, Next Routing Recipient.
Click OK when prompted to send the file to the specified person.