
After your Exchange Server administrators install and configure Outlook Web Access on the server, users can begin accessing their mailboxes through their Web browsers rather than (or in conjunction with) Outlook 2007. This section explains how to connect to the computer running Exchange Server and use Outlook Web Access to access your mailbox.
Note
This section assumes that you are connecting to Exchange Server 2007 with Outlook Web Access. If you have an earlier version of Exchange Server, the features available to you are slightly different.
Typically, you connect to the Exchange Server computer through the URL http://<server>/exchange, where <server> is the DNS name, IP address, or NetBIOS name of the server. This URL isn’t set in stone. The system administrator might have changed the virtual directory name for security purposes. Check with the system administrator if you’re not sure what URL to use to connect to the Exchange Server computer.
Note
Windows Internet Naming Service (WINS) maps NetBIOS names (computer names) to IP addresses, performing a service similar to that provided by DNS (although DNS maps host names, not NetBIOS names). You can use an Lmhosts file to perform NetBIOS name-to-address mapping without a WINS server, just as you can use a Hosts file to perform host name-to-address mapping without a DNS server.
Depending on the server’s authentication settings, you might be prompted to log on. Enter your user name and password for the Exchange Server account. If the account resides in a different domain from the one in which the server resides, enter the account name in the form <domain><account>, where <domain> is the logon domain and <account> is the user account.
When you connect to your mailbox, you should see a page similar to the one shown in Figure 44-4 for Exchange Server 2007. Earlier versions of Exchange Server show a somewhat different interface (Outlook Web Access 5.5, not shown, is considerably different). Outlook Web Access opens your Inbox by default, but you can switch to other folders as needed.
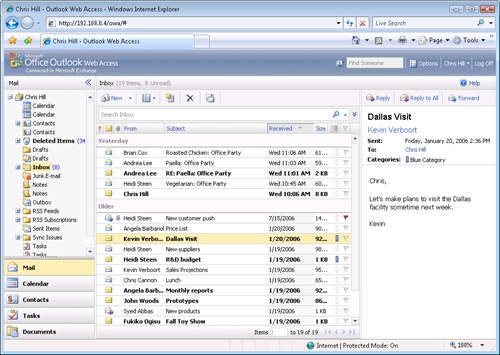
The left pane functions much as the Navigation Pane does in Outlook 2007 (or, in the case of Exchange 2000 Server or Exchange Server 5.5, as the Outlook Bar in Outlook 2002 or earlier), and you can select folders from it. (Throughout this chapter, I’ll refer to the left pane as the Navigation Pane for simplicity.) The right pane changes to show the folder’s contents.
Note
The interface for Outlook Web Access changed slightly between Exchange Server 5.5 and Exchange 2000 Server, and even more so from Exchange 2000 Server to Exchange Server 2003. The following sections assume that you’re using Outlook Web Access to access Exchange Server 2007, but the procedures are similar for Outlook Web Access with earlier versions of Exchange Server. Also note that some features are not available with Outlook Web Access and Exchange Server 5.5 or with versions of Internet Explorer earlier than 5.0. Certain other features, such as rules, are only available with Exchange Server 2003 or Exchange Server 2007.
Outlook Web Access automatically shows your current messages when you connect. To read a message, double-click its header to display a window similar to the one shown in Figure 44-5.

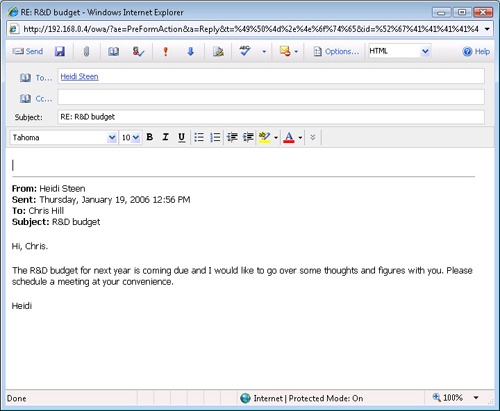
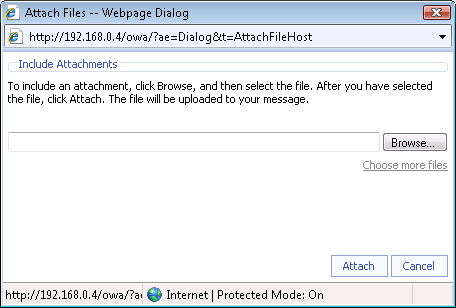
As in Outlook 2007, you can reply to or forward e-mail messages. Simply click Reply or Reply To All to reply to a message or click Forward to forward a message. Outlook Web Access opens a form similar to the one shown in Figure 44-6. Add addresses as needed and type your text. If you want to add an attachment, click the Attach File toolbar button. Outlook Web Access opens the window shown in Figure 44-7 so that you can add one or more attachments to the message.
When you want to create a message, click the New toolbar button (refer to Figure 44-4). Outlook Web Access opens a form similar to the one shown previously in Figure 44-5. You can specify addresses, attachments, body text, and other message properties.
You can set a handful of options for a new message by clicking the Options toolbar button with the new message form open. These options correspond to some of the options available in Outlook 2007 (see Figure 44-8).

By default, Outlook Web Access displays messages sorted by date and time received in multiline view. You can sort the messages by other properties as well. To do so, select the drop-down menu beside Arrange By and choose the field by which you want to sort messages (see Figure 44-9). Outlook Web Access also provides a Single-Line View option. You can click the Single Line button on the toolbar to turn off multiline display. To sort messages in Single-Line view, simply click the column header for the column by which you want to sort messages.

You can copy and move messages by dragging in Outlook Web Access. Open the folder containing the messages you want to copy or move. If the target folder is hidden, scroll and expand folders as needed in the Navigation Pane to display the folder in the folder list. To move messages, drag them from the right pane to the destination folder in the folder list. If you want to copy the messages instead of moving them, hold down the Ctrl key while dragging.
Deleting messages in Outlook Web Access is a good way to clean out your mailbox when you don’t have Outlook 2007 handy. It’s also particularly useful for deleting large or corrupted messages that would otherwise prevent Outlook 2007 from downloading your messages normally.
To delete messages in Outlook Web Access, just select the messages and click the Delete toolbar button. Outlook Web Access moves the messages to the Deleted Items folder.
Outlook Web Access does not limit you to working only with your Inbox. You can work with your Mail, Calendar, Contacts, and Tasks folders. With Outlook Web Access 2007, you can also work with SharePoint libraries and file servers configured on the Exchange Server computer by the Exchange Server administrator(s). When you select a different folder in the Navigation Pane, Outlook Web Access 2007 displays the contents of the selected folder in the right pane.
While in Outlook Web Access 2007, you can rename and delete folders in your Exchange Server mailbox that you have created—but note that you cannot rename or delete the default Outlook 2007 folders. To perform either of the first two actions, display the folder in the Navigation Pane, right-click that folder, and then choose either Rename or Delete.
In addition to working with the Inbox or other message folders, you can also manage your schedule, tasks, and contacts list on Exchange Server through Outlook Web Access.
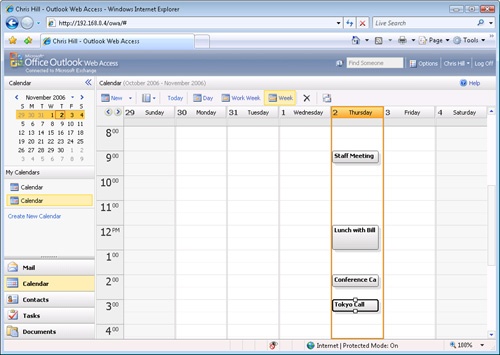
To manage your schedule, click the Calendar icon in the Navigation Pane. Outlook Web Access updates the right pane to display your Calendar folder. Click the toolbar buttons to choose between Today, Day, Week, and Work Week views. The page also includes a Date Navigator similar to the one in Outlook 2007, which you can use to select dates (see Figure 44-10).
Click the New toolbar button or click the arrow beside New and choose Appointment to display an appointment form similar to the one in Outlook 2007. Use the appointment form to specify the title, the time, and other properties for an appointment, just as you would in Outlook 2007.
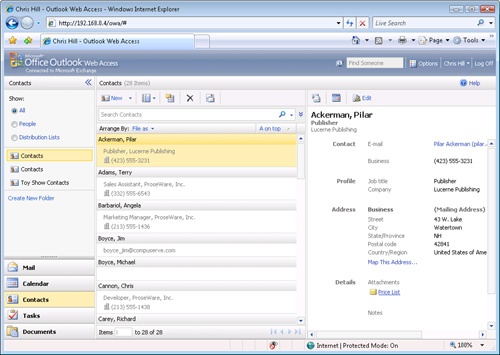
You can also view and manage contacts in Outlook Web Access. Click the Contacts icon in the Navigation Pane to display the Contacts folder (see Figure 44-11).
Simply double-click a contact entry in the list to open a form that contains detailed information for that contact. Click New on the toolbar to open the form shown in Figure 44-12, which you can use to create new contact entries. Click Save And Close to save a new contact entry or to save changes to an existing contact entry.
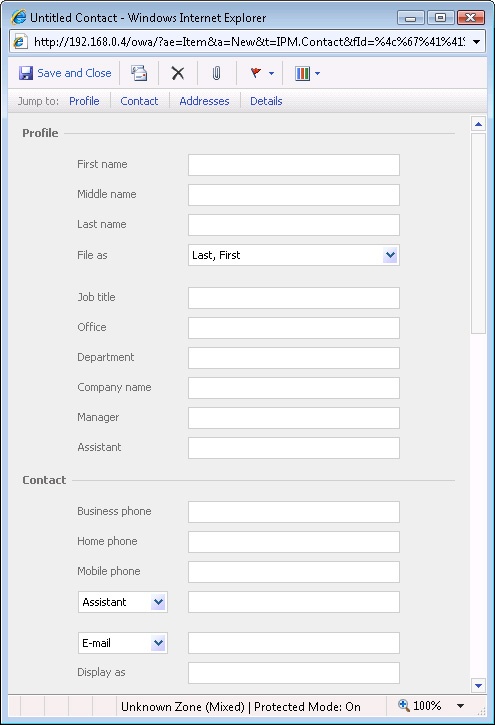
Figure 44-12. The form for creating contact entries in Outlook Web Access is similar to the contact form in Outlook 2007.
As when you are working with your mail folders, you can click the drop-down button beside Arrange By to choose a different field for sorting contacts. To locate a contact, click in the Search Contacts text field and click the magnifying glass icon (which turns to a red X icon during the search). Click the red X to clear the search results.
In Outlook Web Access 2007, you can also work with the Tasks folder. With Outlook Web Access 2003, you can also work with the Journal and Notes folders. Outlook Web Access 2003 enables you to create messages, contact items, distribution lists, appointments, tasks, and folders. You can view but not create items in the Journal folder. Earlier versions of Outlook Web Access restrict you to creating messages, contact items, and appointments.
The Out Of Office Assistant automatically responds to messages when you are out of the office. The Out Of Office Assistant functions essentially as a server-side rule, replying to messages as they arrive in your Inbox. Although you usually configure the Out Of Office Assistant in Outlook 2007, you can also configure it in Outlook Web Access.
Note
For details on using the Out Of Office Assistant, see the section "Creating Automatic Responses with the Out Of Office Assistant" in Chapter 13.
To configure the Out Of Office Assistant in Outlook Web Access, connect to the server using your Web browser and click Options to view the Options page (see Figure 44-13), and then click Out Of Office Assistant to view the Out Of Office Assistant properties. To turn on the Out Of Office Assistant, select Send Out Of Office Auto-Replies. Outlook Web Access 2007 enables you to specify two different replies: one for people inside your organization and one for people outside the organization. When you are satisfied with the autoreply text, click Save to save the changes. When you want to turn off the Out Of Office Assistant, open the Options page again and select Do Not Send Out Of Office Auto-Replies.

You can also use the Outlook Web Access Options page (see Figure 44-14) to set many other options for Outlook Web Access (in addition to the Out Of Office Assistant, as just discussed). You can configure date and time options, calendar options, and contact options; and you can also change your password. You can configure reminders, set up a signature for outgoing messages, set spelling options, and configure many additional options, all of which are essentially the same as those available in Outlook 2007 and covered elsewhere in this book.
