
Over time, your Microsoft® Office Outlook® 2007 data store can become overloaded with messages, contact information, appointments, and other data. If you can’t manage all this data, you’ll be lost each time you try to find a particular item. What’s more, the more data in your data store, the larger your .pst file (if you’re using one) or your Microsoft Exchange Server mailbox. Many companies impose mailbox size limits to help manage disk use on the servers. So the size of your mailbox can become a problem.
This chapter focuses on managing your Office Outlook 2007 folders and their contents. You’ll learn how to archive your data, both manually and automatically, using AutoArchive. You’ll also learn how to back up your data and recover it when needed.
Over time, you will likely want to move some of your Outlook 2007 items to a separate location because you no longer need them but don’t want to delete them. For example, perhaps you want to keep copies of all of the messages in your Sent Items folder so that you can refer to them later if needed, but you don’t want them to stay in Sent Items. In these situations, you can use the Outlook 2007 AutoArchive feature to move out those old items.
The Outlook 2007 AutoArchive feature archives data automatically according to settings you configure for each folder or all your folders. You might want to archive every day if you receive new data that you don’t want to take the chance of losing overnight. Or you might want to set AutoArchive to run once a week.
To set up a folder to automatically archive using the default AutoArchive settings, follow these steps:
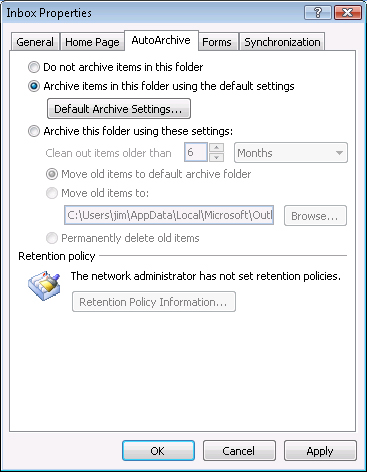
Right-click a folder in the Folder List, choose Properties, and then in the Properties dialog box, click the AutoArchive tab.
Select Archive Items In This Folder Using The Default Settings, as shown in Figure 31-1.
Click OK.
Repeat these steps for each folder you want to archive.
By default, Outlook 2007 starts AutoArchive every 14 days and archives your data in the selected folder to the Archive.pst personal folders file.
Note
For information about changing the default AutoArchive settings, see "Configuring Automatic Archiving" later in this chapter.
You can also specify custom AutoArchive settings for a folder. Open the Properties dialog box for the folder, click the AutoArchive tab, and then select the Archive This Folder Using These Settings option. Then specify settings on the AutoArchive tab as desired for the folder. See the section "Configuring Automatic Archiving" later in this chapter for details about each of the available settings.
From this point on, the folder for which you have enabled automatic archiving will be archived when Outlook 2007 performs its next automatic archive operation. However, you can also initiate an archive operation any time you need. The next section explains how.
You can archive data not only automatically but also manually—for example, before leaving on vacation or when you need to move your files to a new machine.
To archive data manually, perform these steps:
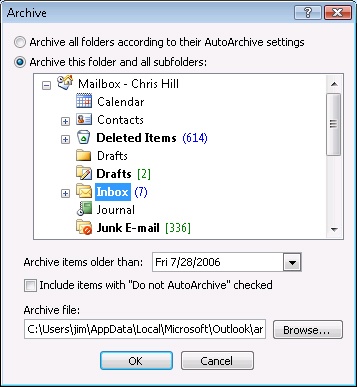
Choose File, Archive.
In the Archive dialog box, shown in Figure 31-2, select one of the following options:
Archive All Folders According To Their AutoArchive Settings. Use this option to archive all folders using preset AutoArchive settings. When you select this option, the remaining options in this dialog box become unavailable. Go to step 7.
Archive This Folder And All Subfolders. Select this option if you want to archive individual folders and their subfolders. Go to step 3.
Select the folder you want to archive. If the folder includes subfolders, those folders are archived as well.
In the Archive Items Older Than drop-down list, specify the latest date from which Outlook 2007 should start archiving data. For instance, if you want to archive data older than today’s date, select that date. Otherwise, all your data in the selected folder will not be archived.
If you have specified that a folder should not be archived automatically but you want to archive this folder now, select the Include Items With "Do Not AutoArchive" Checked check box.
To change the personal folders file that will store your archive, click Browse, and then specify the file and folder where the archive will be stored. You also can type the path and file name in the Archive File box if you know this information.
Click OK.
Outlook 2007 begins archiving your data. If the folder contains a large amount of data, archiving might take several minutes (or longer, depending on the speed of your computer and other factors). You can watch the status of the archiving by looking at the right side of the Outlook 2007 status bar. When the process has finished, the Archive.pst file (or whichever archive file you specified in step 6) will contain the data that Outlook 2007 just archived.
Suppose that you’ve worked on a project for six months and you’ve been diligent about archiving messages and other items from the project. You come into work one day and find that your system has failed and Outlook 2007 has lost all your data. You need the archived data to get back all your lost information and continue working. How do you get it back?
You can restore data from an archive file in two ways: drag items from a .pst file to a folder, or import a .pst file.
The following steps show you how to drag data from a .pst file:
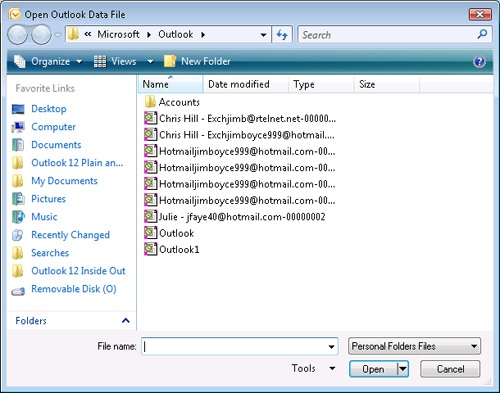
After restoring your computer and, if necessary, reinstalling Outlook 2007, choose File, Open, Outlook Data File to open the Open Outlook Data File dialog box, shown in Figure 31-3.
Select the file that contains the archived items you want to restore.
Click OK. The archive folder (named Archive Folders by default) now appears in your folder list.
Click the plus sign (+) next to Archive Folders (or the name you’ve given this folder) to expand the folder. Expand subsequent folders if necessary until your data is in the pane on the right.
Drag the folder or item to the original folder in which the data was stored.
Continue dragging items until they all are restored. To drag multiple items at one time, hold down the Ctrl key, select the items, and then drag them to the destination.
To restore items by importing a .pst file, follow these steps:
Choose File, Import And Export to open the Import And Export Wizard.
Select Import From Another Program Or File, and then click Next.
Select Personal Folder File (.pst), and then click Next.
On the Import Personal Folders page, shown in Figure 31-4, type the name of the file you want to import in the File To Import box, or click Browse to locate the file using the Open Personal Folders dialog box.
Select one of the following import options pertaining to duplicate data:
Replace Duplicates With Items Imported. Replaces duplicate items that might be in your folders during import.
Allow Duplicates To Be Created. Lets Outlook 2007 create duplicates in the destination folders.
Do Not Import Duplicates. Outlook 2007 will not create duplicate items.
Click Next.
Select the folder from which you want to import data.
If the archived folder includes subfolders you want to import as well, select the Include Subfolders option.
To filter data, click Filter. You can filter by using search strings, Structured Query Language (SQL), and other advanced querying methods. Click OK after filling in your filter information.
Select one of the following destination options:
Import Items Into The Current Folder. Select this option to import data into the current folder—that is, the folder currently selected.
Import Items Into The Same Folder In. Choose this option to import data into the destination folder of the same name as the source folder (such as from the Inbox to the Inbox). Then, in the drop-down list under this last option, select the destination personal folders or mailbox.
Click Finish.

Outlook 2007 displays a window showing you the progress of the import process. The archive folder appears in the folder list (if the folder list is open), but it is removed when the operation is completed.