
Not too many years ago, a person with an Internet e-mail address was the exception rather than the rule. Today, however, it seems as though everyone is using Internet e-mail. So it’s a good bet that you’ll want to use Microsoft® Office Outlook® 2007 to send and receive messages through at least one Internet e-mail account.
This chapter focuses on setting up Office Outlook 2007 to access Internet mail servers and accounts. The chapter also covers topics related to sending and receiving Internet e-mail. You’ll learn how to create Internet e-mail accounts, use multiple accounts, and work with e-mail accounts for services such as Microsoft Hotmail® and CompuServe. You’ll also learn how to ensure that your messages are available from different locations, what to do if your e-mail service won’t accept outgoing mail from your dial-up location, and how to view full message headers in Internet e-mail.
Note
This chapter assumes that your system is already set up to connect to the Internet, either on a broadband connection such as a local area network (LAN), Digital Subscriber Line (DSL), or cable modem or by a dial-up connection. Whatever the situation, your Internet service provider (ISP) or network administrator has likely set up the connection for you. This chapter instead focuses on configuring Outlook 2007 to use the existing connection and setting up specific types of accounts.
Note
For help in creating e-mail accounts and assigning the dial-up connection, see "Configuring Accounts and Services" in Chapter 3.
Most Internet-based e-mail servers use Simple Mail Transfer Protocol (SMTP) and Post Office Protocol 3 (POP3) to allow subscribers to send and receive messages across the Internet. (A few exceptions, such as CompuServe 2000, use Internet Message Access Protocol [IMAP]; still other services, such as Hotmail and Yahoo!, use Hypertext Transfer Protocol [HTTP]. These other protocols are covered later in this chapter.) If you have an account with a local ISP or other service provider that offers POP3 accounts, or if your office server is a non–Microsoft Exchange Server system that supports only POP3, you can add an Internet e-mail account to Outlook 2007 to access that server.
Follow these steps to add an Internet e-mail account to Outlook 2007:
With Outlook 2007 open, choose Tools, Account Settings in Outlook 2007 to add an e-mail account.
Accept the default selection Microsoft Exchange, POP3, IMAP, or HTTP, and then click Next.
To use the automatic discovery feature to automatically obtain your server configuration information from your existing e-mail server, on the Auto Account Setup page, shown in Figure 7-1, specify the following information:
Your Name. Specify your name as you want it to appear in the From box of messages you send.
E-Mail Address. Enter your e-mail address in the form <user>@<domain.tld>, where <user> is your user account screen name and <domain.tld> is the name of your e-mail domain.
Password/Retype Password. Type your password in the Password field, and then confirm the password in the Retype Password field.
Enter your name, e-mail address, and password (twice) for your e-mail account, and then click Next. Outlook 2007 will try to connect to your e-mail server and obtain configuration information via an encrypted connection. If Outlook is able to identify your account settings, the process is complete and you can skip the remaining steps.
If your e-mail server doesn’t support encrypted connections, this attempt will fail, and you will be prompted to try an unencrypted connection.
If this attempt doesn’t complete, you will be prompted to verify the e-mail address and click Retry.
If this attempt doesn’t complete, the Problem Connecting To Server dialog box is displayed, indicating that you will need to manually configure the settings—the Manually Configure Server Settings check box will be selected automatically. Click Next to continue.
In the Choose E-Mail Service dialog box, select Internet E-Mail, and then click Next.
On the Internet E-Mail Settings page, shown in Figure 7-2, configure the following settings.
Your Name. Specify your name as you want it to appear in the From box of messages that others receive from you.
E-Mail Address. Specify the e-mail address for your account in the form <account>@<domain>—for example, [email protected].
Account Type. In the Server Information area, select the Account Type (in this case, POP3) of the e-mail server.
Incoming Mail Server. Specify the IP address or Domain Name System (DNS) name of the mail server that processes your incoming mail. This is the server where your POP3 mailbox is located and from which your incoming mail is downloaded. Often, your mail server will use the host name mail and your mail server’s domain name. So an example of a mail server DNS name might be mail.tailspintoys.com. However, this isn’t a given rule, so check with your ISP or network administrator for the correct mail server host name.
Outgoing Mail Server (SMTP). Specify the IP address or DNS name of the mail server that you use to send outgoing mail. In many cases, this is the same server as the one specified for incoming mail, but it can be different. Some organizations and many ISPs separate incoming and outgoing mail services onto different servers for load balancing, security, or other reasons.
Note
Many mail servers will not allow outgoing mail unless you connect using the mail server’s own network.To learn how to overcome that problem, see the troubleshooting sidebar "Troubleshooting," later in this chapter.
User Name. Specify the user account on the server that you must use to log on to your mailbox to retrieve your messages. In some cases, you should not include the domain portion of your e-mail address. For example, if your address is [email protected], your user name is chill. However, there are mail servers (MSN® and Netscape, for example) that require the full e-mail address as the user name to log on.
Password. Specify the password for the user account entered in the User Name box.
Remember Password. Select this option to have Outlook 2007 maintain the password for this account in your local password cache, eliminating the need for you to enter the password each time you want to retrieve your mail. Clear this check box to prevent other users from downloading your mail while you are away from your computer. If the check box is cleared, Outlook 2007 prompts you for the password for each session.
Require Logon Using Secure Password Authentication (SPA). Select this option if your server uses SPA to authenticate your access to the server.
Click More Settings to display the Internet E-Mail Settings dialog box, shown in Figure 7-3. You can configure these settings based on the information in the following sections.


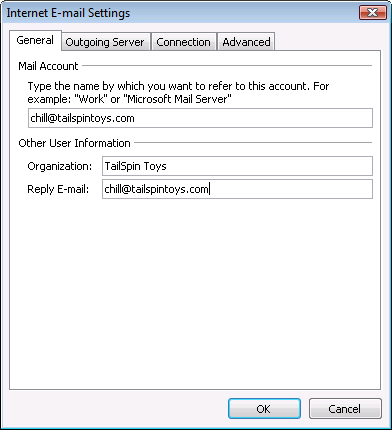
Use the General tab in the Internet E-Mail Settings dialog box (shown earlier in Figure 7-3) to change the account name that is displayed in Outlook 2007 and to specify organization and reply address information as follows:
Mail Account. Specify the name of the account as you want it to appear in the Outlook 2007 account list. This name has no bearing on the server name or your account name. Use the name to differentiate one account from another—for example, you might have various accounts named CompuServe, Work, and Personal.
Organization. Specify the group or organization name that you want to associate with the account.
Reply E-Mail. Specify an e-mail address that you want others to use when replying to messages that you send with this account. For example, you might redirect replies to another mail server address if you are in the process of changing ISPs or mail servers. Enter the address in its full form—[email protected], for example. Leave this option blank if you want users to reply to the e-mail address that you specified in the E-Mail Address box for the account.
Use the Outgoing Server tab, shown in Figure 7-4, to configure a handful of settings for the SMTP server that handles the account’s outgoing messages. Although in most cases you won’t need to modify these settings, you will have to do so if your server requires you to authenticate to send outgoing messages. Some ISPs use authentication as a means of allowing mail relay from their clients outside their local subnets. This allows authorized users to relay mail and prevents unauthorized relay or unauthorized users from sending spam through the server.
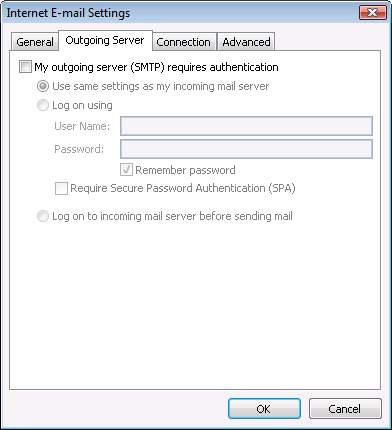
Figure 7-4. Use the Outgoing Server tab to configure authentication and other options for your SMTP server.
The Outgoing Server tab contains the following options:
My Outgoing Server (SMTP) Requires Authentication. Select this option if the SMTP mail server that processes your outgoing mail requires authentication. Connections that don’t provide valid credentials are rejected. Selecting this option makes several other options on the tab available.
Use Same Settings As My Incoming Mail Server. Select this option if the SMTP server credentials are the same as your POP3 (incoming) server credentials.
Log On Using. Select this option if the SMTP server requires a different set of credentials from those required by your POP3 server. You should specify a valid account name on the SMTP server in the User Name box as well as a password for that account. In general, you will have to change this setting only if your SMTP and POP3 servers are separate physical servers.
Remember Password. Select this check box to have Outlook 2007 save your password from session to session. Clear the check box if you want Outlook 2007 to prompt you for a password each time.
Require Secure Password Authentication (SPA). Select this check box if your server uses SPA to authenticate your access to the server.
Log On To Incoming Mail Server Before Sending Mail. Select this option to have Outlook 2007 log on to the POP3 server before sending outgoing messages. Use this option if the outgoing and incoming mail servers are the same server and if the server is configured to require authentication to send messages.
Use the Connection tab, shown in Figure 7-5, to specify how Outlook 2007 should connect to the mail server for this Internet account. You can connect using the LAN (which includes DSL and cable modem broadband connections), a dial-up connection, or a third-party dialer such as the one included with Microsoft Internet Explorer®.
Connect Using My Local Area Network (LAN). Select the LAN option if your computer is hard-wired to the Internet (LAN, DSL, cable modem, or other persistent connection).
Connect Via Modem When Outlook Is Offline. If you use a shared dial-up connection to access the Internet, select this check box if you want Outlook 2007 to attempt a LAN connection first, followed by a dial-up connection if the first attempt fails (for example, when your notebook PC is disconnected from the LAN but a dial-up connection is available).
Connect Using My Phone Line. Select this option if you are using a dial-up connection as your default mode of connecting to the Internet or other network hosting your mail server. Select this option to use an existing dial-up networking connection or to create a new dial-up connection. Select the connection from the drop-down list, and then click Properties if you need to modify the dial-up connection. Click Add if you need to add a dial-up connection.
Connect Using Internet Explorer’s Or A 3rd Party Dialer. Select this option if you want Internet Explorer or another phone dialer application to dial your connection to the network hosting your mail server. If you want to connect to the Internet or to your remote network using the dialer that is included with Internet Explorer or a dialer that is included with a third-party dial-up client, select this option.
Use The Following Dial-Up Networking Connection. Select the modem profile to use when dialing your ISP connection.

Although you won’t normally need to configure settings on the Advanced tab for an Internet account, the settings can be useful in some situations. You can use the options on the Advanced tab, shown in Figure 7-6, to specify the SMTP and POP3 ports for the server, along with time-outs and these other settings.
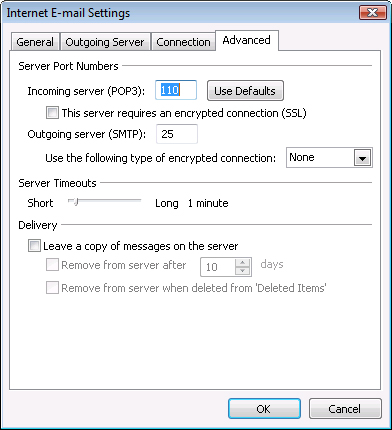
Incoming Server (POP3). Specify the TCP port used by the POP3 server. The default port is 110. Specifying a nonstandard port works only if the server is listening for POP3 traffic on the specified port.
Outgoing Server (SMTP). Specify the TCP port used by the SMTP server for outgoing mail. The default port is 25. Specifying a nonstandard port works only if the server is listening for SMTP traffic on the specified port.
Use Defaults. Click this button to restore the default port settings for POP3 and SMTP.
Use The Following Type Of Encrypted Connection. If your server requires an encrypted connection, use this drop-down list to select the correct type of encryption method—either SSL, TLS, Auto, or None. Select SSL if the server requires the use of a Secure Sockets Layer (SSL) connection, TLS if it requires Transport Layer Security (TLS), and Auto if you want Outlook 2007 to autonegotiate encryption with the mail server. With rare exceptions, public POP3 and SMTP mail servers do not require SSL connections.
Server Timeouts. Use this control to change the period of time that Outlook 2007 will wait for a connection to the server.
Leave A Copy Of Messages On The Server. Select this check box to retain a copy of all messages on the server, downloading a copy of the message to Outlook 2007. This is a useful feature if you want to access the same POP3 account from different computers and want to be able to access your messages from each one. Clear this check box if you want Outlook 2007 to download your messages and then delete them from the server. Some servers impose a storage limit, making it impractical to leave all your messages on the server.
Remove From Server After n Days. Select this check box to have Outlook 2007 delete messages from the server a specified number of days after they are downloaded to your system.
Remove From Server When Deleted From ‘Deleted Items’. Select this option to have Outlook 2007 delete messages from the server when you delete the downloaded copies from your local Deleted Items folder.
When you create a POP3 account, Outlook 2007 needs to know where to store your mail folders. By default, Outlook 2007 stores your POP3 mail folders in whatever location is currently specified as the default delivery location for new mail. For example, if you already have an Exchange Server account with the Exchange Server mailbox designated as the location for e-mail delivery, Outlook 2007 uses the same mailbox location for POP3 mail. Where Outlook 2007 stores the folders also depends on the other services, if any, that you’re using with Outlook 2007. The following list summarizes the possibilities:
POP3 only or as a first account. When you set up a POP3 account as your only Outlook 2007 e-mail account or as your first account, Outlook 2007 creates a personal folder (.pst) file in which to store your POP3 e-mail folders. Outlook 2007 uses the same .pst file to store your other Outlook 2007 data, such as contacts and calendar information.
POP3 added to a profile with an existing Exchange Server account. In this scenario, Outlook 2007 uses the e-mail delivery location specified for your Exchange Server account as the location to deliver POP3 mail. For example, if you currently store your Exchange Server data in your Exchange Server mailbox on the server, your POP3 messages will be placed in your Exchange Server mailbox. In effect, this means that your POP3 messages are downloaded to your computer from your Internet mail account and then uploaded to your Exchange Server mailbox. If you specify a local folder for Exchange Server instead, Outlook 2007 places your POP3 messages in that same local folder.
POP3 added after an IMAP account. IMAP accounts are stored only in .pst files, and Outlook 2007 automatically creates a .pst file for the IMAP account. (The file is created when you first open Outlook 2007 using the profile that contains the IMAP account.) Outlook 2007 also creates a .pst file for storing your other Outlook 2007 data, keeping your IMAP data and other Outlook 2007 data separate. Outlook 2007 designates a .pst file as the default location for new mail, even though messages from your IMAP account are delivered to your IMAP-specific .pst file. If you later create a POP3 account, Outlook 2007 uses the same .pst file for your POP3 account by default. This means that your IMAP folders and mail are kept separate from your POP3 and Exchange Server mail. You can change the settings afterward if you want to designate a different file for storing your POP3 messages, but doing so also changes the location of your Contacts folder, Calendar folder, and other Outlook 2007 folders.