
The most basic calendar item is the one-time appointment. You can create a one-time appointment in several ways:
If the Calendar folder is not open, choose File, New, Appointment or click the arrow next to New on the toolbar and then choose Appointment. The appointment defaults to the next full 30 minutes.
If the Calendar folder is open, select a time in the calendar and then click New on the toolbar, or alternatively, right-click the calendar and choose New Appointment. The appointment is scheduled for the time selected in the calendar.
Right-click a date in Month view, and then choose New Appointment. The appointment defaults to your specified start-of-workday time and runs for 30 minutes.
When you take any of these actions, Outlook 2007 opens the appointment form, shown in Figure 20-9, where you can specify information for the new item.
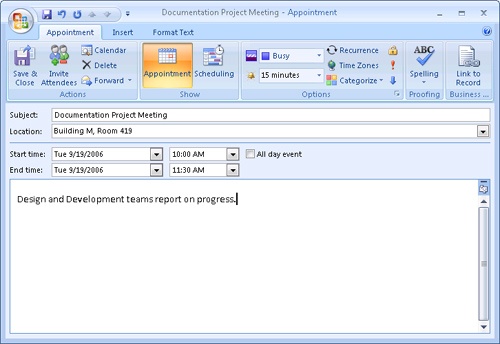
Type the subject of an appointment in the Subject box at the top of the appointment form. Make the subject as descriptive as possible because it will appear on the calendar.
If you want, you can type a location for the appointment in the Location box. To view a list of all previously typed locations, click the Location drop-down arrow; you can select a location in this list. Outlook 2007 will display the location you specify next to the appointment subject in Calendar view (and in parentheses next to the subject in ScreenTips when you hover the mouse pointer over the scheduled appointment).
You set the start and end times of the appointment by typing the date and time in the Start Time and End Time boxes or by clicking the drop-down arrows beside each box. If you click a drop-down arrow for a date, a calendar appears. Click a drop-down arrow for time, and a list of potential start and end times in 30-minute increments appears. The End Time drop-down list shows how long the appointment will be for each given end time. You can also click in these fields and type a value. For example, you might use this method when you want to create a 15-minute appointment when Outlook 2007 is set to use a 30-minute default appointment duration. If you select an appointment time that conflicts with another appointment, a bar above the Subject line will display the message "Conflicts with another appointment on your Calendar."
You can set a reminder for an appointment by clicking the Reminder arrow in the Options group on the Appointment tab. In the Reminder drop-down list, you can specify when the reminder should appear; the default is 15 minutes before the appointment. By default, a reminder both plays a sound and displays a reminder window, as shown in Figure 20-10. If you don’t want the reminder to play a sound, or if you want to use a different sound, click the Sound option at the bottom of the Reminder drop-down list to change the settings.

Outlook 2007 uses color and patterns to indicate free/busy information for appointments. In the calendar itself, Outlook 2007 does not show an indicator next to appointments marked Busy. It uses the following bars at the left edge of the appointment to indicate status:
Free (white)
Tentative (shaded with diagonal lines)
Out Of Office (shaded dark purple)
Note
When you are scheduling a meeting or viewing a group schedule, Outlook 2007 shows busy time using a blue bar.
The indicator (a small bar to the left of the appointment) appears on your local calendar and is also displayed when other users view the free/busy times for that calendar. By default, the time occupied by an appointment is classified as Busy. To reclassify an appointment, select the indicator in the Show As drop-down list in the Options group, as shown in Figure 20-11.

Sometimes an appointment requires more detail. You might need to remind yourself about documents that you need to bring to the appointment, or perhaps you need to write down directions to an unfamiliar location. When that’s the case, you can add a note by typing your text in the large text area of the form, as shown in Figure 20-12.

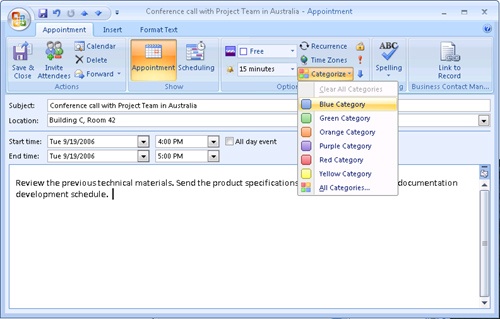
Assigning a category to an appointment is simply another method of organizing your information. Outlook 2007 provides a number of default categories associated with colors, and you can customize the names for each category. The color association enables you to more easily identify the categories of appointments within your calendar. You can create additional categories as desired and associate each with a specific color. Outlook 2007 allows you to categorize your appointments so that you can then filter or sort them before viewing. In this way, you can get an overview of all Outlook 2007 items based on a particular category. For example, you could view all appointments, meetings, messages, contacts, and tasks that have been assigned the same category—perhaps all the items related to a specific work project or objective.
Note
For more information about working with categories in Outlook 2007, see Chapter 5.
To assign a category to an appointment, click Categorize in the Options group of the appointment form. To assign a single category to the appointment, simply select the category in the drop-down list, as shown in Figure 20-13. To select multiple categories, modify existing categories, or create new categories, select the All Categories option at the bottom of the drop-down list.
When you select All Categories, the Color Categories dialog box is displayed, as shown in Figure 20-14, enabling you to manage the categories. In this dialog box, you can select one or more categories and then click OK to assign them to the appointment. You can also rename or delete any of the existing categories and change the color association, as well as assigning a shortcut key for each category.

You can save an appointment in several ways. The most basic method is to click the Save & Close button on the Ribbon. This saves the appointment in the Calendar folder and closes the appointment form. If you want to save the appointment but keep the form open, click the Microsoft Office Button, and then click Save.
A more complex way to save appointments allows them to be transferred to other users (who might or might not use Outlook 2007) and opened in other applications. To save your appointments in any of a number of file formats, click the Microsoft Office Button, and then choose Save As to display the Save As dialog box, shown in Figure 20-15.
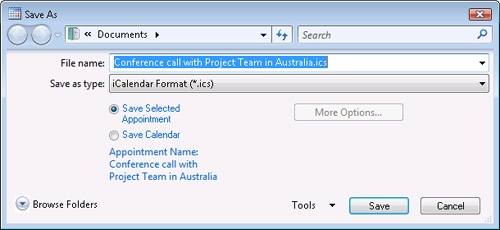
Figure 20-15. You can save your appointment in any of several formats so that the appointment can be opened with another application. You can also save the calendar or any date range portion of it.
The following formats are available:
Rich Text Format and Text Only. These formats save the appointment in a file that text editors can read. Figure 20-16 shows an example of an appointment saved in Rich Text Format and then opened in WordPad.
Outlook 2007 Template. This format allows you to save an appointment and use it later to create new appointments.
Outlook Message Format. Saving an appointment in this format is almost the same as saving an appointment to the calendar, except that the appointment is saved in a file in case you want to archive the file or move it to another installation of Outlook 2007. You can view the file in Outlook 2007, and the data appears as it would if you had opened the item from the calendar.
iCalendar Format and vCalendar Format. These formats are used to share schedule items with people who use applications other than Outlook 2007. iCalendar is a newer version of the standard (maintained by the Internet Mail Consortium) and should be used if possible.

To change an appointment to an event, select the All Day Event check box on the appointment form. When an appointment is converted to an event, the start and end times are removed and only the start and end dates are left because events by definition last all day. The event appears in the banner area of the calendar.