
If you are just starting to organize your business information in electronic format, you probably have to enter most of it manually in Business Contact Manager—creating contacts, accounts, and sales opportunities yourself. If you’ve been using other solutions to keep track of this information and now want to move to Business Contact Manager, you can import data from those other applications to Business Contact Manager and save quite a bit of time.
Business Contact Manager can import data from other applications. You can import data from Act!, Excel 2007, Microsoft Office Access 2007, Microsoft List Builder Contacts, Microsoft Sales Leads, QuickBooks, Outlook Contacts, other Business Contact Manager databases, or any application that can export to a comma-separated value (.csv) file. All options except the Act! 4.0, 5.0 Database option prompt you to specify a file from which to import. Importing from Act! requires that you have Act! installed on your computer.
To import data, choose Business Contact Manager, Database Tools, Import And Export to open the Business Data Import And Export Wizard. Click Import a File and click Next. Choose the data source (see Figure 19-37) and click Next.

The following example imports contacts from an Office Access 2007 database:
Choose Business Contact Manager, Database Tools, Import And Export to open the Business Data Import And Export Wizard. Click Import A File and click Next.
Choose Access Database and click Next; then click Browse to locate and select the Access 2007 database (.mdb or .accdb) file containing your contact list and click Open. Specify how you want duplicates handled, and then click Next.
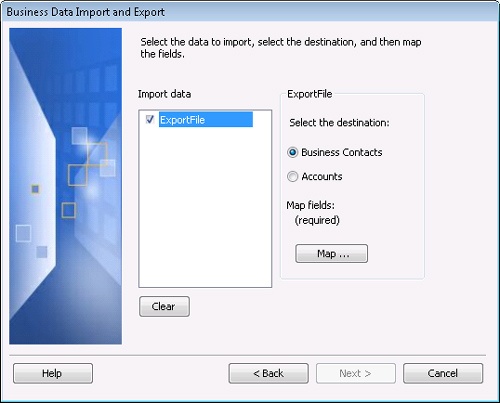
In the Business Data Import And Export Wizard page, shown in Figure 19-38, select the table from which you want to import data, select Business Contacts as the destination to import the contacts as business contacts, or choose Accounts to import the contacts as accounts.
You also have to map the fields in the Access 2007 database to the related fields in the Business Contacts database. Click Map to open the Map Fields dialog box, shown in Figure 19-39. Fields that have the same name in the Access 2007 database and the Business Contacts database will automatically be mapped. To map outstanding fields, drag the fields from the left pane to the right pane, dropping them on the fields to which you want them mapped. For example, drag the Job-Title field in the left pane to the Job Title field in the right pane for a contact. Ignore (do not map) those fields that you do not want imported into Business Contact Manager.
After you have mapped all the desired fields, click OK, click Next, and click Next again to start the import process.

In addition to importing contacts and accounts, you can also import a list of products and services into Business Contact Manager. Business Contact Manager imports products only from a comma-delimited (.csv) text file, which means that you must first export the data from its current location to a .csv file. It also means that you might need to tweak the existing database format before you export the data to make sure that it is in the right format. Business Contact Manager requires three fields in this sequence: Product Name, Description, and Unit Price. The database can include additional fields, but when you export the data, you must export it so these three fields (or the ones that correspond to them in your existing product database) are exported as the first three fields and in the sequence specified.
Note
To change field order in an Access 2007 table, open the table in Design view, place the cursor at the left edge of a row, and when the cursor changes to a left-facing arrow, click and drag the row into the desired position in the table.
Note
The Product And Services List dialog box does not show the Default Quantity field, but it is included in the Business Contact Manager Products And Services database and is accessible in the Add Product Or Service and Edit Product Or Service dialog boxes.
The following steps explain how to export a table from an Access 2007 database to a .csv file. For details on exporting from other applications, check the application’s Help documentation.
Open Access 2007, click More under Recent Databases, browse to and select the database that contains your products and services list, and click Open.
Right-click the products and services table and choose Copy.
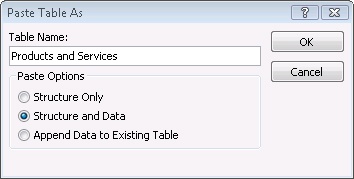
Right-click in the left pane and choose Paste to open the Paste Table As dialog box (see Figure 19-40). Enter a unique name for the table, choose Structure and Data, and click OK.
Right-click the copy of the table you created in step 3, select Design view, and adjust the order of the fields so that from top to bottom the fields are Product Name, Description, and Unit Price. Close the table and save changes to its layout.
Select the External Data page on the Ribbon and select Text File in the Export group to open the Export-Text File dialog box. Enter the file name My Products and Services.csv (or another unique file name that does not already exist) and click OK.
In the Export Text Wizard (see Figure 19-41) accept (or select) Delimited and verify that the fields are listed in the correct order without any additional fields in front of the product name field. Click Finish to accomplish the export.

Note
The default settings in Access 2007 for exporting to a .csv file are correct for exporting to Business Contact Manager. These include a quotation mark (") character as the text qualifier and a comma (,) as the field separator.
With the table exported to a .csv file, you’re ready to import the product list into Business Contact Manager by following these steps:
In Outlook 2007, choose Business Contact Manager, Product And Services Items List to open the Products And Services dialog box.
Click Import to open the Import Product And Service Items dialog box, shown in Figure 19-42.
To replace any existing product list, choose the Replace Existing List With Items In This File option. To append the incoming data to your existing Business Contact Manager products and services list, choose the Add The Items In This File To The Existing List option.
Click Browse and select the .csv file (previously created in step 5) that contains your products and services list; then click Import to import the data. The products should now appear in the Products And Services list dialog box. Click OK to close the dialog box.

With your product list now imported into Business Contact Manager, you can begin associating products with opportunities, as explained in the section "Adding Products to an Opportunity" earlier in this chapter.