
This chapter focuses on some common messaging topics related specifically to Microsoft® Exchange Server, such as recalling sent messages, setting messages to expire, and working with the Global Address List (GAL). This chapter also covers voting, which is another feature that relies on Exchange Server. Other chapters cover many topics that are more specifically applicable to the Outlook 2007 messaging capabilities. For example, see Chapter 8, to learn about message composition, replies, and using send/receive groups to synchronize your Exchange Server mailbox.
When you send messages in Outlook 2007 while connected to Exchange Server, you have more options than you do when you use a regular Internet mail account—for example, you have the ability to recall messages, and you have access to a GAL.
To send a new message, you have three choices:
In the Inbox or another message folder, click the New toolbar button.
Choose File, New, Mail Message.
Click the arrow next to the New toolbar button, and then choose Mail Message.
Whichever method you use, a new message form opens, as shown in Figure 42-1.

Figure 42-1. Write a message and choose the options for this message using the standard message form.
You can designate the recipients of your message in two ways. The first method is to click To or Cc (or Bcc) to open the Select Names dialog box, shown in Figure 42-2. By default, the GAL is displayed.

The GAL contains all users in the entire organization, except those who are explicitly hidden. An Exchange administrator can define other address lists on the computer running Exchange Server to filter addresses by any criteria, such as location, name, or department.
To add a message recipient, select the recipient in the list, and then click To, Cc, or Bcc. Double-click a recipient in the To, Cc, or Bcc field to view the recipient’s properties so that you can verify his or her contact information.
One of the most useful features of the Select Names dialog box is the Find feature. Click Advanced Find to open the Find dialog box, shown in Figure 42-3. You can search the address book by any of the criteria shown, such as Title, Company, or Department. The ability to search the address book is most useful when you have a large organization and no additional address lists are defined.

The second way to add recipients to a message is the simplest: Type the recipient’s name or alias in the To, Cc, or Bcc field on the message form. An Exchange alias is another way of referring to an account. In most cases, an alias is the same as a user’s Microsoft Windows® user name.
As soon as you finish typing a recipient’s name and move the insertion point out of the text box, Outlook 2007 checks the name. If the name is not unique or can’t be found, it is underlined in red. When this occurs, you’ll need to manually check the name.
You can also check a recipient’s name by clicking Check Names in the Names group on the Message tab on the Ribbon or by pressing Ctrl+K. When a problem arises, a Check Names dialog box appears, indicating whether the name is not unique or not found. When the name is not unique, all matches are displayed so that you can make a selection.
When you set the level of importance for a message, an icon indicating the level is displayed by default in the mailbox folders of the message recipients (although they can remove the Importance field from their message window). By default, messages are sent with normal importance and display no icon. Messages designated with a high importance level have a red exclamation mark, and messages with low importance are displayed with a blue down arrow.
You can set the importance level (or priority level) of a message in two ways. You can click either the red exclamation mark or the blue down arrow in the Options group on the Message tab on the Ribbon, shown in Figure 42-4. If you click either button again, the message returns to normal importance. You can also click the small Message Options button in the Options group on the Message tab to open the Message Options dialog box, shown in Figure 42-5, and then make your selection in the Importance drop-down list.
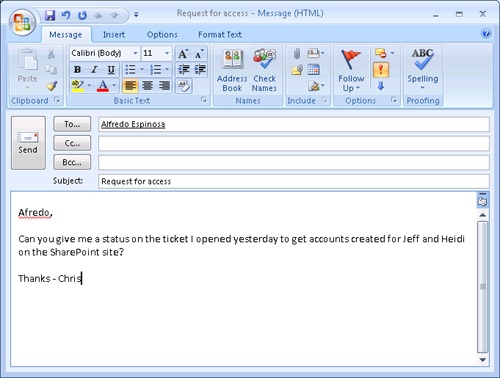
Figure 42-4. Click the High Importance button in the Options group on the Message tab to set the priority of a message.

Message sensitivity, like message importance, appears as a flag on the message that the recipient sees. By default, message sensitivity is not shown in the Outlook 2007 message folder views. (You can add it to the view, of course, by choosing View, Current View, Customize Current View, clicking the Fields button, and then configuring options in the Show Fields dialog box.) However, if the message sensitivity is set to other than Normal (the default), Outlook 2007 displays the sensitivity level when the message is opened or viewed in the Reading Pane. You can set one of four levels of sensitivity—Normal, Personal, Private, or Confidential—in the Sensitivity drop-down list in the Message Options dialog box (shown in Figure 42-5).
If for some reason you don’t want to receive the reply to your message, you can have the reply sent to someone else.
To redirect a reply, follow these steps:
With the message form open, click the Message Options button in the Options group on the Message tab to open the Message Options dialog box.
Select the Have Replies Sent To check box; your name (the sender) is added as a recipient in the text box.
Delete your name from the text box, and either type each recipient’s name (separated by semicolons) or click Select Names to select the names from the address book. Select each name in the list, click Reply To, and then click OK to have Outlook 2007 add those names to the Have Replies Sent To box. Click Close to save these options.
Each recipient listed in the Have Replies Sent To box receives any replies to the selected message. Figure 42-5, shown earlier, shows the Message Options dialog box with redirected replies.
Delivery and read receipts are useful tracking features. The delivery receipt is sent to you when the message is delivered. The read receipt is sent when the message’s status changes from unread to read. (This status can change automatically in the Reading Pane, when the recipient opens the message, or when the recipient right-clicks the message and chooses Mark As Read.) Delivery and read receipts are not supported on all mail clients. Most mail clients that do support them allow the recipient to choose not to send receipts, so you can’t always rely on these receipts to confirm what you need to know. Figure 42-6 shows an example of a delivery receipt.

To set a delivery receipt, a read receipt, or both for a message, follow these steps:
In the message form, click the Message Options button in the Options group on the Message tab to open the Message Options dialog box, shown in Figure 42-7.
Select the Request A Delivery Receipt For This Message check box, the Request A Read Receipt For This Message check box, or both.
Click Close.

You can set up your mail to request delivery and read receipts by default for each message you send out. To do so, follow these steps:
In Outlook 2007, choose Tools, Options to open the Options dialog box.
On the Preferences tab, click E-Mail Options, and then click Tracking Options to open the Tracking Options dialog box.
In the For All Messages I Send, Request area, select Read Receipt, Delivery Receipt, or both.
Click OK three times to close the three dialog boxes.
Note
In the Tracking Options dialog box, you can prevent Outlook 2007 from sending read receipts to the senders of messages you receive (by selecting the Never Send A Response option). You can also direct Outlook 2007 to move any receipts to a specified folder (by selecting the After Processing, Move Receipts To option).
By default, Outlook 2007 saves messages you send by placing copies of the messages in the Sent Items folder. New outgoing messages are also saved to the Drafts folder every three minutes. To specify how new, unsent messages should be automatically saved, follow these steps:
Choose Tools, Options.
On the Preferences tab, click E-Mail Options, and then click Advanced E Mail Options.
Select the folder in which unsent items should be saved in the AutoSave Items In drop-down list, turn AutoSave on or off, and set the AutoSave interval.
Click OK to close each of the dialog boxes.
When a message is sent, it is delivered immediately by default. You can, however, delay message delivery until a specified time for an individual message. To do so, click the Message Options button in the Options group on the Message tab to open the Message Options dialog box. Select the Do Not Deliver Before check box, and then set the date and time using the drop-down lists. Because delayed sending is a feature of Exchange Server, you can exit Outlook 2007 as soon as you click Send—the message will wait in your Outbox on the server until the delivery time arrives.
Just as you can delay the delivery of a message, you can also set a message to expire. The message expires and is removed from the recipient’s mailbox after a specified period of time whether or not it has been read. You might want to have a message expire if its contents become outdated after a certain amount of time, or if you want to ensure that the message is deleted. To set this option, open the Message Options dialog box, select the Expires After check box, and then set a date and time. The message will no longer be available to the recipient after that time.
Note
The capability to set a message to expire is not a security feature but simply causes the message to be deleted after the specified period. Use Information Rights Management (IRM), covered in Chapter 14, to prevent messages from being forwarded, copied, or printed.
You assign a category to a message by clicking Categories in the Message Options dialog box and then choosing a color category. These categories can be used for sorting, grouping, and filtering messages.
Note
For complete information about assigning and working with categories, see Chapter 5.