
A standard form is a great point of departure for developing a custom solution. For example, have you ever sent an e-mail message with an attached document to someone and forgotten to include the attachment? In a large company, this rather common error could amount to hundreds, if not thousands, of extra e-mail messages being sent each day as users send follow-up messages containing the omitted attachments. If the attachment was a document needed for review, there is the potential for significant time loss as well. By adding a small script to the standard mail message form, you can avoid this problem. You can programmatically assess whether an attachment has actually been added to the e-mail message and prompt the user to add one if needed.
To begin working with the standard forms, click Tools, Forms, and then select Design A Form to display the Design Form dialog box, shown in Figure 28-2. You can simply select one of the standard forms listed in this dialog box and begin working with the form in design mode. Later sections in this chapter discuss how to save and publish the forms you modify or create.

One of the most basic processes in Outlook 2007 is sending and receiving messages and documents. Although this is a fairly simple process, it requires a close look. In nearly all cases, the form a sender employs to compose an e-mail message is not the exact form that the receiver of that message uses to read the message. For example, although a user can edit the Subject field when composing a message, the recipient can’t, under normal circumstances, edit the subject. This is because the standard forms have Compose and Read areas.
Figure 28-3 shows a message being composed; Figure 28-4 shows the same message after it has been received.


Figure 28-4. Here is the same message shown in Figure 28-3, after it has been received. Notice that some fields can no longer be modified.
Notice that some of the fields, such as Subject and To, can’t be modified by the recipient in the Read version. It is, however, entirely possible to configure a form with identical Compose and Read areas. Whether this makes sense for your Outlook 2007 solution is up to you.
To work with a standard form, choose Tools, Forms, select Design A Form to display the Design Form dialog box (shown earlier in Figure 28-2), and then select a Message type form. When you’re working with a standard form in design mode, you can switch between the Compose and Read pages by clicking the Edit Compose Page and Edit Read Page buttons in the Design group on the Developer tab. You can select these options by clicking the arrow in the Design group, as shown in Figure 28-5, and then clicking the Edit Compose Page or Edit Read Page button.
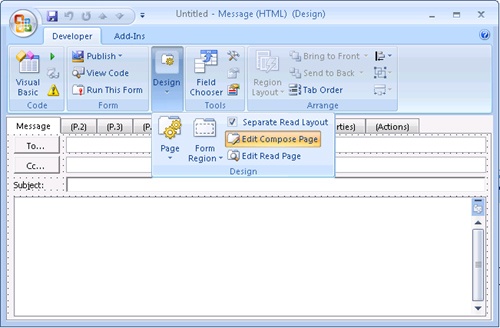
Figure 28-5. Use the Edit Compose Page and Edit Read Page buttons located in the Design group to switch between compose and read views of the form.
In Figure 28-6, the Compose page of the standard message form is ready for editing. When you click Edit Read Page, the Read area of the form appears for editing, as shown in Figure 28-7.


Because this is a standard form, a number of controls are already on the form. For example, the text box control for the body of the message is the largest element on the form. This control is bound to an Outlook 2007 field. The following section examines fields and what they mean to an Outlook 2007 solution; working with controls is discussed in "Adding and Arranging Controls" later in this chapter.
An Outlook 2007 field represents a discrete unit of information that is intelligible to Outlook 2007, such as the Bcc and To fields in an e-mail message. You don’t need to tell Outlook 2007 that e-mail messages have these fields—they are already included in the standard form. Outlook 2007 provides a number of fields that you can use, and you can also add new fields. In theory, an unlimited number of fields are available, but the most common practice is to use a generous number of the built-in fields and a judicious number of new, user-defined properties. For now, this discussion focuses on the fields already available to you.
Because it provides so many built-in fields, Outlook 2007 groups them to make it easier to find the ones you need. For example, some fields, such as To, From, Subject, Importance, Expires, Due By, Created, Size, and Attachment, are particular to e-mail messages. Other fields, such as City, Children, and Birthday, are associated with Outlook 2007 contacts. You can, however, use fields from other forms to suit your needs on any form you’re designing—for example, Outlook 2007 doesn’t prevent you from adding a Birthday field to an e-mail form.
You can find more information about user-defined fields in the Microsoft Knowledge Base article "How to Work with User-Defined Fields in Solutions in Outlook 2002," at support.microsoft.com/kb/290656. Although this article was written for an earlier version of Microsoft Outlook, the information in the article applies to later versions, including Outlook 2007.
When you work with a form, you can view the available fields in the Field Chooser, shown in Figure 28-8. To display the Field Chooser (if closed), click the Field Chooser button to the right of the Edit Read Page button; clicking this button shows or hides the Field Chooser. In the Field Chooser, the fields are organized by categories and displayed in a list. You can choose a category in the drop-down list and then search in the body of the Field Chooser for the fields you need.
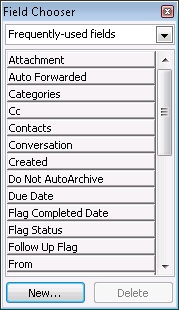
The scrollable list of fields shown in the Field Chooser in Figure 28-8 contains all the fields available for a form published in a certain folder. The standard item types come with a number of fields already defined. For example, a mail message comes with To, Subject, Body, and Sent fields already defined. Although you have the full range of fields available as you modify or create a form, you can speed your development time and decrease your effort by carefully selecting a standard form that most closely corresponds to the solution you’re developing. This way, you can leverage as many built-in fields as possible. You’ll learn how to represent these fields on your form using controls in the section "Adding and Arranging Controls" later in this chapter.