
Outlook 2007 offers a handful of settings you can use to configure the way your address books display contacts and address information. You also can add other address books and choose which address book Outlook 2007 uses by default for opening and storing addresses and processing messages.
You can set only one option for the OAB. This setting controls the order in which Outlook 2007 displays names from the OAB: either First Name, Last Name or Last Name, First Name.
Follow these steps to set this display option:
If Outlook 2007 is open, choose Tools, Account Settings, and then select the Address Books tab. If Outlook 2007 is not open, right-click the Outlook icon on the desktop or on the Start menu, choose Properties, click E-Mail Accounts, and then select the Address Books tab.
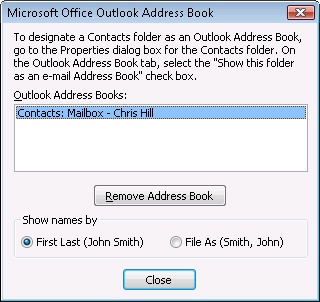
Select Outlook Address Book and click Change to display the Microsoft Office Outlook Address Book dialog box, shown in Figure 6-4.
In the Show Names By box, select the display format you prefer. Click Close, and then click Close.
In most cases, you’ll want all your Contacts folders to appear in the OAB. If you have several Contacts folders, however, you might prefer to limit how many folders appear in the OAB or you might simply want to restrict the folders to ensure that specific addresses are used.
You can set the folder’s properties to determine whether it appears in the OAB by following these steps:
Open Outlook 2007 and open the folders list (or click the Contacts button in the Navigation Pane). Then right-click the Contacts folder in question and choose Properties.
Click the Outlook Address Book tab and clear the Show This Folder As An E-Mail Address Book option to prevent the folder from appearing in the OAB.
Change the folder name, if necessary, and then click OK.
You can configure other addressing options to determine which address book Outlook 2007 displays by default for selecting addresses, which address book is used by default for storing new addresses, and the order in which address books are processed when Outlook 2007 checks names for sending messages. The following sections explain these options in detail.
To suit your needs or preferences, you can have Outlook 2007 display a different address list by default. For example, for profiles that include Exchange Server accounts, Outlook 2007 displays the GAL by default. If you use the GAL only infrequently and primarily use your Contacts folders for addressing, you might prefer to have Outlook 2007 show the OAB as the default address list instead of the GAL. Or you might want to display a filtered address list other than the GAL on the server.
Follow these steps to specify the default address list:
In Outlook 2007, choose Tools, Address Book or click the Address Book icon on the toolbar. Outlook 2007 displays the Address Book dialog box (see Figure 6-5).
Choose Tools, Options.
In the Addressing dialog box, select the default address list from the Show This Address List First drop-down list.
Click OK.

You can choose which address book you want to use for personal addresses. Although you can’t store these addresses in the GAL or other server address books, you can store them in your OAB. When you create a new address in the New Entry dialog box, Outlook 2007 suggests storing the entry in the address book you have chosen as the default. If you want to store a particular address in a different address book, you can do so by clicking the Put This Entry In The option and selecting the address book from the drop-down list (see Figure 6-6).

Note
The OAB is the default location for storing personal addresses. Keep in mind, however, that you don’t actually store addresses in the OAB itself. Instead, you store addresses in your Contacts folder, which appears as your OAB.
Follow these steps to specify the default location for storing new personal addresses:
When you create a message, you can specify the recipient’s name instead of specifying the address. Instead of typing [email protected], for example, you might type Jim Boyce and let Outlook 2007 convert the name to an address for you. This saves you the time of opening the address book to look for the entry if you know the name under which it’s stored.
When you click Send to process the message, Outlook 2007 checks the address books to determine the correct address based on the name you entered. Outlook 2007 checks names from multiple address books if they are defined in the current profile. For example, Outlook 2007 might process the address through the GAL first, then through your OAB, and then through the LDAP (assuming that all three are in the profile). If Outlook 2007 finds a match, it replaces the name in the message with the appropriate address. If it doesn’t find a match or finds more than one, it displays the Check Names dialog box, shown in Figure 6-7, in which you can select the correct address, create a new one, or open the address book to display more names and then select an address.

Figure 6-7. The Check Names dialog box helps you resolve address problems before you send a message.
Why change the order in which Outlook 2007 checks your address books? If most of your addresses are stored in an address book other than the one Outlook 2007 is currently checking first, changing the order can speed up name checking, particularly if the address book contains numerous entries.
Here’s how to change the address book order:
To quickly create a contact while you’re composing a message, type the e-mail address in the To, Cc, or Bcc field, and then press Tab. The e-mail address becomes underlined. Right-click the e-mail address and select Add To Outlook Contacts (see Figure 6-8). You can also create new contacts, distribution groups, and other types of entries from any navigation pane. To do this, select the drop-down arrow next to the New button on the main window’s Menu bar and choose the type of item to create.

You can modify any addresses stored in your own address books, as well as in the address books of other users for which you have the appropriate access. You can modify an address while working with an e-mail message or while working directly in the address book. If you’re using a message form, click To, Cc, or Bcc. Right-click the address you want to change and click Properties. If you’re working in the address book instead, just right-click the address and choose Properties. Outlook 2007 displays the same form you used to create the contact. Make the changes you want and click OK.