
Outlook 2007 provides a variety of illustration types that you can use to enhance your e-mail. You can add pictures, clip art, shapes, charts, and SmartArt (new to Outlook 2007). You control page layout, so you can place illustrations in any location in your message and then format them in a number of ways, including adding borders, shadows, and three-dimensional (3-D) effects. (Exact options vary between illustration types.) You can wrap your text around illustrations in several styles and even layer text and graphics on top of each other, using transparency effects to make everything visible.
Each type of illustration has one or more groups of commands specific to it, providing the controls needed for that kind of illustration. They also share a number of groups of commands on the Ribbon and operate in much the same way. We will examine the process of inserting a picture in some detail in the next section, describing the common commands. Following that, we will highlight the differences between the other types of illustration.
Your ability to insert graphics in a message depends in part on which message format you use. With the new Outlook 2007 editor, you can insert embedded graphics when using HTML (the default) or RTF, with minor differences in layout options. You can’t insert embedded graphics in a message that uses plain-text format.
Troubleshooting
Commands on the Design tab are missing or disabled
Commands on the Design tab might be missing or always unavailable. This is because some commands work only with certain types of illustrations or when the message uses a particular format. For example, the Group command is always shown on the Design tab, in the Arrange group, even though its use is limited to only one type of illustration: shapes. If the message is in rich-text format, the Arrange group, which controls some aspects of text and graphics layout, is not displayed at all. You can still use a subset of those commands, however, by right-clicking the image and choosing the command from the shortcut menu.
Follow these steps to insert a picture in a message:
On the Insert tab, in the Illustrations group, click Picture to display the Picture dialog box.
In the Picture dialog box, select the graphics file to insert in the message, and then click Insert. (To insert a link to the image, click the arrow next to Insert, and then select Link To File or Insert And Link.)
In the message, when the picture is selected, Outlook 2007 displays the Picture Tools Format tab with tools used to format the picture, as shown in Figure 9-19.
Figure 9-19. You can adjust the appearance of the picture as well as format how the picture is displayed in the e-mail message.
To adjust the appearance of the picture, under Picture Tools, click the Format tab, and then in the Adjust group, use the appropriate tools, as follows:
Brightness and Contrast. You can increase or decrease the brightness or contrast in 10 percent increments by selecting a value on the menu. Choose Picture Correction Options to display the Format Picture dialog box, and then set an exact amount to adjust the Brightness and Contrast settings.
Recolor. You can apply a tinted filter to the picture, changing it to be similar to a grayscale, but done with shades of a single color.
Compress Pictures. Outlook 2007 can compress the images in your e-mail messages to minimize message size. When you select Compress Picture, you are given the option of compressing one picture or all of the images in the message. You can click Options in the Compress Pictures dialog box to set the automatic compression option, choose whether to delete cropped areas of images, and determine the picture quality.
Change Picture. This option lets you replace the current image while keeping the object formatting and size settings intact.
Reset Picture. You can reset the picture to the original image as inserted from a file, discarding all changes you have made.
You can customize how the picture appears in the message by using the options in the Picture Styles group, as described here:
Quick Styles. You can choose from a number of framing and perspective options to set the overall look of the picture.
Picture Shape. Select a shape for the picture to be displayed in, and Outlook 2007 will automatically crop the image to fit. The Picture Shapes gallery contains a number of shapes in several categories, including rectangles, arrows, flowchart objects, banners, and callouts.
Picture Border. You can add an optional border around the graphic, with a specified pixel width and pattern, and using the colors from your theme or custom colors. To configure additional border settings, choose More Lines on the Weight menu to display the Format Picture dialog box, shown in Figure 9-20, and then configure the Line Style settings.
Picture Effects. You can apply a number of effects to a picture to produce just the look you want for your message. The available effects are Shadow, Reflection, Glow, Soft Edges, Bevel, and 3-D Rotation. The Preset option has some preconfigured effects that you can choose from.
You can specify how you want the image aligned in the message and how text will flow with the graphic using the options in the Arrange group. The commands operate as described here:
Bring To Front/Send To Back. These options specify which layer the picture is in.
Text Wrapping. You can choose how the text wraps relative to the picture, selecting from having the image in line with text, behind text, or in front of text or having the text only at the top and bottom of the picture or wrapped around a square. To drag a picture to a new location in the message, you must first select it and then choose either Behind Text or In Front of Text.
Align. You can line up multiple pictures (or other objects) by selecting them (using Shift-click) and then clicking Align. You can choose to align the edges or centers of the selected objects.
Group. This command is unavailable when you are working with pictures.
Rotate. You can change the orientation of the picture by selecting Rotate Right 90°, Rotate Left 90°, Flip Vertical, or Flip Horizontal. To have finer control over image orientation, choose More Rotation Options on the Rotate menu to open the Size dialog box, and then set the exact degree of rotation. (You can also resize and crop images in the Size dialog box.)
The picture can be resized and cropped with the settings in the Size group. To crop the image, select Crop, and then drag the cropping handles on the image. To resize the image, enter the new size in the Shape Height and Shape Width fields. (If Outlook 2007 is configured to constrain the aspect ratio of pictures, you need to enter only one of these options, not both.)
If you want to set Alternate Text (which is displayed in place of the picture for recipients whose e-mail clients don’t show graphics), right-click the picture, and then choose Size on the shortcut menu. In the Size dialog box, select the Alt Text tab. Enter your text in the Alternative Text box, and then click Close.
To add a hyperlink to the picture, right-click on the picture, and then choose Hyperlink on the shortcut menu. (For detailed instructions on working with hyperlinks, see "Working with Hyperlinks" later in this chapter.)


Some, but not all, of the formatting and graphical effects are cumulative, and you might have to experiment to get exactly the effect you want. As an example, Figure 9-21 shows a picture that has had a number of things done to it in order to achieve this effect. After the picture was inserted and resized, Text Wrapping was set to Behind Text. Next the Bevel Rectangle option was selected from the Quick Styles gallery to give the picture a new shape. Brightness was set to 40 percent to give the picture a semitransparent look. Last Preset 10 was applied from the Presets gallery to apply the rotation and other effects.

Inserting a clip art image launches the Clip Art task pane, which lets you search for the clip art image you want to use. You can enter search terms and specify the collections to search, as well as limit the file types that are returned in the results. Once the clip art has been inserted, under Picture Tools, on the Format tab, use the commands as described in the preceding section.
Outlook 2007 includes a library of shapes (previously called AutoShapes) from which you can select just the right one to illustrate your words. Shape types include lines, basic shapes (square, cylinder, and so on), arrows, flowchart objects, callouts, stars, and banners.
To insert a shape into a message, follow these steps:
With a message open, on the Insert tab, in the Illustrations group, select Shapes.
Choose a shape from the Shapes gallery.
Click and drag across the message where you want to create the shape.
With the shape selected, the Drawing Tools Format tab will be displayed, as shown in Figure 9-22, providing you with these options for formatting the shape:
Insert Shapes. You can select a shape to create, edit a shape, or edit text with the commands in this group.
Shape Styles. This group provides a Quick Styles gallery of frame and fill effects, shape fill, shape outline, and shape changing effects.
Shadow Effects. This group provides control over the shape’s shadow effects, toggles the shadow on or off, and lets you nudge the shadow. You can also choose the shadow color.
3-D Effects. This group contains the 3-D Effects gallery, and you can turn 3-D effects on or off and set tilting options. Menu options include 3-D Color (themes or custom), Depth (in points), Direction (perspective), Lighting (direction and type), and Surface (select a surface finish: matte, plastic, metal, or wire frame).
Arrange. This group controls how the shape is aligned in the message and how text flows with the graphic. You can move the shape to the front or back layer, control text wrapping, align multiple shapes, group shapes together, and control rotation of the shape. If the message uses RTF format, you can access the Bring To Front, Send To Back, and Text Wrapping commands by right-clicking the image and then choosing the command on the shortcut menu.
Size. This group lets you set the shape height and shape width.

When you choose a chart as the illustration type to insert, the Insert Chart dialog box opens, allowing you to select the type of chart you want to use. When you click OK, an Excel 2007 workbook is opened with a small amount of data entered. After you have entered your data, click the Microsoft Office Button, and then click Close to update the chart and return to Outlook 2007. On the Ribbon, under Chart Tools, there are three tabs with quite a few commands allowing you fine control over the appearance of your chart, as described in the following sections.
The Chart Tools Design tab contains groups of commands that let you choose the type, style, and layout of the chart as well as the data it contains, as shown in Figure 9-23.
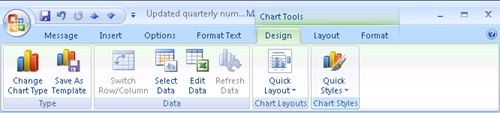
The Design tab has these groups:
Type. You can select the chart type (pie, bar, area, and so on) and save the current chart as a template.
Data. This group has commands that let you manipulate your data in Excel 2007.
Chart Layouts. You can choose from the Quick Layout gallery using various arrangements of the chart, legend, title, and other text.
Chart Styles. This group consists of a Quick Styles gallery with a selection of colors, outlines, and effects.
The Chart Tools Layout tab, shown in Figure 9-24, has groups of commands that control the appearance of many aspects of the chart such as grid, labels, and background.
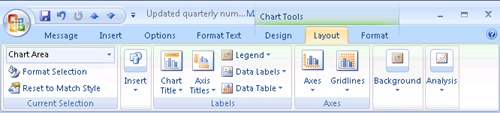
Figure 9-24. You can control the display of data and labels and add analysis tools to charts with the commands on the Chart Tools Layout tab.
The Layout tab contains these groups of commands:
Current Selection. You can select a chart element and format the selection.
Insert. You can insert a picture or shape or draw a text box inside your chart.
Labels. These commands let you turn titles, legends, and data labels on and off. You can also format the style and placement of these labels.
Axes. The Axes command controls the display of the horizontal and vertical axes; the Gridlines command does the same for the chart gridlines.
Background. You can turn on the display of a background color on the Plot Area, Chart Floor, and Chart Wall and also control the 3-D rotation of the chart.
Analysis. The commands in the Analysis group can add additional data to your charts. Each analysis option works with only certain types of charts. You can select a Trendline (most chart types), Drop Lines (area and line charts), High-Low Lines (2-D line chart), Up/Down bars (line chart), and Error Bars with Standard Error, Percentage, or Standard Deviation (most chart types).
The Chart Tools Format tab, shown in Figure 9-25, provides you with the tools you need to customize the appearance of your charts. You can control colors, styles, and effects and the page layout of your chart using these commands.
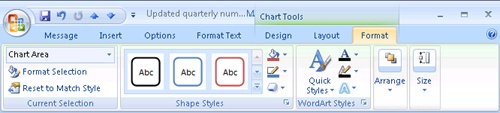
Figure 9-25. You can customize the appearance of your chart with the commands on the Chart Tools Format tab.
The Format tab contains these groups:
Current Selection. You can select a chart element and format the selection.
Shape Styles. This group provides a Quick Styles gallery with frame and fill effects, shape fill, shape outline, and shape effects options.
WordArt Styles. These commands control the text used in text labels, axes, titles, and legends. (WordArt commands are available only if a suitable chart component is selected.)
Arrange. This group contains the text wrapping, layering, and alignment commands. (This group is not available if your message is in RTF format.)
Size. This group specifies the shape height and shape width.
SmartArt is a type of reusable object designed as a means of displaying complex information in an easy-to-understand graphical format. Outlook 2007 includes a gallery of SmartArt graphics in formats that represent things such as a list, a hierarchy (like an organizational chart), a process (like a flowchart), or a relationship (such as a Venn diagram).
To insert a SmartArt graphic into a message, follow these steps:
With a message open, on the Insert tab, in the Illustrations group, select SmartArt.
In the Choose A SmartArt Graphic dialog box, shown in Figure 9-26, select a SmartArt graphic, and then click OK.

Figure 9-26. You can select the style of SmartArt graphic you want in the Choose A SmartArt Graphic dialog box.
Once the SmartArt graphic is inserted in the message, you can add text and format the graphic. The two SmartArt Tools tabs are described in the following sections.
The SmartArt Tools Design tab, shown in Figure 9-27, contains groups of commands that let you work with the SmartArt content, adding and customizing shapes and changing layout and styles.

Figure 9-27. You can work with the graphics components and layout of SmartArt using the SmartArt Tools Design tab.
The groups available on the Design tab are:
Create Graphic. You can add a shape, bullet, or text pane to the SmartArt graphic and manipulate the text layout inside the SmartArt shapes with this set of controls.
Layouts. This group lets you change the SmartArt type either from the gallery or in the Choose A SmartArt Graphic dialog box.
SmartArt Styles. You can change the colors used in the SmartArt and the effects used in the SmartArt style.
Reset. The Reset Graphic command lets you quickly remove all custom formatting from the selected object.
The SmartArt Tools Format tab, shown in Figure 9-28, has the commands you need to style the SmartArt and control its placement in the message.

Figure 9-28. You can change the appearance of the SmartArt text, frame, and background using the SmartArt Tools Format tab.
The groups available on the Format tab are:
Shapes. You can choose the shapes to use as SmartArt elements and then resize those shapes.
Shape Styles. This group provides frame and fill effects, shape fill, shape outline, and shape changing effects.
WordArt Styles. You can format the text used in SmartArt objects, selecting a style from the gallery, Text Fill, Text Outline, and Text Effects. Each of these options has additional menu selections for fine-grained control over text format.
Arrange. This group contains the text wrapping, layering, and alignment commands. (This group is not displayed when a message is in RTF format.)
Size. This group lets you specify the shape height and shape width.