
Outlook 2007 lets you share contacts with others by sending vCards through e-mail or by sharing your Contacts folder. The former method lets you share contacts with people who don’t use Outlook 2007 or who don’t have access to your network or to your Exchange Server. The latter method—sharing your Contacts folder—is a good solution when you need to provide access to contacts for others on your network. This section explains how to share contacts through vCards, offers a brief overview of sharing the Contacts folder, and explains how to share contacts from a public folder.
Note
You can use Windows SharePoint Services (WSS) to share contacts and even integrate those contacts within Outlook 2007. See Chapter 40, to learn how to work with and share contacts from a WSS site.
If you’re running Outlook 2007 with Exchange Server 2000 or later, you can assign permissions to a folder stored in your Exchange Server mailbox to give other users access to that folder. You can grant permissions on a group basis or a per-user basis. Outlook 2007 provides two groups by default—Anonymous and Default—that you can use to assign permissions on a global basis. You also can add individual users to the permissions list and use distribution lists to assign permissions.
Outlook 2007 offers two methods to set permissions on a folder. Here is the easiest method:
Open the Folder List, right-click the Contacts folder, and then choose Share Contacts.
Outlook 2007 displays a Sharing Invitation message, as shown in Figure 18-26, on the next page.
Click To, and then select the people to whom you want to grant access.
If you also want to request access to the recipients’ calendars, select the Request Permission To View Recipient’s Contacts Folder check box.
Click Send.
Outlook 2007 prompts you to confirm that you want to grant Reviewer (read-only) access to the folder. Click Yes.

The message that the recipients receive informs them that they have been granted access to the folder and can click Open in the message header to open your Contacts folder in Outlook, as shown in Figure 18-27.

Figure 18-27. Users who receive the sharing message can simply click Open This Contacts Folder in the message header to open the shared folder.
You can also set permissions directly on the folder, which is useful when you want to specify permissions other than Reviewer. Follow these steps to set permissions on your Contacts folder to allow other users access to your contacts:
Open the Folder List, right-click the Contacts folder, and then choose Properties on the shortcut menu to display the Contacts Properties dialog box for the folder.
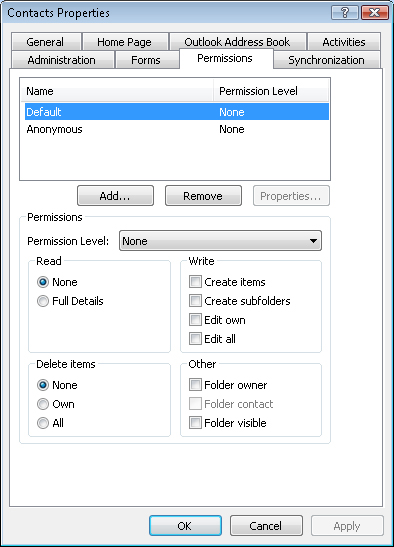
Click the Permissions tab, as shown in Figure 18-28.
Click Add to display the Add Users dialog box.
Select the person for whom you want to configure permissions, and then click Add. Click OK to return to the Permissions tab.
In the Name box, select the name of the person you just added.
In the Permission Level drop-down list, select a level of permission according to the tasks that the user should be able to perform with your Contacts folder. When you select a permission level, Outlook 2007 selects one or more individual permissions in the Permissions area. You also can select or clear individual permissions as needed.
Click OK to save the permission changes.
You can grant several permissions for a folder, and you can assign them in any combination you need. See "Sharing Your Calendar" in Chapter 36 to learn more about sharing permissions for Outlook folders.
Note
For a complete explanation of permissions and folder sharing, see "Granting Access to Folders" in Chapter 35.
A vCard presents contact information as an electronic business card that can be sent through e-mail. vCards are based on an open standard, allowing any application that supports vCards to share contact information. In addition to sending a vCard as an attachment, you also can include it with your message signature.
When you receive a message with a vCard attached, a paper clip icon appears in the Reading Pane to indicate the attached vCard. Use one of the following methods to add the data in the vCard as a contact entry:
In the Reading Pane, select the paper clip icon, and then click the file name that appears.
If you’ve opened the message, right-click the business card icon in the message, and then choose Open.
After you can view the information sent in the vCard, click Save & Close to add the information to your contacts list.
As mentioned earlier, one way to send contact information to someone else is to attach the contact entry to a message as a vCard. You can use this method to share your own contact information or to share one or more other contact entries with another person.
Follow these steps to attach a vCard to a message:
In the Contacts folder, select the contact item you want to send as a vCard.
Choose Actions, Send Full Contact, In Internet Format (vCard). Outlook 2007 opens a new message form with the contact entry attached as a vCard.
Specify an address, complete the message as you would any other, and then click Send to send it.
The second method of sharing a contact is useful when you want to share your own contact information. Rather than attaching it to a message, you can have Outlook 2007 send it along with your message signature. This ensures that the vCard is sent with all outgoing messages.
Note
You can attach text (such as a favorite quote) and graphics to each outgoing message as part of your signature. For complete details on using signatures with Outlook 2007, see "Using Signatures" in Chapter 9.
Follow these steps to add your contact information as a vCard to your message signature:
Create your own contact entry if you have not already done so.
Click Tools, Options.
Click Mail Format and then Signatures.
Click New.
Enter a name for your signature.
Click Business Card.
Browse to your own business card, and then click OK.
In the Signatures And Stationery dialog box, shown in Figure 18-29, add other information as needed.
Click OK twice.

From now on, your contact information will be attached to outgoing messages.
In addition to sending vCards as e-mail attachments, Outlook 2007 allows you to save a contact entry to a file as a vCard. You might do this if you want to link to vCards on a Web site so that others can download the vCards directly rather than receiving a message with the vCards attached. Or perhaps you want to save a large number of contacts as vCards and send them to someone on a Zip disk or other removable media rather than through e-mail.
Follow these steps to save a contact item as a vCard file:
Open the contact item that you want to save as a vCard.
In Windows Vista™, click the Microsoft Office Button, click Save As, and then click Export To vCard File. In Microsoft Windows XP, click File, Save As. In the Save As type drop-down list, select vCard Files (*.vcf).
Type a name in the File Name box, and then click Save.
When you receive a message containing a vCard attachment, you’ll probably want to save the vCard as a contact item in your Contacts folder. Follow these steps to do so: