
The Visual Basic Editor design-time error-handling tools let you correct mistakes in VBA syntax and catch misspellings of variable names. They also let you follow the “flow” of a macro or function (seeing each line of code as it is executed) and monitor the values of variables during the course of a procedure’s execution.
If you type a worksheet formula incorrectly in Excel, Excel alerts you to the error and refuses to accept the entry. The VBA compiler (the system component that converts your English-like VBA code into the machine language that actually executes the macro on your computer) ordinarily performs the same service for you if you type a VBA expression incorrectly. If you omit a required parenthesis, for example, the compiler beeps as soon as you press Enter. It also presents an error message and displays the offending line of code in a contrasting color (red, by default).
Certain kinds of syntax errors don’t become apparent to the compiler until you attempt to run your code. For example, if you write the following:
With Selection.Border
    .Weight = xlThin
    .LineStyle = xlAutomatic
and attempt to run this code without including an End With statement, you see this error message:

Your procedure halts, and you are now in break mode. (You can tell you’re in break mode by the appearance of the word break in brackets in the Visual Basic Editor title bar. The line the compiler was attempting to execute will be highlighted—in yellow, by default.) Break mode lets you fix your code and then continue running it. For example, if you omit an End With statement, you can add that statement while in break mode, and then press F5 (or select Run, Continue) to go on with the show. If you want to exit from break mode rather than continue with the execution of your procedure, select Run, Reset.
If you don’t like having the compiler complain about obvious syntax errors the moment you commit them, you can turn off that functionality. Click Tools, Options, click the Editor tab (shown in Figure 29-1), and clear the Auto Syntax Check check box. With automatic syntax checking turned off, your syntax errors will still be flagged when you try to run your code.
Note
You’ll find the files used in this chapter’s examples, Breakpoints.xlsm and LakhsCrores.xlsm, with the other examples on the companion Web site.

Figure 29-1. Clear the Auto Syntax Check check box if you don’t want to know about syntax errors until you run your code.
Note
You can also use the Options dialog box to change the color that the Visual Basic Editor uses to highlight syntax errors. If you don’t like red, click the Editor Format tab, select Syntax Error Text in the Code Colors list, and then select a different color.
Auto Syntax Check is on by default. So are three other “auto” options: Auto List Members, Auto Quick Info, and Auto Data Tips. These options are all useful, and you should leave them on, especially if you’re relatively new to VBA. Auto List Members and Auto Quick Info help you complete a line of VBA code by displaying available options at the current insertion point or the names of arguments required by the function you’re currently entering. Auto Data Tips is relevant only in break mode. If you rest your pointer on a variable name in break mode, the Auto Data Tips feature displays the current value of that variable as a ScreenTip.
The VBA compiler doesn’t care about the capitalization style of your variable names. MyVar, myVar, and myvar are identical names as far as the compiler is concerned. (If you’re inconsistent about the capitalization of a variable name, the Visual Basic Editor adjusts all instances of that variable to make them the same.) If you change the spelling of a variable name in mid-program, however, the compiler creates a new variable, and havoc for your program ensues. An error in programming introduced by a misspelled variable can be especially treacherous because the program might appear to behave normally.
You can virtually eliminate the possibility of having inconsistently spelled variable names in a module by adding a single statement at the top of that module (before any Sub or Function statement):
Option Explicit
The Option Explicit statement forces you to declare any variables used in the current module. You declare variables with Dim statements. (For complete details about Dim, type Dim in a module, and then press F1.) With Option Explicit in place, if you use a variable without first declaring it, you get a compile error at run time. If you accidentally misspell a variable name somewhere in your program, the compiler flags the misspelled variable as an undeclared variable, and you’ll be able to fix the problem forthwith.
You can add Option Explicit to every new module you create by clicking Tools, Options, going to the Editor tab, and then selecting the Require Variable Declaration check box. This option is off by default, but it’s good programming practice to turn it on. Option Explicit does more for you than eliminate misspelled variable names. By forcing you to declare your variables, it also encourages you to think ahead as you work.
The Visual Basic Editor step commands cause the compiler to execute either a single instruction or a limited set of instructions and then pause in break mode, highlighting the next instruction that will be executed. Execution is suspended until you take another action—such as issuing another step command, resuming normal execution, or terminating execution. By issuing step commands repeatedly, you can follow the procedure’s execution path. You can see, for example, which way the program branches when it comes to an If statement or which of the alternative paths it takes when it encounters a Select Case structure. (A Select Case structure causes the program to execute one of a set of alternative statements, depending on the value of a particular variable. For details, type case in a module, and press F1.) You can also examine the values of variables at each step along the way.
Note
You can monitor the value of variables by displaying the Watch Window or the Quick Watch dialog box or by resting your pointer on particular variables while in break mode. For information about using the Watch Window, see Using the Watch Window to Monitor Variable Values and Object Properties on page 935.
You have four step commands at your disposal. You’ll find these commands—and their keyboard shortcuts—on the Debug menu:
Step Into Executes the next instruction only.
Step Over Works like Step Into unless the next instruction is a call to another procedure (that is, a subroutine). In that case, Step Into executes the entire called procedure as a unit.
Step Out Executes the remaining steps of the current procedure.
Run To Cursor Executes everything up to the current cursor position.
You can run an entire procedure one step at a time by repeatedly pressing F8 (the keyboard shortcut for Debug, Step Into). To begin stepping through a procedure at a particular instruction, move your cursor to that instruction, and press Ctrl+F8 (the shortcut for Debug, Run To Cursor). Alternatively, you can force the compiler to enter break mode when it reaches a particular instruction, and then you can use any of the step commands.
A breakpoint is an instruction that causes the compiler to halt execution and enter break mode. The simplest way to set a breakpoint is to put your cursor where you want the breakpoint and then click Debug, Toggle Breakpoint (or press F9). Click this command sequence a second time to clear a breakpoint. You can set as many breakpoints in a procedure as you like using this method. The Toggle Breakpoint command sets an unconditional breakpoint—one that always occurs when execution arrives at the breakpoint. To set a conditional breakpoint—one that takes effect under a specified condition only—see the next section.
As Figure 29-2 shows, the Visual Basic Editor highlights a line where you set a breakpoint in a contrasting color and displays a large bullet in the left margin of the Code window. To customize the highlighting color, click Tools, Options. Click the Editor Format tab, and then select Breakpoint Text.

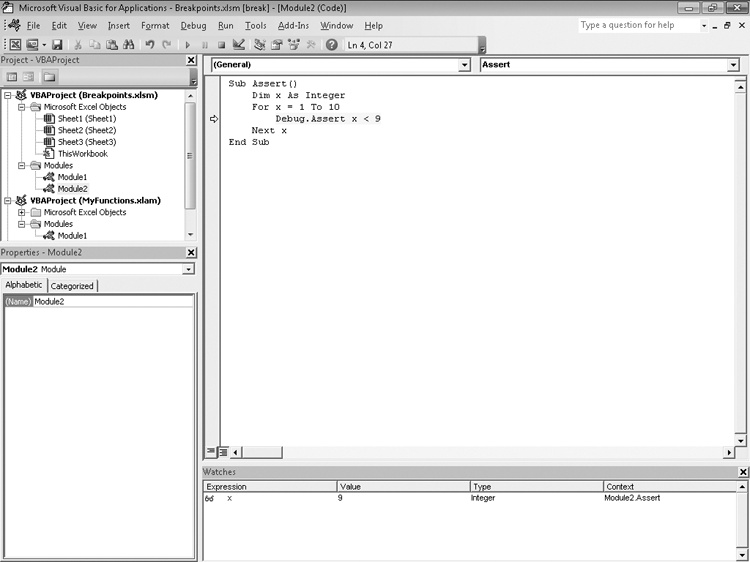
With the Assert method of the Debug object, you can cause the VBA compiler to enter break mode only if a particular expression generates a FALSE result. Figure 29-3 provides a simple example.
The Debug.Assert statement in this otherwise useless bit of code asserts that x is less than 9. As long as that assertion is true, the procedure runs. When it becomes false, the compiler enters break mode. As the Watch Window in Figure 29-3 shows, the compiler enters break mode when x is equal to 9. (We’ll discuss the Watch Window next.)
Note
You can also use the Watch Window to set conditional breakpoints. See Setting Conditional Breakpoints with the Watch Window on page 936.
The Watch Window shows the current values of selected variables or expressions and the current property settings for selected objects. You can use the Watch Window to monitor the status of variables and objects as you step through a procedure.
To display the Watch Window, click View, Watch Window. (To close the window, click its Close button.) To add a variable or object to the Watch Window, you can select it in the Code window and drag it to the Watch Window. You can add expressions, such as a + 1, to the Watch Window in this manner. Alternatively, you can add something to the Watch Window by clicking Debug, Add Watch. In the Expression text box in the Add Watch dialog box (see Figure 29-4), type a variable name or other valid VBA expression.
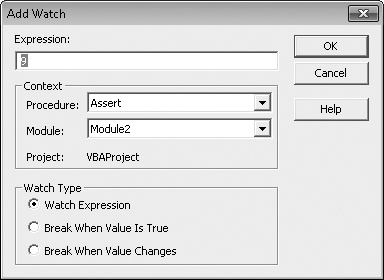
Figure 29-4. You can use the Add Watch dialog box to add a watch variable or to set a conditional breakpoint.
As Figure 29-4 shows, you can use the Add Watch dialog box to set a conditional breakpoint. Click Debug, Add Watch; specify the name of a variable or a VBA expression; and then select either Break When Value Is True or Break When Value Changes. Selecting Break When Value Is True for an expression is comparable to using a Debug.Assert statement to set a conditional breakpoint. The difference is that Debug.Assert causes a break when an expression becomes false, and Break When Value Is True does the opposite.
In break mode, you can select any variable name or expression in your code and click Debug, Quick Watch (or press Shift+F9) to see the current value of the selected item. If you decide you want to monitor that item continuously, you can click Add in the Quick Watch dialog box. The Visual Basic Editor then adds the item to the Watch Window.
While in break mode or before running a procedure, you can execute any VBA statement in the Immediate window. (If the Immediate window isn’t visible, click View, Immediate Window, or press Ctrl+G.) For example, you can discover the value of a variable x by typing Print x in the Immediate window. (As a shortcut, you can type ?x. The question mark character is a synonym for Print in VBA.)
You can also use the Immediate window to monitor an action in a procedure while that procedure is running. You do this by inserting Debug.Print statements into the procedure. The statement Debug.Print x, for example, displays the current value of x in the Immediate window.
The Immediate window can be a handy place to test VBA statements while you’re still wrestling with the syntax of this programming language. If you’re not sure a particular statement will have the effect you intend, you can try it in the Immediate window and see what happens.