
Legions of hackers are seemingly willing to go to any length to gain bragging rights by creating viruses, breaking firewalls, and thwarting password protection. Excel has always had security features, but Excel 2010 raises the ante a bit to help make your workbooks more secure.
Note
For more about workbook security, see Hiding and Protecting Workbooks on page 189.
It’s increasingly important to be sure that you don’t leave helpful tidbits of information lying around for others to abuse. Although it’s up to you to check that you’re not giving away personal information on your worksheets (your password-protected worksheets, of course!), information also lives in places you might forget to look. Excel 2010 includes the Document Inspector, which is designed to look in all the nooks and crannies for you. Click the File tab, click Info, click Check For Issues, and then click Inspect Document to display the dialog box shown in Figure 4-8. (You can also access the Document Inspector by clicking the button of the same name located in the Privacy Options category in the Trust Center dialog box.)
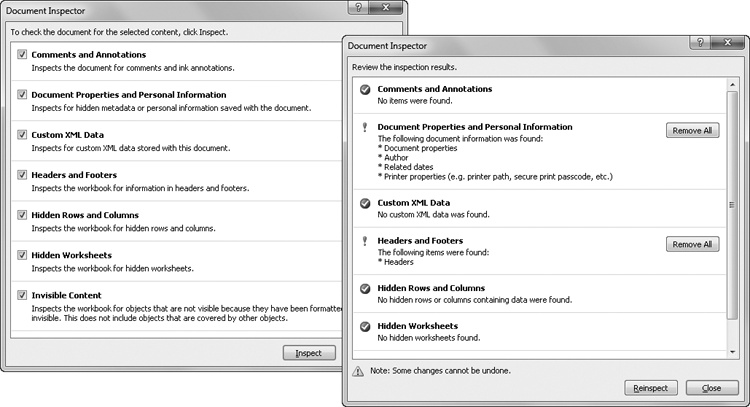
Figure 4-8. The Document Inspector examines the hidden places in your workbooks where personal data can hide.
As you can see in Figure 4-8, data is slippery stuff. The Document Inspector searches and reports on what it finds, as shown on the dialog box on the right of Figure 4-8. You can then click any Remove All button that appears or close the dialog box and edit the area in question. Most of these items are usually perfectly benign, of course. You probably don’t want to purge your headers and footers, for example, unless they contain your address or Social Security number. But if you are sharing data with others, the Document Inspector gives you a quick and easy way to find forgotten personal data you might not otherwise have found.
Digital signatures are similar to handwritten signatures in that both are intended to provide authenticity to documents. However, although the digital version might include a graphic representation of an actual signature, it also uses cryptography to establish not only a document’s authenticity but also the integrity of the file and the identity of the signer. You can add signatures to your own documents and to others’ as well. One way to use signatures is to verify that others have read a document (or at least opened it) by adding their signatures.
One important fact about digital signatures is that when you digitally sign a workbook, Excel saves it as a read-only document, preventing you from making further changes. Adding a handwritten signature, being typically the last element you add before sending a letter, in this case ensures that it actually is the last step you perform in a workbook. But don’t worry—you can remove and reapply a signature if you need to make changes.
To accomplish all this, you need a valid digital signature, which you must create or obtain separately. Fortunately, Excel provides ways to accomplish this. To begin, click the File tab, click Info, click Protect Workbook, and then click Add A Digital Signature to display the message shown in Figure 4-9.

If you don’t yet have your own digital signature, you can click Signature Services From The Office Marketplace to open a Web page where you can select and order one from a number of third-party vendors. Otherwise, clicking OK displays a dialog box where you can choose to use a third-party vendor or create your own digital signature.
Microsoft is careful to point out that creating your own digital signature lets you verify only the authenticity of your own documents, and even then only on your own computer. The upshot is that you might consider purchasing a verifiable signature if you think you need one. If, despite these drawbacks, you still want to create your own digital signature, select Create Your Own Digital ID.
After you create or purchase a digital ID, the dialog box at the top of Figure 4-10 appears when you click Add A Digital Signature. After you click OK, Excel saves the current workbook as read-only; your signature becomes invalid if you further modify the workbook.

If you click the Change button in the Sign dialog box shown in Figure 4-10, the second dialog box shown in the figure appears, where you can confirm your signature, or certificate. If you click a listed certificate, the Certificate Details dialog box appears, shown in Figure 4-11, which contains more information about the selected certificate and an Install Certificate button you can use to invoke the Certificate Import Wizard, also shown in the figure. This wizard helps you set up certificate stores on your computer, locations in your system where digital certificates are kept. The default settings are okay unless you have certificate locations on a network or prefer to specify places other than the suggested ones (not recommended).
After a document is digitally signed, [Read-Only] appears in the title bar next to the file name, and a small icon that looks like a certificate ribbon appears next to the word Ready in the status bar. You can click this icon to open and close the Signatures task pane, which you can also open and close by clicking the File tab, clicking Info, clicking Protect Workbook, and clicking View Signatures.
