
In the realm of spreadsheets, the complementary actions of inserting and deleting are collectively the second most used editing techniques. Inserting and deleting rows and columns of information have some nuances that don’t exist in the world of word processing, for example, but that you must consider.
On the Home tab, you can click commands on the Insert menu in the Cells group to add cells, columns, and rows to a worksheet—and even add a new sheet to a workbook. However, when you need to insert entire rows or columns, it’s easiest to right-click a column or row heading, which simultaneously selects the whole row or column and displays the shortcut menu shown in Figure 8-9. (You can also drag through several rows or columns and then right-click the selection to insert the same number of columns or rows you selected.) Then just click Insert.

Figure 8-9. Right-click a row or column heading, and click Insert. Click the Insert Options button that appears after you insert for some post-insertion options.
After inserting the column in Figure 8-9, the contents of column D move to column E, leaving the freshly inserted column D blank and ready for new information. The newly inserted cells take on the same formats as the cells in the column to the left, and Excel adjusts the formulas in cells F4:F15 to account for the expanded range.
A floating Insert Options button appears after you insert, which you can use to change the formatting of the inserted cells. Click the button to display the menu shown in the second image in Figure 8-9. If you want to extend a table by inserting a column on its right, for example, you might want to use the Format Same As Right or Clear Formatting option. The default Format Same As Left option works for our example.
You can insert cells or cell ranges rather than entire rows or columns by using the shortcut menu technique described earlier or by clicking Home, Insert, Insert Cells, which displays the Insert dialog box shown in Figure 8-10.

Figure 8-10. Click the Insert Cells command to choose the direction in which to move existing cells in your worksheet.
Note
The Insert menu is actually a button with an arrow to its right; if you click the button, it is the equivalent of clicking the Insert Cells command, which moves cells either down or to the right, depending on the shape of the selected cell range. To display the menu shown on the left in Figure 8-10, click the arrow.
Note
You can insert multiple nonadjacent cells when you use the Insert command, but only when inserting blank cells. Inserting nonadjacent cut or copied cells is not allowed.
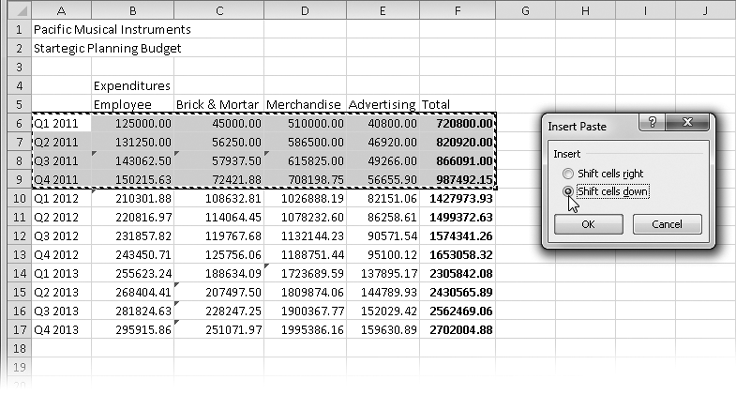
Often you need to copy or move existing data to the middle of another area of existing data, moving other data out of the way in the process. You can do this the hard way by inserting just the right amount of space in the destination area and then copying or cutting cells and pasting them to the new location. However, it’s much easier to click Home, Insert, Insert Copied Cells or Insert Cut Cells because this handles all these actions for you. These commands appear on the Insert menu (or on the shortcut menu) only when you have copied or cut some cells. Sometimes it’s obvious what needs to happen. For example, if you cut an entire row, you’ll surely want to insert the entire row somewhere else. In these cases, Excel employs some common sense rules and executes the action without hesitation. If Excel needs more information about how to adjust the worksheet, it opens the Insert Paste dialog box shown in Figure 8-11.
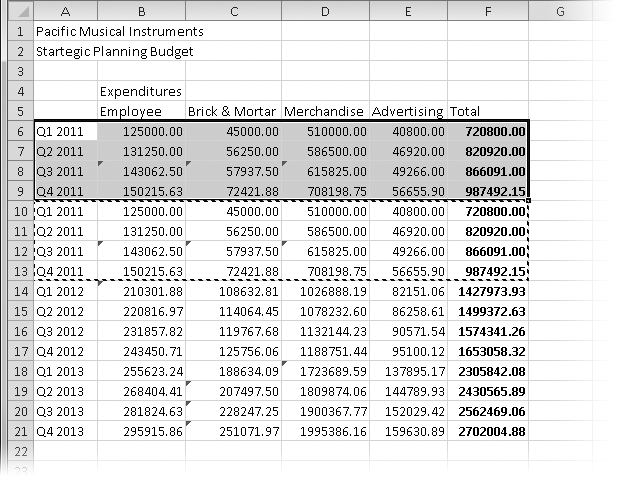
For example, you can use cutting and inserting to add rows for more data in Figure 8-11 by copying the rows containing 2011 data and editing the contents, thereby saving yourself some unnecessary typing. To do so, select cells A6:F9, and press Ctrl+C to copy the range. Then click Home, Insert, Insert Copied Cells to display the Insert Paste dialog box. Then select the Shift Cells Down option, and click OK. Excel inserts the copied data and moves the rest of the table down to accommodate the insertion, as shown in Figure 8-12.
You can use the Delete menu on the Home tab (located in the Cells group) to remove cells, rows, or columns from your worksheet. Deleting removes the selected cell or range from the worksheet, shifting cells to fill the empty space you create.
Note
The Delete menu is actually a button with an arrow to its right; if you click the button, it is the equivalent of clicking the Delete Cells command, which moves remaining cells either up or to the left, depending on the shape of the selected cell range. To display the menu, click the arrow.
Here are some guidelines for using Delete:
You can delete multiple nonadjacent rows by selecting the row heading before clicking Delete. Excel shifts everything below the deleted rows upward and adjusts any formulas accordingly.
You can delete entire columns by selecting the column heading before clicking Home, Delete. Excel moves everything to the right of the deleted columns left and adjusts any formulas accordingly.
You can delete multiple nonadjacent selections in one operation as long as you delete either entire rows or entire columns. You cannot delete entire rows and columns at the same time, however, because they overlap. The universe would implode.
You can delete partial rows and columns by selecting a cell or cells and clicking Delete. Excel displays the Delete dialog box shown in Figure 8-13. You can choose the direction you want to shift remaining cells to fill the gap, or you can choose to eliminate the entire rows or columns inhabited by the selected cells.
Note
For more information about formulas and cell references, see Chapter 12.

When you delete (or insert) partial rows or columns, it’s easy to misalign data. For example, in Figure 8-14 on page 220, we deleted cells B6:E9 with the default Shift Cells Up option selected. This eliminated the cells referred to by the formulas in column F, producing #REF errors. In addition, the column F totals in rows 13 through 20 now refer to the data in rows 9 through 16. This is a case where we should have cleared the cell contents rather than deleted the cells.
Caution
Although you can generally use Undo to cancel a deletion, you should take heed of these important points. Before you delete an entire column or row, scroll through your worksheet to be sure you’re not erasing important information that is not currently visible. Deleting cells that are referred to by formulas can be disastrous, as Figure 8-14 illustrates. Finally, when you delete a column or row referred to by an argument of a function, Excel modifies the argument, if possible, to account for the deletion. This adaptability is a compelling reason to use functions wherever possible. For more about using functions, see Chapter 13.
Fixing Formula Problems
In the following worksheet, notice that the formulas in row 21 have small triangular indicators in the upper-left corner of each cell (they are green on your screen):

These triangles indicate an anomaly of some kind; in this case, we moved cells around within the table, so the formulas no longer include the cells we moved. Notice in the graphic that the formula bar displays the formula =SUM(B13:B20), omitting cells B9:B12. We used the Insert Cut Cells technique described in this chapter to move the rows containing September through December data from the bottom of the table to the top, which created the problem. When you insert or move rows or columns at the edge of cell ranges referred to by formulas, the formulas might not be able to adjust properly, as is the case here. In the “old days” (a couple of releases ago), you had to figure this out on your own, but Excel 2010 now offers help. As shown here, not only do the little flags appear, but when you select one of the formula cells, a menu appears offering a Formula Omits Adjacent Cells item containing pertinent options.
The Update Formula To Include Cells option works correctly in our example. This is a much easier solution than editing each formula manually.

The difference between deleting and clearing isn’t subtle. Although deleting completely removes selected cells, shifting adjacent cells to fill the void, clearing leaves selected cells in place and removes contents, formats, and any comments that might be attached. The Home tab includes a Clear menu, which is one of the buttons in the Editing group without a label—the one that is meant to look like an eraser (but really doesn’t). Figure 8-15 shows the Clear menu.
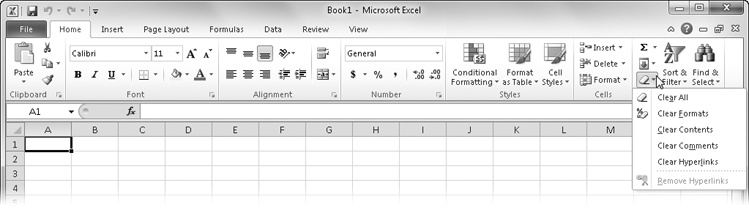
Figure 8-15. The commands on the Clear menu remove the corresponding attributes of selected cells without removing the cells.
The commands on the Clear menu perform the following tasks on selected cells:
To perform the next group of operations, you use the fill handle, a tiny black square that appears in the lower-right corner of the selection rectangle, the bold border that appears around the selected cell or range. If you select entire rows or columns, the fill handle appears next to the row or column heading.
When you select a single cell and drag the fill handle in any direction, Excel copies the contents of that cell to all the cells through which you drag (with exceptions, which you’ll learn later). When you select more than one cell, Excel either copies the range or extends a data series in the direction you drag, depending on the cell contents, the shape of the selection, and whether you are holding down Ctrl. Pressing the Shift key while dragging the fill handle lets you insert blank cells into a worksheet.
In the worksheet at the top in Figure 8-16, we selected A7:G7 and dragged the fill handle one row down while pressing the Shift key. The pointer became a double-headed arrow. The worksheet on the bottom in Figure 8-16 shows the newly inserted blank cells.
You use the same technique to insert entire blank rows or columns—just select the row or column headings, or press Shift and drag the fill handle, which appears adjacent to the row or column headings. You can just as easily delete cells, columns, or rows using a similar technique. To delete the cells we inserted in Figure 8-16, select A8:G8, hold down Shift, and then drag the fill handle up one row. The area turns gray, and the pointer changes to a similar double-headed arrow, with the arrows pointing inward this time. When you release the mouse button, Excel deletes the selection.
If you drag the fill handle back over selected cells without pressing Shift, you clear the cell contents instead of deleting the cells. This clears formulas, text, and numbers only. If you hold down the Ctrl key while dragging over a selection, you clear all the cell contents as well as the formatting, borders, and comments.

Fill Handles and Cell Selection Rectangles
The cell selection rectangle is the heavy black-bordered box that surrounds the currently selected cells. There is only one fill handle in a cell selection rectangle, regardless of the number of cells:

Dragging the fill handle extends the selection and performs other feats of prowess, as described in this chapter. Dragging the selection rectangle moves or copies the selection, also as described in this chapter. If the fill handle is not visible, click the File tab, click Options, and then click the Advanced category. In the Editing Options area, select the Enable Fill Handle And Cell Drag-And-Drop check box. The Alert Before Overwriting Cells check box is automatically selected (and recommended).
If you select cells and then drag the selection rectangle using the right mouse button, a shortcut menu appears when you release the button, as shown in Figure 8-17. You can use the options on the shortcut menu to consummate your edit in a variety of ways.

The options on the shortcut menu are as follows:
Move Here Moves the source cells to the selected destination
Copy Here Copies the source cells to the selected destination
Copy Here As Values Only Copies the visible values from the source cells to the selected destination cells but does not copy formulas
Copy Here As Formats Only Copies the formats of the source cells to the destination cells without affecting the contents
Link Here Creates linking formulas at the destination that refer to the source cells
Create Hyperlink Here Creates a Web-style link to the source cells in the selected destination
The Shift options Let you copy or move the source cells to a location that contains existing data, shifting it out of the way in the selected direction