Using send/receive groups in Outlook 2007 gives you additional options for selective message processing with POP3 accounts. You can configure a POP3 account in a send/receive group to download only headers, for example, or to download only those messages smaller than a specified size while retrieving only headers for larger messages. If you prefer to process your POP3 account selectively—perhaps because you connect over a dial-up connection, or because you want to delete unwanted messages before they arrive in your Inbox, or because you need to control which messages are downloaded—you can use a send/receive group to process the account.
Note
For details on setting up send/receive groups, see "Controlling Synchronization and Send/Receive Times" in Chapter 8.
Let’s assume that your profile includes two POP3 accounts, a Hotmail account, and an Exchange Server account. You want to process messages normally for the Hotmail and Exchange Server accounts but would like to process the POP3 accounts selectively. You can configure a send/receive group (either the default All Accounts group or another that you create) to perform a send/receive operation for the other accounts that processes all messages. You can also configure the POP3 accounts in the send/receive group to download only message headers. When you perform a send/receive operation with the group, the POP3 accounts download only headers, and the other accounts download messages.
You can configure multiple send/receive groups, using different settings for each (although some settings, such as Exchange Server filters, apply to all send/receive groups to which the folder belongs). For example, you might configure your POP3 accounts in the All Accounts send/receive group to download message bodies and attachments but create a second send/receive group named POP3 Remote that processes only message headers for your POP3 accounts when that group is executed.
After you decide which combination of send/receive groups makes the most sense for you, follow these steps to configure a POP3 account to retrieve only message headers and then process the headers:
In Outlook 2007, choose Tools, Send/Receive, Send/Receive Settings, Define Send/Receive Groups.
Select the existing send/receive group in which you want to configure POP3 accounts for headers only (or create a group for that purpose), and then click Edit.
In the Accounts list in the Send/Receive Settings dialog box, shown in Figure 15-6, click the POP3 account.
If you are creating a new group, select the Include The Selected Account In This Group check box.
Select the Download Headers Only option.
If you don’t want the group to send messages from the selected POP3 account, clear the Send Mail Items check box.
Click OK, and then close the Send/Receive Groups dialog box.
Choose Tools, Send/Receive, and select the group to have Outlook 2007 process it according to the settings you specified in the preceding steps. Outlook 2007 then downloads message headers.
Review and mark the downloaded message headers, and then process the group again. Alternatively, choose Tools, Send/Receive, Process All Marked Headers.

You can configure a POP3 account in a send/receive group to specify a message size limit. Messages that meet or are below the specified size limit are downloaded in their entirety, complete with attachments. For messages larger than the specified size, only headers are downloaded. This is an easy way to restrict the volume of incoming POP3 mail and keep large messages from choking a low-bandwidth connection such as a dial-up connection.
Follow these steps to configure a POP3 account in a send/receive group to download headers only for messages over a specified size:
In Outlook 2007, choose Tools, Send/Receive, Send/Receive Settings, Define Send/Receive Groups.
Select or create the send/receive group, and then click Edit.
Select the POP3 account in the Accounts list in the Send/Receive Settings dialog box, and then select the Download Complete Item Including Attachments option.
Select Download Only Headers For Items Larger Than n KB, as shown in Figure 15-7.
Enter a value to define the message size limit, and then click OK.
Click Close to close the Send/Receive Groups dialog box.

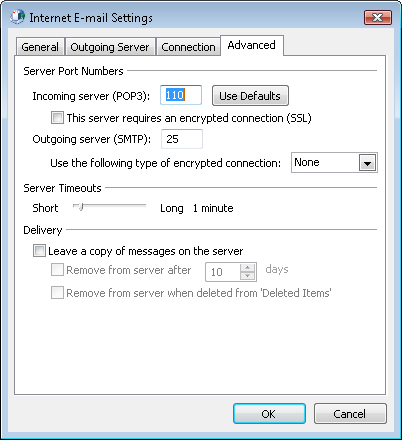
Often you’ll want to keep a copy of your messages on the server and download a copy. For example, you might be checking your messages from the office but want to be able to retrieve them from home or from your notebook computer. Or perhaps you’re using remote mail to process a few important messages and want to leave copies on the server for safekeeping. You can configure the account to leave a copy of all messages on the server, allowing you to retrieve the messages again from another system.
When you configure a POP3 account to retain messages on the server, you also can specify that the messages must be removed after they’ve been on the server for a designated period of time. Alternatively, you could have Outlook 2007 delete the messages from the server when you delete them from your Deleted Items folder, which prevents the messages from being downloaded again from the server after you’ve deleted your local copies.
Here’s how to configure these options for POP3 accounts:
In Outlook 2007, choose Tools, Account Settings, or right-click the Outlook 2007 icon on the Start menu, choose Properties, and then click E-Mail Accounts.
Select the E-Mail tab.
Select the POP3 account, and then choose Change.
Click More Settings, and then click the Advanced tab, shown in Figure 15-8.
Select the Leave A Copy Of Messages On The Server check box, and then select one of the two associated check boxes if needed. Click OK.
Click Next, and then click Finish.