
Outlook 2007 uses send and receive groups (or send/receive groups) to control when messages are sent and received for specific e-mail accounts. You can also use send/receive groups to define the types of items that Outlook 2007 synchronizes. Synchronization is the process in which Outlook 2007 synchronizes the local copy of your folders with your Exchange Server message store. For example, assume that while you were working offline you created several new e-mail messages and scheduled a few events. You connect to the Exchange Server and perform a synchronization. Outlook 2007 uploads to your Exchange Server the changes you made locally and also downloads changes from the server to your local store, such as downloading messages that have been delivered to your Inbox on the server.
Send/receive groups enable you to be flexible in controlling which functions Outlook 2007 performs for synchronization. For example, you can set up a send/receive group for your Exchange Server account that synchronizes only your Inbox, not your other folders, for those times when you simply want to perform a quick check of your mail.
Send/receive groups also are handy for helping you manage different types of accounts. For example, if you integrate your personal and work e-mail into a single profile, you can use send/receive groups to control when each type of mail is processed. You might create one send/receive group for your personal accounts and another for your work accounts. You can also use send/receive groups to limit network traffic to certain times of the day. For example, if your organization limits Internet connectivity to specific times, you could use send/receive groups to schedule your Internet accounts to synchronize during the allowed times.
Think of send/receive groups as a way to collect various accounts into groups and assign to each group specific send/receive and synchronization behavior. You can create multiple send/receive groups, and you can include the same account in multiple groups if needed.
To set up or modify send/receive groups in Outlook 2007, choose Tools, Send/Receive, Send/Receive Settings, Define Send/Receive Groups. Outlook 2007 displays the Send/Receive Groups dialog box, shown in Figure 8-10. By default, Outlook 2007 sets up one group named All Accounts and configures it to send and receive when online and offline. You can modify or remove that group, add others, and configure other send/receive behavior in the Send/Receive Groups dialog box.

When you select a group from the Group Name list, Outlook 2007 displays the associated settings in the Setting For Group area of the dialog box:
Include This Group In Send/Receive (F9). Select this check box to have Outlook 2007 process accounts in the selected group when you click Send/Receive on the message form toolbar or press F9. Outlook 2007 provides this option for both online and offline behavior.
Schedule An Automatic Send/Receive Every n Minutes. Select this check box to have Outlook 2007 check the accounts in the selected group every n minutes (the default is 30 minutes). Outlook 2007 provides this option for both online and offline behavior.
Perform An Automatic Send/Receive When Exiting. Select this check box to have Outlook 2007 process the accounts in the selected group when you exit Outlook 2007 from an online session.
Although you could modify the All Accounts group to process only selected accounts, it’s better to create other groups as needed and leave All Accounts as is for those times when you want to process all your e-mail accounts together.
Follow these steps to create a new group:
In Outlook 2007, choose Tools, Send/Receive, Send/Receive Settings, Define Send/Receive Groups.
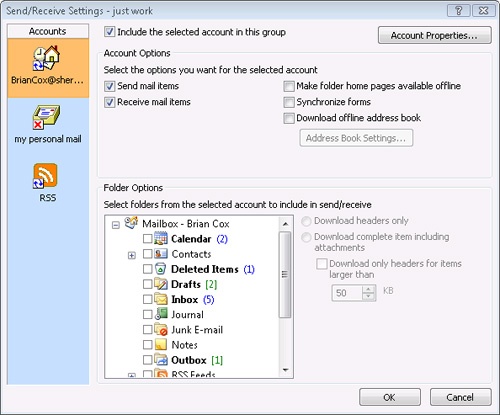
Click New, type the name for the group as you want it to appear on the Send/Receive submenu, and click OK. Outlook 2007 displays the Send/Receive Settings dialog box, shown in Figure 8-11.
In the Accounts bar on the left, click the account you want to configure. By default, all accounts in the group are excluded from synchronization, indicated by the red X on the account icon.
Select the Include The Selected Account In This Group check box to activate the remaining options in the dialog box and to have the account included when you process messages for the selected group.
In the Check Folders From The Selected Account To Include In Send/Receive list, select the check box beside each folder that you want Outlook 2007 to synchronize when processing this group.
Select other settings, using the following list as a guide:
Send Mail Items. Select this check box to have Outlook 2007 send outgoing mail for this account when a send/receive action occurs for the group.
Receive Mail Items. Select this check box to have Outlook 2007 retrieve incoming mail for this account when a send/receive action occurs for the group.
Make Folder Home Pages Available Offline. This check box has Outlook 2007 cache folder home pages offline so that they are available to you any time.
Synchronize Forms. Select this check box to have Outlook 2007 synchronize changes to forms that have been made locally as well as changes that have been made on the server.
Download Offline Address Book. When this check box is selected, Outlook 2007 updates the offline address book when a send/receive action occurs for the group.
Get Folder Unread Count. For Internet Message Access Protocol (IMAP) accounts only; you can select this option to have Outlook 2007 get the number of unread messages from the server.
If you need to apply filters or message size limits, do so. Otherwise, click OK, and then click Close to close the Send/Receive Groups dialog box.
Note
For information on how to apply message size limits, see the upcoming section "Limiting Message Size."
Other options for the send/receive group are explained in the following sections.
You can modify existing send/receive groups in much the same way you create new ones. Choose Tools, Send/Receive, Send/Receive Settings, Define Send/Receive Groups. Select the group you want to modify and click Edit. The settings you can modify are the same as those discussed in the preceding section.
You can also use the Send/Receive Settings dialog box to specify a limit on message size for messages downloaded from the Inbox of the selected Exchange Server account. This provides an easy way to control large messages that arrive in your Exchange Server account. Instead of downloading messages that are larger than the specified limit, Outlook 2007 downloads only the headers. You can then mark the messages for download or deletion, or simply double-click the message to download and open it.
Note
Specifying a message size limit in the Send/Receive Settings dialog box doesn’t affect the size of messages that you can receive on the server. It simply directs Outlook 2007 to process them differently.
Follow these steps to specify a message size limit for an Exchange Server 2007 account:
Choose Tools, Send/Receive, Send/Receive Settings, Define Send/Receive Groups.
Select a group to modify and click Edit.
From the Accounts bar, select the Exchange Server account containing the folder for which you want to set a message size limit.
Select a folder, as shown in Figure 8-12.
Specify the criteria you want to use to limit message download, based on the following option list, and click OK:
Download Headers Only. Download only the message header, not the message body or attachments.
Download Complete Item Including Attachments. Download the entire message, including body and attachments.
Download Only Headers For Items Larger Than. Download only headers for messages over the specified size.

You can use a similar mechanism to control downloading of large messages from POP3 accounts. In this case, you can choose to download only message headers for messages larger than a specified size.
Follow these steps to configure POP3 message size filtering:
Choose Tools, Send/Receive, Send/Receive Settings, Define Send/Receive Groups.
Select a group to modify and click Edit.
From the Accounts bar, select the POP3 account for which you want to set a message size limit.
Select Download Complete Item Including Attachments, select the Download Only Headers For Items Larger Than Nn KB check box, specify the size limit, and click OK.
To retrieve a message with a large attachment from a POP3 server, mark the message to be downloaded.
Note
For details on using remote mail with POP3 accounts, see the section "Working with Message Headers" in Chapter 15.
You can schedule synchronization for each send/receive group separately, giving you quite a bit of control over when Outlook 2007 processes your Inbox, Outbox, and other folders for synchronization. You can configure Outlook 2007 to process each send/receive group on a periodic basis and to process specific groups when you exit Outlook 2007. For example, you might schedule the All Accounts group to synchronize only when you exit Outlook 2007, even if you scheduled a handful of other groups to process messages more frequently during the day. Because you can create as many groups as needed and can place the same account in multiple groups, you have a good deal of flexibility in determining when each account is processed.
Note
For a discussion of Cached Exchange Mode, see the section "Configuring Cached Exchange Mode" in Chapter 3. Also see Chapter 41.
Follow these steps to configure synchronization for each send/receive group:
Choose Tools, Send/Receive, Send/Receive Settings, Define Send/Receive Groups.
In the Send/Receive Groups dialog box, select the group for which you want to modify the schedule.
In the Setting For Group area, select Schedule An Automatic Send/Receive Every n Minutes, and then specify the number of minutes that should elapse between send/receive events for the selected group. Set this option for both online and offline behavior.
If you want the group to be processed when you exit Outlook 2007, select Perform An Automatic Send/Receive When Exiting.
You can use a combination of scheduled and manually initiated send/receive events to process messages and accounts. For example, you can specify in the Send/Receive Group dialog box that a given group (such as All Accounts) must be included when you click Send/Receive or press F9 and then configure other accounts to process as scheduled. Thus, some accounts might process only when you manually initiate the send/receive event, and others might process only by automatic execution. In addition, you can provide an overlap so that a specific account processes manually as well as by schedule—simply include the account in multiple groups with the appropriate settings for each group.
On occasion, you might want to disable scheduled send/receive events altogether. For example, assume that you’re working offline and don’t have a connection through which you can check your accounts. In that situation, you can turn off scheduled send/receive processing until a connection can be reestablished.
To disable scheduled send/receive processing, choose Tools, Send/Receive, Send/Receive Settings, Disable Scheduled Send/Receive. Select this command again to enable the scheduled processing.