
The preceding section explained how to add e-mail account services and introduced data stores. This section provides a more detailed look at storage options in Outlook 2007 and shows how to configure those options.
Like earlier versions of Microsoft Outlook, Outlook 2007 offers three options for storing data: your Exchange Server mailbox, .pst files, and offline folder (.ost) files. Outlook 2007 can also use Cached Exchange Mode in conjunction with an .ost file to create a local copy of an Exchange Server mailbox. With Cached Exchange Mode, Outlook 2007 works from the cached local copy of the mailbox and automatically handles synchronization between the local profile and the server. Your mailbox is therefore always available, even when the server is not. When you connect to the network, Outlook 2007 automatically detects server connection status and synchronizes the Outlook 2007 folders.
Note
See Chapter 41, to learn how to configure an Exchange Server client, including enabling and disabling Cached Exchange Mode.
Regardless of its location, a data store holds your Outlook 2007 data, including your Contacts, Calendar, and other folders. You can have only one default store. This means that your e-mail, contacts, schedule, tasks, and other information are all stored in the same set of folders. Outlook 2007 directs all incoming e-mail to your default store. The exceptions to this are IMAP and Hypertext Transfer Protocol (HTTP) accounts, which store their e-mail folders and messages separately from your other data.
Note
For detailed information about configuring and using IMAP accounts and how Outlook 2007 stores IMAP folders and messages, see "Using IMAP Accounts" in Chapter 7.
Although you can have only one default store, you can add other store files to a profile. You can use the other stores to organize or archive your data. For example, if you have a profile with an Exchange Server account and a Post Office Protocol 3 (POP3) account, the profile might be configured to deliver all mail to the Exchange Server mailbox. You might want to add another set of folders (another .pst file) that you can use to separate your Internet mail from your workgroup mail, or perhaps you want to use a different store to separate your personal messages from your work-related messages. Another use for a second store file is to share data with others without exposing your default store. Whatever the situation, you need to decide which type of store is most appropriate for your default store as well as for your additional stores.
A .pst file in Outlook 2007 is essentially the same as the default store type in earlier versions of Microsoft Outlook, although the native .pst format of Outlook 2007 is not compatible with Outlook 2002 or earlier. The native Outlook 2003/Outlook 2007 .pst format provides better support for multilingual Unicode data and eliminates the 2-GB file size limit imposed by the Outlook 2002 and earlier .pst format.
You can password-protect .pst files for greater security, although utilities available on the Web can bypass the password security. The .pst files offer encryption, providing an additional level of security. The .pst files do not have a built-in capability for synchronization with an Exchange Server mailbox, although you can work offline if a .pst file rather than the Exchange Server mailbox is configured as the default store location. If the Exchange Server mailbox is your default store (which is recommended), you must use an .ost file to work offline, whether in normal offline mode or in Cached Exchange Mode.
As mentioned earlier, the format for .pst files in Outlook 2007 is different from the format in Outlook 97, Outlook 98, Outlook 2000, and Outlook 2002, which means that those systems cannot share a .pst file created using Outlook 2007. This is a significant consideration if you need to share a local data file with other Microsoft Outlook users who have not yet upgraded to Outlook 2003 or Outlook 2007. However, Outlook 2007 can use .pst files created using earlier versions of Microsoft Outlook.
You can choose the format of a .pst file only when you create the .pst file—you can’t convert an existing .pst file to the new format. You can, however, simply export all of the items in an existing .pst file to a new .pst file that does use the new format. Start Outlook 2007, choose File, Import And Export, and then follow the wizard’s prompts to export to a .pst file. The wizard creates an Outlook 2007 native format .pst file by default.
To decide which .pst file format you should use, consider whether you need to use the .pst file with an earlier version of Microsoft Outlook. If not, the Outlook 2007 native format is the best choice. If you need to export items from an Outlook 2007 .pst file to an earlier version, simply export the items to a .pst file that you created with an earlier version of Microsoft Outlook, or create the pre–Outlook 2003 .pst file in Outlook 2007. To do so, choose the Office Outlook 97-2002 Personal Folders File option when creating the .pst file.
Outlook 2007 uses a particular store as your default store to contain your Outlook 2007 data and e-mail, but you can add other store files to help you organize, separate, or archive your data.
Adding another store is easy. Just follow these steps:
Right-click the Microsoft Office Outlook icon on the Start menu, choose Properties, and then click Data Files. (Select the profile first, if necessary.) Or, if Outlook 2007 is running, choose Tools, Account Settings, Data Files. The current storage files are listed on the Data Files tab.
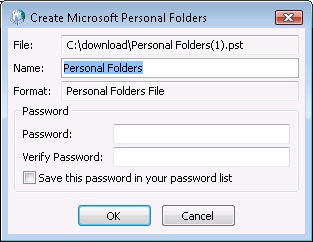
Click Add, enter the file name, select the type of personal folders file to create, and then click OK.
Outlook 2007 next displays the Create Microsoft Personal Folders dialog box, shown in Figure 3-6. Configure settings as necessary based on the following list:
Name. Specify the name by which you want the folders to be known in Outlook 2007. This is not the file name for the store file, but you can use the same name for both if you want.
Password. Specify an optional password (and type it a second time to verify it) to protect your .pst file from access by others.
Save This Password In Your Password List. Select this check box to have Outlook 2007 save the password for your .pst file file in your local password cache. This eliminates the need for you to enter the password each time you open the .pst file. Clear this check box if you want Outlook 2007 to prompt you each time (providing greater security).
Click OK to close the Create Microsoft Personal Folders dialog box.
Note
It’s possible for others to gain access to your .pst file and bypass the password, even if you use a compression option. For best security, keep your sensitive data on the computer running Exchange Server rather than in a .pst file. You can also employ NTFS file system permissions to secure the folder where your .pst file is located, granting applicable permissions only to those users who need access to that folder or your .pst file.
Occasionally, you might want to remove a data store from a profile—for example, perhaps you’ve been using a .pst file as your primary store and are now moving to Exchange Server with an .ost file for offline use.
To remove a data store from a profile, you use steps similar to those you followed to add a store:
On the Start menu, right-click the Microsoft Office Outlook icon, choose Properties, and then click Data Files. (Select the profile first, if necessary.) Or, if Outlook 2007 is running, choose Tools Account Settings, Data Files. The current storage files are listed in the Data Files dialog box.
Select the data file to remove from the profile, click Remove, and then click Yes to verify the action.
Click Close to close the Account Settings dialog box.
When you remove a data file from a profile, Outlook 2007 does not delete the file itself. This means that you can later add the file back to a profile if you need to access its contents. If you don’t need the data stored in the file or if you’ve already copied the data to a different store, you can delete the file. Open the folder where the file is located, and then delete it as you would any other file.
Configuring an offline store allows you to continue working with data stored in your Exchange Server mailbox when the server is not available (if your computer is disconnected from the network, for example). As soon as the server becomes available again, Outlook 2007 synchronizes the data either automatically or manually—according to the way in which you have configured Outlook 2007.
Note
For a detailed explanation of folder synchronization, see "Controlling Synchronization and Send/Receive Times" in Chapter 8.
Like earlier versions of Microsoft Outlook, Outlook 2007 supports the use of an .ost file to serve as an offline cache for Exchange Server. This method is compatible with all versions of Exchange Server, including Exchange Server 2000, Exchange Server 2003, and Exchange Server 2007.
You can use an .ost file to provide offline capability for your Exchange Server mailbox. You do not need to use a .pst file in conjunction with the .ost file—the .ost file can be your only local store file, if you want. However, you can use other .pst files in addition to your .ost file.
This section assumes that you are working with an Exchange Server account that has not been configured to use Cached Exchange Mode. When you add an Exchange Server account in Outlook 2007, the Add New E-Mail Account Wizard enables Cached Exchange Mode by default. This section helps you create and enable an offline store for a profile that has not had Cached Exchange Mode enabled previously.
Note
The .ost file does not appear as a separate set of folders in Outlook 2007. In effect, the .ost file is hidden and Outlook 2007 uses it transparently when your computer is offline. For more information, see Chapter 43.
Follow these steps to configure offline storage with an .ost file:
On the Start menu, right-click the Microsoft Office Outlook icon, choose Properties, and then click E-Mail Accounts. Or, if Outlook 2007 is running, choose Tools, Account Settings.
On the E-Mail tab, select the profile, and then click Change.
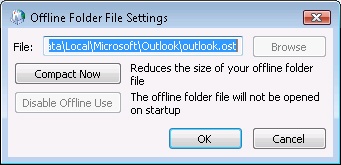
Click More Settings to display the Microsoft Exchange Server dialog box. Click the Advanced tab, and then click Offline Folder File Settings to open the dialog box shown in Figure 3-7.
Specify a path and name for the .ost file in the File box, and then click OK.
Click OK to close the Offline Folder File Settings dialog box.
Click Next, and then click Finish.
When you add an Exchange Server account to a profile in Outlook 2007, Outlook enables Cached Exchange Mode by default and creates the .ost file that Cached Exchange Mode will use to store the local copy of the mailbox. If you originally added the Exchange Server account without Cached Exchange Mode, you can still enable it by following these steps:
Exit Outlook 2007, and then double-click the Mail icon in Control Panel.
Click E-Mail Accounts in the Mail Setup dialog box.
Select the Exchange Server account, and then click Change.
Select Use Cached Exchange Mode, click Next, and then click Finish.
Outlook 2007 creates the .ost file the next time you start Outlook 2007 and begins the synchronization process if the server is available.
On occasion, you might need to move a data file from one location to another. For example, perhaps you’ve been using a local .pst file file and now want to place that file on a network share for use with a roaming profile so that you can access the file from any computer on the network.
Moving a .pst file file is a manual process. You must exit Outlook 2007, move the file, and then reconfigure the profile accordingly.
Follow these steps to move a .pst file:
Exit Outlook 2007, right-click the Microsoft Office Outlook icon on the Start menu, and then choose Properties.
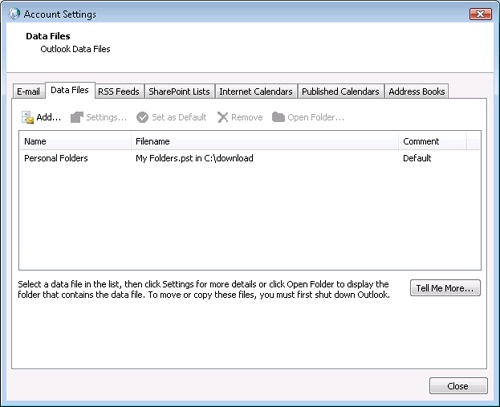
Select a profile if necessary, and then click Data Files to display the Data Files tab in the Account Settings dialog box, shown in Figure 3-8.
Select the .pst file you want to move, and then click Open Folder. Outlook 2007 opens the folder where the .pst file is located and selects the file’s icon.
Drag the file or use the Clipboard to move the file to the desired location, and then close the folder.
Back on the Data Files tab, click Settings. Outlook 2007 displays an error message indicating that it can’t find the file. Click OK.
Browse to the new location of the .pst file, select it, click Open, and then click OK.
Click Close to close the Outlook Data Files dialog box, and then click Close again to close the Mail Setup dialog box.
Outlook 2007 uses one data store location as the default location for delivering messages and storing your other Outlook 2007 items. You can change the store location if needed. You also can specify the order in which Outlook 2007 processes e-mail accounts, which determines the server that Outlook 2007 uses (where multiple servers are available) to process outgoing messages. The order also determines the order in which Outlook 2007 checks the servers for new messages.
For example, assume that you have an Exchange Server account and a POP3 account for your personal Internet mail. If the Exchange Server account is listed first, Outlook 2007 sends messages destined for Internet addresses through Exchange Server. In many cases, however, this might not be what you want. For example, you might want all personal mail to go through your POP3 account and work-related mail to go through your Exchange Server account.
You have two ways to change the e-mail service that Outlook 2007 uses to send a message: you can configure the service order, or you can specify the account to use when you create the message.
Follow these steps to configure the service order for your e-mail:
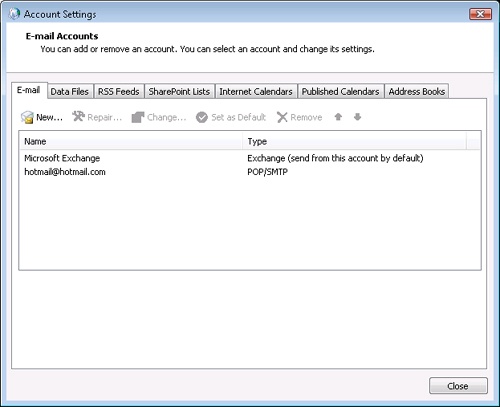
Right-click the Microsoft Office Outlook icon on the Start menu and choose Properties, or in Outlook 2007, choose Tools, Account Settings to display the E-Mail Accounts tab in the Account Settings dialog box, shown in Figure 3-9.
Use the Move Up and Move Down buttons to change the order of the accounts in the list.
Click Close.
When you compose a message, you can override the default e-mail service that Outlook 2007 uses to send messages simply by selecting the account before sending the message.
To select the account, follow these steps: