
Of all the features in Microsoft® Office Outlook® 2007, messaging is probably the most frequently used. Even if you use Office Outlook 2007 primarily for contact management or scheduling, chances are good that you also rely heavily on the Outlook 2007 e-mail and other messaging capabilities. Because many of the Outlook 2007 key features make extensive use of messaging for workgroup collaboration and scheduling, understanding messaging is critical to using the program effectively.
This chapter provides an in-depth look at a wide range of topics related to sending and receiving messages with Outlook 2007. You’ll learn the fundamentals—working with message forms, addressing, replying, and forwarding—but you’ll also explore other more-advanced topics. For example, this chapter explains how to control when your messages are sent, how to save a copy of sent messages in specific folders, and how to work with attachments.
This section of the chapter offers a primer to bring you up to speed on the Outlook 2007 basic messaging capabilities. It focuses on topics that relate to all types of e-mail accounts. The Inbox is the place to start learning about Outlook 2007, so launch the program and open the Inbox folder. The next section explains how to work with message forms.
Note
If you haven’t added e-mail accounts to your profile, see the appropriate chapter for details. Chapter 7, explains how to configure POP3, IMAP, and HTTP accounts; Chapter 41, explains how to configure the Microsoft Exchange Server client.
You can begin a new message in Outlook 2007 by using any one of these methods:
Choose File, New, Mail Message.
With the Inbox open, click New on the message form toolbar.
Click the down arrow beside the New button on the message form toolbar and choose Mail Message.
With the Inbox open, press Ctrl+N.
Outlook 2007 uses a new native e-mail editor that is based on Microsoft Office Word 2007. When you begin a new message, Outlook 2007 displays the Untitled Message form, shown in Figure 8-1.

The Outlook 2007 address books make it easy to address messages. When you want to send a message to someone whose address is stored in your Contacts folder or an address list on the server, you can click in the To box on the message form and type the recipient’s name—you don’t have to type the entire address. When you send the message, Outlook 2007 checks the name, locates the correct address, and adds it to the message. If multiple addresses match the name you specify, Outlook 2007 shows all the matches and prompts you to select the appropriate one. If you want to send a message to someone whose address isn’t in any of your address books, you need to type the full address in the To box.
Note
For more information about Outlook 2007 address books, see Chapter 6.
Note
Outlook 2007 can check the names and addresses of message recipients before you send the message. Enter the names in the To box and click the Check Names button on the message form toolbar to perform this action.
To open the address book (see Figure 8-2), click an Address Book icon (To, Cc, or Bcc) beside an address box on the message form. Outlook 2007 opens the Select Names dialog box, which you can use to address the message.
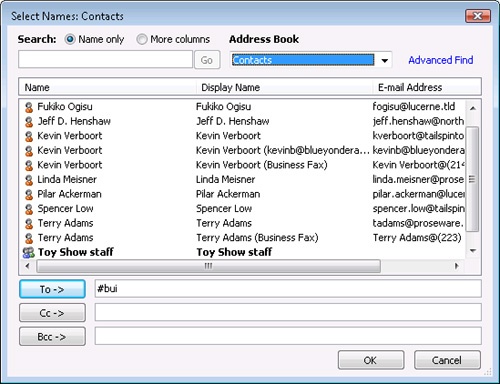
Follow these steps to select addresses in this dialog box and add them to your message:
You can direct a single message to multiple recipients by including multiple addresses in the To box on the message form or by using the Cc (Carbon Copy) and Bcc (Blind Carbon Copy) boxes. The Cc box appears by default on message forms, but the Bcc box does not. To display the Bcc box, on the Options ribbon, in the Fields group, choose Bcc. You use the Cc and Bcc boxes the same way you use the To box: type a name or address in the box, or click the Address Book icon beside the box to open the address book.
In some situations, you might want every outgoing message to be copied to a particular person. For example, maybe you manage a small staff and want all employees’ outgoing messages copied to you. Or perhaps you want to send a copy of all of your outgoing messages to yourself at a separate e-mail account.
Rules you create with the Outlook 2007 Rules Wizard can process outgoing messages as well as incoming ones. One way to ensure that a recipient is copied on all outgoing messages is to add a rule that automatically adds the recipient to the message’s Cc field. Follow these steps to do so:
Choose Tools, Rules And Alerts to begin creating the rule.
Click New Rule; in the Start From A Blank Rule group, select Check Messages After Sending and click Next.
Click Next again without choosing any conditions to cause the rule to be used for all messages. Click Yes in the warning dialog box to confirm that you want the rule applied to all messages.
Select the action Cc The Message To People Or Distribution List; then click the underlined link in the Rule Description box and select the addresses where you want to send the carbon copies. These addresses can be from the Global Address List (GAL) or your Contacts folder, or you can type in specific addresses.
Click Next, set exceptions as needed, and then click Next.
Supply a Name for the rule, verify that the Turn On This Rule check box is selected, and ensure that you are satisfied with the rule settings; then click Finish. Click OK to close the Rules And Alerts dialog box.
Note
For more details about working with message rules, see Chapter 11.
Note
Outlook might display a dialog box informing you that the rule you are creating is client-side only. For information on client-side rules, see the section "Creating Client-Side and Server-Side Rules" in Chapter 11.
Unfortunately, Outlook 2007 doesn’t offer a Bcc action for the rule. The add-on Always BCC for Outlook 2007, available at www.sperrysoftware.com/jcAlwaysBCC.asp, enables you to automatically add a Bcc recipient. It is designed to work with the Outlook E-Mail Security Update for Outlook 2000 and the same features built into Outlook 2002, Outlook 2003, and Outlook 2007.
A rule is handy for copying all messages—or only certain messages—to one or more people, as explained in the preceding section. Distribution lists are handy for addressing a message to a group of people without entering the address for each person.
If you regularly send the same message to the same people but want to specify some on the To field, others in the Cc field, and still others in the Bcc field, distribution lists and rules won’t do the trick. Instead, you can use a template or a custom form to send the message. You create the form or template ahead of time with the addresses in the desired fields; you then open that item, complete it, and send it on its way. Use the following steps to create and use a template for this purpose:
In Outlook 2007, start a new message.
Enter the e-mail or distribution list addresses as needed in the To, Cc, and Bcc fields.
Enter any other information that remains the same each time you send the message, such as subject or boilerplate text in the body of the message.
Click the Microsoft Office Button, click Save As and then click Save As.
Choose Outlook Template from the Save As Type drop-down list.
Enter a name in the File Name field, and if you want to use a location other than your Templates folder, choose a path for the template.
Close the message form and click No if prompted to save changes.
When it’s time to create the message, choose Tools, Forms, Choose Form to open the Choose Form dialog box (see Figure 8-3).
Choose User Templates In File System from the Look In drop-down list, choose the template you created in step 7, and click Open.
Add any other recipients of message content and click Send to send the message.

Note
If you use the default Template folder for your templates, you don’t have to browse for them when you choose the User Templates In File System option.
Note
See Chapter 25, for more information on using templates in Outlook 2007 and Chapter 28, for details on creating and using custom forms.
By default, new messages have their priority set to Normal. You might want to change the priority to High for important or time-sensitive messages or to Low for non–work mail or other messages that have relatively less importance. Outlook 2007 displays an icon in the Importance column of the recipient’s Inbox to indicate High or Low priority. (For messages with Normal priority, no icon is displayed.)
The easiest way to set message priority is by using the Message ribbon in the message form. In the Options group, click the High Importance button (which has an exclamation point icon) to specify High priority. Click the Low Importance button (which has a down arrow icon) to specify Low priority. To set the priority back to Normal, click the selected priority again to remove the highlight around the button (see Figure 8-4).

Figure 8-4. Outlook 2007 highlights the appropriate priority button to provide a visual indicator of the message’s priority.
You also can specify a message’s sensitivity by choosing a Normal (the default), Personal, Private, or Confidential sensitivity level. Setting sensitivity adds a tag to the message that displays the sensitivity level you selected. This helps the recipient see at a glance how you want the message to be treated. To set sensitivity, click the More button in the Options group on the Message ribbon and select the sensitivity level from the Sensitivity drop-down list.
Although you can create some messages in a matter of seconds, others can take considerably longer—particularly if you’re using formatting or special features, or if you’re composing a lengthy message. If you’re interrupted while composing a message or if you simply want to leave the message to finish later, you can save the message in your Drafts folder. Later, when you have time, you can reopen the message, complete it, and send it. Click the Microsoft Office Button and choose Save in the message form to have Outlook 2007 save the message to the Drafts folder (see Figure 8-5). When you’re ready to work on the message again, open the Drafts folder and double-click the message to open it.

In the Advanced E-Mail Options dialog box (see Figure 8-6), you can configure various options that affect how Outlook 2007 sends e-mail messages. To open this dialog box, choose Tools, Options and then click E-Mail Options on the Preferences tab. In the E-Mail Options dialog box, click Advanced E-Mail Options.

Note
For details on specifying which account is used to send a message, see the section "Sending Messages Using a Specific Account" in Chapter 7.
In the Advanced E-Mail Options dialog box, you can modify the following settings:
Set Importance. This option sets the default importance or priority level for all new messages. When you compose a message, you can override this setting by clicking the High Priority button or the Low Priority button on the toolbar in the message form, or by clicking Options on the toolbar and setting the priority in the Message Options dialog box. The default setting is Normal.
Set Sensitivity. This option sets the default sensitivity level for all new messages. When you compose a message, you can override this setting by clicking Options on the toolbar and setting the sensitivity level in the Message Options dialog box. The default setting is Normal.
Messages Expire After n Days. This option causes the messages to expire after the specified number of days. The message appears in strikethrough in the recipient’s mailbox at that time. (This setting does not necessarily work with every e-mail client.)
Allow Comma As Address Separator. If this check box is selected, you can use commas as well as semicolons in the To, Cc, and Bcc boxes of a message form to separate addresses.
Automatic Name Checking. Select this check box to have Outlook 2007 attempt to match names to e-mail addresses. Verified addresses are underlined, and those for which Outlook 2007 finds multiple matches are underscored by a red wavy line. When multiple matches exist and you’ve used a particular address before, Outlook 2007 underscores the name with a green dashed line to indicate that other choices are available.
Delete Meeting Request From Inbox When Responding. Select this check box to have Outlook 2007 delete a meeting request from your Inbox when you respond to the request. If you accept the meeting, Outlook 2007 enters the meeting in your calendar. Clear this check box if you want to retain the meeting request in your Inbox.
Suggest Names While Completing To, Cc, And Bcc Fields. When this check box is selected, Outlook 2007 completes addresses as you type them in the To, Cc, and Bcc boxes of the message form. Clear this check box to turn off this automatic completion. See Chapter 6, for more information on the address nickname cache and how to work with it.
Press Ctrl+Enter To Send Messages. When this check box is selected, Outlook 2007 accepts Ctrl+Enter as the equivalent of clicking the Send button when composing a message.
Other options in the Advanced E-Mail Options dialog box are explained in other locations in this book, including in the following sections.
To specify when Outlook 2007 should send messages, choose Tools, Options and click Mail Setup to locate the Send Immediately When Connected option. With this option selected, Outlook 2007 sends messages as soon as you click Send (provided that Outlook 2007 is online). If Outlook 2007 is offline, the messages go into the Outbox until you process them with a send/receive operation (which is also what happens if you do not select this option).
Regardless of which e-mail editor you use, you can request a delivery receipt or a read receipt for any message. Both types of receipts are messages that are delivered back to you after you send your message. A delivery receipt indicates the date and time your message was delivered to the recipient’s mailbox. A read receipt indicates the date and time the recipient opened the message.
Specifying that you want a delivery receipt or read receipt for a message doesn’t guarantee that you’ll get one. The recipient’s mail server or mail client might not support delivery and read receipts. The recipient might have configured the e-mail client to automatically reject requests for receipts or the recipient might answer No when prompted to send a receipt. If you receive a receipt, it’s a good indication that the message was delivered or read. If you don’t receive a receipt, however, don’t assume that the message wasn’t delivered or read. A message receipt serves only as a positive notification, not a negative one.
To request receipts for a message you’re composing, in the Options group of the Message ribbon, click the More button to display the Message Options dialog box (see Figure 8-7). You’ll find the delivery and read receipt options in the Voting And Tracking Options group.

You can set options to determine how Outlook 2007 handles delivery and read receipts by default. Choose Tools, Options and click E-Mail Options on the Preferences tab. In the E-Mail Options dialog box, click Tracking Options to display the Tracking Options dialog box, shown in Figure 8-8, in which you’ll find the options discussed in this section.

The following options control how Outlook 2007 requests read receipts and how the receipts are processed after they are received:
Process Requests And Responses On Arrival. Select this check box to have Outlook 2007 process all message receipt requests and responses when they arrive.
Process Receipts On Arrival. Select this check box to have Outlook 2007 generate received/read receipts when messages come in requesting them. Clear this check box to have Outlook 2007 prompt you for each receipt.
After Processing, Move Receipts To. Select this check box to have Outlook 2007 move receipts from the Inbox to the specified folder.
For All Messages I Send, Request Read Receipt. Select this check box to have Outlook 2007 request a read receipt for each message you send. When you compose a message, you can override this setting; to do so, click the Options button in the Options group of the Message ribbon.
For All Messages I Send, Request Delivery Receipt. Select this check box to have Outlook 2007 request a delivery receipt for each message you send.
These three options in the Tracking Options dialog box let you control how Outlook 2007 responds to requests from others for read receipts on messages you receive and apply to Internet mail accounts only:
Always Send A Response. When this option is selected, Outlook 2007 always sends a read receipt to any senders who request one. Outlook 2007 generates the read receipt when you open the message.
Never Send A Response. Select this option to prevent Outlook 2007 from sending read receipts to senders who request them. Outlook 2007 will not prompt you regarding receipts.
Ask Me Before Sending A Response. Selecting this option enables you to control, on a message-by-message basis, whether Outlook 2007 sends read receipts. When you open a message for which the sender has requested a read receipt, Outlook 2007 prompts you to authorize the receipt. If you click Yes, Outlook 2007 generates and sends the receipt. If you click No, Outlook 2007 doesn’t create or send a receipt.
Note
The Delete Blank Voting And Meeting Responses After Processing check box, if selected, causes Outlook 2007 to delete voting and meeting requests that contain no comments. Instead, Outlook 2007 processes them automatically.
Note
See the section "Voting in Outlook" in Chapter 42, to learn more about voting. See Chapter 20, to learn about the Calendar and scheduling meetings.
If you compose a message from Office Word 2007 (that is, you started Word 2007 outside Outlook 2007), you have the ability to send the message as a document for review. You might use this feature if you’re collaborating on a document with others or incorporating their comments into the final draft. Recipients can review the document and add comments, which they send back to you. They also can incorporate the changes directly into the document, which enables them to take advantage of the Word 2007 revision marks feature.
Before you can send a document for review, you must first add the Send For Review button to the Word 2007 Quick Access Toolbar. To do this, open the document in Word 2007, click the Microsoft Office Button, and choose Word Options. In the Word Options dialog box, select Customize, and then select Commands Not In The Ribbon in the Choose Commands From drop-down list. Select Send For Review and click Add; then click OK. In the document, click the Send For Review button, and then address and send the e-mail message as usual.
When you reply to a message, Outlook 2007 sends your reply to the person who sent you the message. Replying to a message is simple: select the message in the Inbox, and then click the Reply button on the Standard toolbar; choose Actions, Reply; or press Ctrl+R. Outlook 2007 opens a message form and, depending on how you have configured Outlook 2007 for replies, can also include the original message content in various formats.
If the message to which you’re replying was originally sent to multiple recipients, and you want to send your reply to all of them, click Reply To All; choose Actions, Reply To All; or press Ctrl+Shift+R.
Note
For more information about message replies, see the section "Using Other Reply and Forwarding Options" on the next page.
Note
When you use Reply All, Outlook 2007 places all the addresses in the To box. If you don’t want the recipients list to be visible, use the Bcc box to send blind carbon copies. To do this, click Reply All, highlight the addresses in the To box, and cut them. Then click in the Bcc box and paste the addresses there.
In addition to replying to a message, you can forward the message to one or more recipients. To forward a message, select the message header in the message folder (Inbox or other), and then click Forward in the Respond group of the Message ribbon or press Ctrl+F. Outlook 2007 opens a new message form and either incorporates the original message in the body of the current one or attaches it to the new message.
If you forward a single message, Outlook 2007 forwards the original message in the body of your new message by default, and you can add your own comments. If you prefer, however, you can configure Outlook 2007 to forward messages as attachments instead of including them in the body of your messages.
You can change how Outlook 2007 handles and formats message replies and forwarded messages. These options are found in the E-Mail Options dialog box, shown in Figure 8-9.
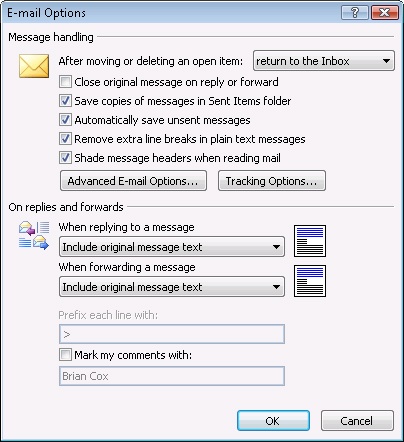
Figure 8-9. You can set options for message replies and forwarded messages in the E-Mail Options dialog box.
To open this dialog box, click Tools, Options; then click E-Mail Options on the Preferences tab. You can then view or set the following options that affect replies and forwards:
Close Original Message On Reply Or Forward. Select this check box to have Outlook 2007 close the message form when you click Reply or Forward. Clear this check box to have Outlook 2007 leave the message form open. If you frequently forward the same message with different comments to different recipients, it’s useful to have Outlook 2007 leave the message open so that you don’t have to open it again to perform the next forward.
When Replying To A Message. Use this drop-down list to specify how Outlook 2007 handles the original message text when you reply to a message. You can choose to have Outlook 2007 generate a clean reply without the current message text, include the text without changes, or include but indent the text, for example. Note that you can either include the original message text in the body of your reply or add it to the message as an attachment.
When Forwarding A Message. Use this drop-down list to specify how Outlook 2007 handles the original message text when you forward a message. You can, for example, include the message in the body of the forwarded message or add it as an attachment.
Prefix Each Line With. If you select Prefix Each Line Of The Original Message in the When Replying To A Message drop-down list or the When Forwarding A Message drop-down list, you can use this box to specify the character Outlook 2007 uses to prefix each line of the original message in the body of the reply or forwarded message. The default is an angle bracket (>) and a space, but you can use one or more characters of your choice.
Mark My Comments With. Select this check box and enter a name or other text in the associated box. Outlook 2007 will add the specified text to mark your typed comments in the body of a message that you are replying to or forwarding.
Note
For more details on replying to and forwarding messages, see the sections "Replying to Messages" and "Forwarding Messages" earlier in this chapter.
Troubleshooting
You can’t forward a single message as an attachment
In Outlook 2007, you can send documents from other 2007 Microsoft® Office system applications as attachments, and you can forward multiple messages in Outlook 2007 as attachments. However, sending a single message as an attachment instead of including it in the body of the message in Outlook 2007 requires that you either reconfigure the Outlook 2007 default behavior before forwarding the message or use a workaround.
To change the Outlook 2007 default behavior so that it sends a single message as an attachment when you forward it, choose Tools, Options, E-Mail Options. In the When Forwarding A Message drop-down list, select Attach Original Message and click OK. This setting now applies to all messages you forward, not just the current one.
If you want to override the Outlook 2007 default behavior for the current message only, use one of these two workarounds. One method is to select two messages to forward and then, in the message form, delete the attached message that you don’t want to include. A second method is to compose a new message and choose Insert, Item to insert the message (or any other Outlook 2007 item).
When you delete messages from any folder other than the Deleted Items folder, the messages are moved to the Deleted Items folder. You can then recover the messages by moving them to other folders, if needed. When Outlook 2007 deletes messages from the Deleted Items folder, however, those messages are deleted from Outlook 2007 permanently.
You can set Outlook 2007 to automatically delete all messages from the Deleted Items folder whenever you exit the program, which helps keep the size of your message store manageable. However, it also means that unless you recover a deleted message before you exit Outlook 2007, that message is irretrievably lost. If you seldom have to recover deleted files, this might not be a problem for you.
To change what happens to items in the Deleted Items folder when you exit Outlook 2007, choose Tools, Options and click the Other tab. Select or clear Empty The Deleted Items Folder Upon Exiting.