
You can do much more with your Outlook 2007 contacts list than just view address and phone information. Outlook 2007 provides a set of tools that make it easy to phone, write, e-mail, or communicate with contacts in other ways. This section explains these tools.
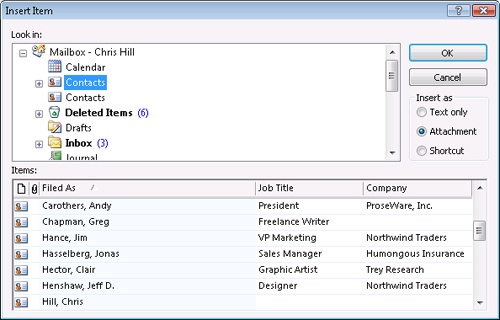
As you work with contacts, it’s useful to have e-mail messages, appointments, tasks, documents, or other items related to the contact at your fingertips. You can relate items to a contact by inserting one Outlook 2007 item in another. For example, if you create a task to call several of your contacts, you can use the Attach Items button on the Insert tab to insert those contacts in the task:
With the task open, click Attach Item on the Insert tab.
Select the contacts in the resulting Insert Item dialog box, shown in Figure 18-7.
Click OK to insert the item.
Note
For details on setting up tasks, see "Working with Tasks in the Tasks Folder" in Chapter 22.
E-mail messages that you send to a contact are automatically associated to that contact and appear on the Activities page of the contact form (discussed shortly). In addition, most items you create using the Actions menu are automatically associated with the contact entry and appear on the Activities page. For example, if you choose Actions, New Task For Contact to create a new task for a contact, Outlook 2007 associates the task with the contact.
On the Contact tab of the Ribbon of any contact form, clicking the Activities button in the Show group displays all the items associated with that contact, as shown in Figure 18-8. Outlook 2007 searches for links to items in the main Outlook 2007 folders, including Contacts, e-mail (Inbox and other message folders), Journal, Notes, Tasks, and Calendar.
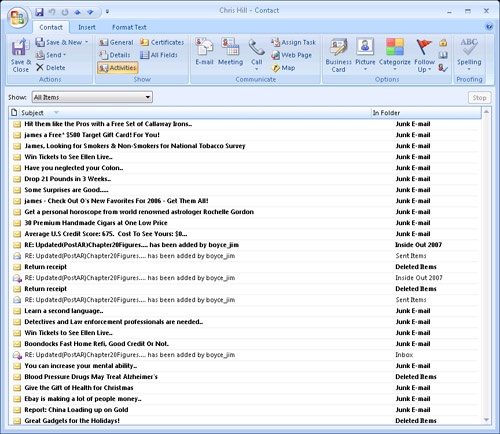
What good is the Activities page? It’s extremely useful for finding items associated with a specific contact. For example, you could sort the Inbox by sender to locate an e-mail message from a particular person, or you could use the Activities page of his or her contact form to achieve the same result. You could also view a list of the tasks assigned to an individual by checking the Activities page. Although you can view these associations in other folders, the Activities page not only offers an easier way to view the links but also lets you see all linked items, not just specific types of items.
In many cases, you might want to insert one or more documents in a contact. For example, assume that you manage contracts for several individuals or companies. You can insert a contract document into the contact covered by the contract to make it easier to open the document from the contact form. With this association, you don’t need to remember the document name if you know the name of the contact with whom it is associated.
Follow these steps to insert a document in a contact:
Open the Contacts folder, open the contact item, and then click the Insert tab.
Click Attach File.
Locate the files you want to associate with the contact, and then click Insert.
The link now appears in the Notes area of the contact details.
Click the Contact tab, and then click Save & Close to create the link.
When you want to open the document, simply open the contact form and click the link in the Notes section.
In the preceding example, you actually inserted the document in the contact item. An alternative is to insert a hyperlink to the document in the contact item. The advantage to this method is that you are not duplicating the document—it remains in its original location on disk. When you need to open the document, you can click the hyperlink in the contact item. Or you can open the document from its location on disk.
Linking a document in a contact is easy. In step 3 of the preceding example, rather than click Insert, click the down arrow next to the Insert button, and then select Insert As Hyperlink.
Occasionally, you’ll want to remove a link between a contact and another item. For example, perhaps you’ve accidentally linked the wrong document to a contact, or perhaps the contact who had been associated with a particular project has taken a different job.
To remove a link from a contact to an item, follow these steps:
Open the contact item, and then on the Contact tab, in the Show group, click Activities.
Right-click the link to the item you want to remove, and then choose Delete.
Note
Although you can remove the contact association in a task, doing so removes the task from the contact’s Activities page only if the task is assigned to someone other than the linked contact. If the contact owns the task, the task continues to be listed on the Activities page even after the task is marked as completed.
A category is a keyword or a phrase that helps you keep track of items so that you can easily find, sort, filter, or group them. Use categories to keep track of different types of items that are related but stored in different folders. For example, you can keep track of all the meetings, contacts, and messages for a specific project when you create a category named after the project and then assign items to it.
Categories also give you a way to keep track of contacts without putting them in separate folders. For example, you can keep business and personal contacts in the same contacts folder and use the Business and Personal categories to sort the two sets of contacts into separate groups.
One quick way to assign categories to a contact is to right-click the contact item, choose Categorize, and then click a category. If the category you want doesn’t appear in the category list, choose All Categories on the shortcut menu. Then, in the Color Categories dialog box, you can select the check boxes next to the categories you want to assign to the contact. Alternatively, you can open the contact item, click the Categorize button on the contact form, and select a category, or click All Categories to open the Color Categories dialog box. This dialog box is useful not only for assigning categories but also for reviewing the categories you’ve already assigned to an item.
Note
For more information about how to assign a category to a contact; how to use categories to sort, filter, and group contact items; and how to create your own categories, see Chapter 5.
If you create a contact entry using the same name or e-mail address as an entry that already exists in your Contacts folder, Outlook 2007 displays the Duplicate Contact Detected dialog box, in which you can choose to either add the new contact entry or update your existing entry with the new information, as shown in Figure 18-9.

Figure 18-9. Use the Duplicate Contact Detected dialog box to tell Outlook 2007 how to handle a duplicate contact.
If you select the first option, Outlook 2007 adds the new contact to your Contacts folder, and you’ll now have two entries listed under the same name or e-mail address. In that case, you’ll probably want to add some information to the contact forms—perhaps company affiliation or a middle initial—to distinguish the two entries.
If you select the second option, to update the existing entry with information from the new one, Outlook 2007 compares the fields containing data in both entries and copies the data from the new entry into any fields that have conflicting data. For example, if you have a contact named Chris Ashton whose phone number is 555-5655, and you create a new contact entry for Chris Ashton with a new phone number, Outlook 2007 copies the new number into the existing entry and leaves the other fields the same.
Not all data is simply copied, however. Outlook 2007 does not copy any categories you’ve assigned to the new entry or any text that appears in the message box of the new entry. If you want to copy data from these fields from a new entry into an existing entry, you must copy that data manually. Likewise, if you’ve added links to items other than contacts on the Activities page of the new contact form (links to tasks or appointments, for example), Outlook 2007 does not copy them. Certificates and links to contacts on the Activities page are copied from the new entry and added to the existing entry without replacing the original information.
In case you need to revert to the information in the original contact entry, a copy of the original entry is stored in your Deleted Items folder whenever Outlook 2007 copies new data.
If you have a modem, you can use Outlook 2007 to dial any phone number you specify, including phone numbers for contacts in your contacts list.
To make a phone call to a contact using Outlook 2007, follow these steps:
Open the Contacts folder.
Right-click a contact item, and then choose Call Contact to open the New Call dialog box with the contact’s phone number already entered, as shown in Figure 18-10. You can also click the Dial button on the toolbar, or if the contact form is open, click the Call button in the Communicate group on the Contact tab of the Ribbon.
If you want Outlook 2007 to use a phone number associated with a different contact, type the contact’s name in the Contact box, and then press Tab or click in the Number box. Alternatively, you can simply type the phone number in the Number box.
If the contact entry for the person you’re calling already includes phone numbers, select the phone number in the Number box. If the contact entry doesn’t specify a phone number, type the number in the Number box.
To keep a record of the call in the journal, select the Create New Journal Entry When Starting New Call check box. If you select this check box, a journal entry opens with the timer running after you start the call. You can type notes in the text box of the journal entry while you talk.
Click Start Call.
Pick up the phone handset, and begin the call.
If you created a journal entry for the call, click Pause Timer to stop the clock when you’ve finished the call, and then click Save & Close.
Click End Call, and then hang up the phone.

Note
If you omit the country code and area code from a phone number, the automatic phone dialer uses settings from the Dialing Properties dialog box, which you can access through the Phone And Modem Options icon in Control Panel or by clicking Dialing Properties in the New Call dialog box. If you include letters in the phone number, the automatic phone dialer does not recognize them.
If you make frequent calls to particular phone numbers, you can create a speed dial list of those phone numbers and quickly make calls from the list. Before you become enamored with the idea of the Outlook 2007 speed dialing feature, however, you should understand that it suffers from a flaw that renders it only moderately useful. Although you can add names and numbers to the speed dial list, Outlook 2007 keeps only the numbers and loses the names. If you remember whom a particular number belongs to, this isn’t a problem. However, if you have more than a few numbers on the list, the speed dial feature won’t do you much good.
Follow these steps to create entries in the speed dial list:
Open the Contacts folder, and then choose Actions, Call Contact, New Call to open the New Call dialog box. Alternatively, you can click the Dial button on the Standard toolbar.
Click Dialing Options to display the Dialing Options dialog box.
If the person’s contact information is stored in the Contacts folder, type the name in the Name box, and then press Tab to move to the Phone Number box, where Outlook 2007 automatically fills in the phone number from the contact entry. If you need to use a different number, select it from the drop-down list or type the number in the Phone Number box.
Click Add to add the entry to the speed dial list, shown in Figure 18-11.
Repeat these steps to add other numbers as needed, and then click OK.
Click Close to close the New Call dialog box.

If you’re working in the Contacts folder, you can send an e-mail message to one of your contacts without switching to the Inbox folder. This is a handy feature that can save a lot of time in an average work day.
Here’s how to send a message from the Contacts folder:
It seems everyone has a Web site these days, whether it’s a company’s site or a collection of family photos. If you have the URL for a contact’s Web page recorded in the contact entry, you can connect to that site directly from Outlook 2007. This is particularly handy for linking to business sites from a company contact entry—for example, you might create a link to the company’s support or sales page. Associating Web sites with contacts is often more meaningful than simply storing a URL in your Favorites folder.
With the contact item open, you can connect to the contact’s Web site by performing one of the following actions:
Click on Web Page in the Communicate group on the Contact tab.
Press Ctrl+Shift+X.
Click the hyperlink that appears in the Web Page Address box in the contact entry.
Many Outlook 2007 users believe that the Calendar folder is the only place you can easily schedule a new appointment or meeting, but that’s not the case. You can schedule an appointment or a meeting in any Outlook 2007 folder. The Contacts folder, however, is a logical place to create new appointments and meetings because those events are often associated with one or more contacts stored in the Contacts folder.
Meetings differ from appointments in that they are collaborative efforts that involve the schedules of all the attendees. When you set up a meeting, Outlook 2007 creates and sends meeting requests to the individuals you want to invite. You can create meeting requests for any number of contacts through the Contacts folder, saving the time of switching folders.
To send a meeting request to one or more of your contacts from the Contacts folder, follow these steps:
Open the Contacts folder, and then select the contact entries for those people you want to invite to the meeting. (To select multiple entries, hold down the Ctrl key and click the entries.)
Choose Actions, Create, and then select New Meeting Request To Contact.
In the Subject box, type a description of the proposed meeting.
Enter the proposed start and end times for the meeting.
Select any other options you want.
Click Send.
Note
For details about setting up meetings and sending meeting requests, see Chapter 21.
The Tasks folder in Outlook 2007 offers a handy way to keep track of your work and the work you delegate to others. For example, if you manage a group of people, you probably use the Tasks folder to assign tasks to the people who work for you. However, if you need to assign a job to one of your contacts, you can do this directly from the Contacts folder. Doing so adds the contact’s name to the Contacts box in the task request.
Follow these steps to assign a task to a contact:
In the Contacts folder, select the contact, choose Actions, Create, and then select New Task For Contact. Or simply right-click the contact, choose Create, and then select New Task For Contact.
Outlook 2007 opens a new task form. Enter the subject and other information about the task, and then click Assign Task. Outlook 2007 adds the contact’s e-mail address in the To box. Enter other information as needed, such as start and stop dates for the task.
Click Send to send the task request.
You can flag a contact item for follow-up to have Outlook 2007 remind you to call or e-mail the contact. For example, suppose that you want to make a note to yourself to call a colleague at 10:00 A.M. tomorrow to ask about the status of a project. You could create a note in the Notes folder, create a task, or add an appointment to your schedule—but an easy way to create the reminder is to add a follow-up flag to the contact entry in the Contacts folder. Flagging a contact item adds an additional field to the contact data. The flag text appears in the contacts list, as shown in Figure 18-12, and shows up as a message on the contact form, as shown in Figure 18-13. You can also organize the view in the Contacts folder to show contacts sorted by flag: choose View, Current View, By Follow-Up Flag to view contacts organized by follow-up flag.

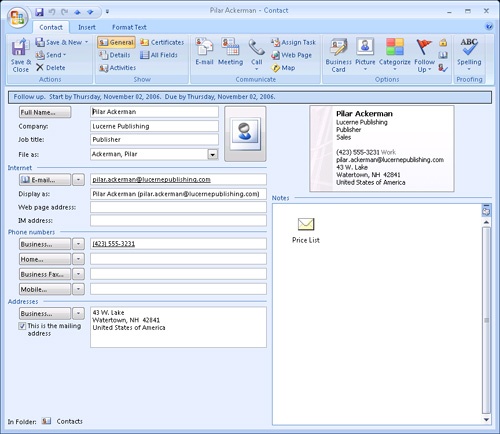
Figure 18-13. Outlook 2007 displays a message on the contact form indicating that a follow-up is needed for the contact.
If you specify a particular date and time for follow-up when you add the flag, Outlook 2007 generates a reminder at the appointed time. Adding a reminder helps ensure that you don’t forget to follow up with the contact at the appropriate time.
Follow these steps to flag a contact for follow-up:
In the Contacts folder, select the contact that you want to flag, and then choose Actions, Follow Up. Or right-click the contact, and then choose Follow Up.
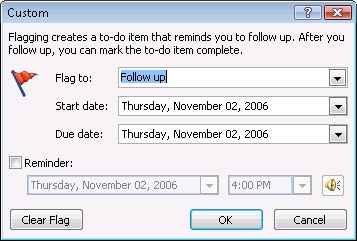
If one of the default follow-up time options suits you, click it. If not, click Custom to open the Custom dialog box.
In the Flag To box of the Custom dialog box, shown in Figure 18-14, select the flag text you want Outlook 2007 to use, or type your own flag text.
Select a start date in the Start Date drop-down list, and then select a due date in the Due Date drop-down list.
If you want a reminder, click the Reminder option, select a date, and then specify a time.
Click OK. Outlook 2007 adds the flag text to the contact item and adds an entry to your task list.
When you have completed your follow-up action, you can remove the flag from the contact item (clear the flag) or mark the follow-up as completed. If you clear the flag, Outlook 2007 removes it from the contact item and the task list. If you prefer to have the flag remain, you can mark the follow-up as completed. In this case, the flag remains, but the contact form includes a message indicating that the follow-up was accomplished (and the date). When you choose View, Arrange By, Current View, By Follow-Up Flag to view the Contacts folder sorted by flag, the completed items are grouped together. Use one of the following methods to mark a follow-up flag as completed:
Select the flagged contact item, click Actions, Follow Up, and then click Mark Complete.
Right-click the contact item, click Follow Up, and then click Mark Complete.
Use one of the following methods to clear a flag, which removes it from the contact item:
Select the contact item, click Actions, Follow Up, and then click Clear Flag.
Right-click the contact item in the Contacts folder, click Follow Up, and then click Clear Flag.
If you store only a small list of contacts, finding a particular contact is usually not a problem. As the number of contacts grows, however, it becomes more and more difficult to locate information, especially if you aren’t sure about a name. For example, you might remember that a person works for a certain company but can’t recall the person’s name. Outlook 2007 provides features to help you quickly and easily locate contact information.
Perhaps the easiest method of locating a contact if you know the name is to type the name in the Search Address Books box on the Outlook 2007 Standard toolbar and then press Enter. Outlook 2007 locates the contact and displays the contact form. If more than one contact matches the data you’ve entered, Outlook 2007 displays the Choose Contact dialog box, which lists all the matches to allow you to select the appropriate one, as shown in Figure 18-15.

Figure 18-15. Use the Choose Contact dialog box to select the correct contact after a search returns multiple items.
Finally, if you need to perform an advanced search, choose Tools, Instant Search, Advanced Find to open the Advanced Find dialog box, shown in Figure 18-16. You can use this dialog box to perform more complex searches based on multiple conditions, such as searching for both name and company.

Figure 18-16. Use the Advanced Find dialog box to perform more complex searches using multiple conditions.
Note
For a detailed discussion of how to perform both simple and complex searches in Outlook 2007, see Chapter 33.
Making changes to a single contact doesn’t take long, but making the same change to several contacts can take a lot of time. You can relieve some of that time drain by propagating a change for a single contact to multiple contacts.
For example, let’s say that your Contacts folder includes contacts for several people who work for the same organization. The organization’s fax number has changed, and now you need to make that change for each contact. Propagating the change to other contacts is a simple drag-and-drop action with the Outlook 2007 capability to group items in the Contacts folder view.
Here’s how to make it happen:
Open the folder containing the contacts to be changed.
In the Navigation Pane, click the view that best displays the information you need to change. In this example, choose By Company because its table view includes the fax number. Then click View, Arrange By, Custom.
Click Group By, and in the Group Items By drop-down list, select the item you want to change (in this example, Business Fax). Figure 18-17 shows By Company view grouped by Business Fax.
In the Expand/Collapse Defaults drop-down list, select All Collapsed. Click OK twice to return to the view you just created.
Expand the group that includes the item you want to change.
Open one of the contacts, make the needed change, and then save and close the contact. This contact now appears by itself under a different group.
To propagate the change, drag the gray grouping bar for the unchanged contacts to the grouping bar for the modified contact. Outlook 2007 makes the change to the other contacts automatically.

Changing multiple items at one time is easy as long as you remember that you need to first display a table view and then group it by the item you want to change. You can either customize an existing view or create a new one. If you customize an existing standard view, you can restore it to its default condition by clicking View, Arrange By, Current View, Define Views, selecting the view, and then clicking Reset.