
Before the introduction of workgroup software such as Microsoft® Exchange and Microsoft Office Outlook® 2007, scheduling a meeting could be a difficult task. Now all it takes is a few simple steps to avoid those endless e-mail exchanges trying to find a suitable meeting time for all invitees. Office Outlook 2007 provides you with a single place to schedule both people and resources for meetings. You can take advantage of these features whether or not you use Exchange Server.
Chapter 20, tells you all about scheduling appointments. Meetings and appointments are similar, of course: both types of items appear on your calendar, and you can create, view, and store them in your Outlook 2007 Calendar folder. An appointment, however, involves only your schedule and time, whereas a meeting involves inviting others and coordinating their schedules. Another difference is that a meeting often requires you to schedule resources, such as a conference room or an overhead projector.
You can schedule meetings with other Outlook 2007 users as well as those who use any e-mail or collaboration application that supports the vCalendar or iCalendar standard. (For more information, see "iCalendar, vCalendar, and vCard" in Chapter 2.) This chapter takes you through the process of scheduling meetings and lining up resources.
To schedule a meeting, you begin by selecting your calendar in Outlook 2007 and sending a meeting request. Choose File, New, Meeting Request or click the arrow next to New on the toolbar and choose Meeting Request. The meeting form opens, as shown in Figure 21-1.

A meeting request is like an appointment item but with a few additional details—and you can work with it in much the same way you work with an appointment. This chapter describes only the parts of a meeting request that differ from an appointment.
Note
For details about creating and working with appointments in the Outlook 2007 Calendar folder, see Chapter 20.
To invite people to your meeting, start by selecting their names on either the Appointment page or the Scheduling page of the Meeting tab. To select them on the Appointment page, you can type each name in the To box, separating the names with a semicolon. When you enter the names manually, Outlook 2007 considers each person a required attendee. Alternatively, you can click To to open the Select Attendees And Resources dialog box, shown in Figure 21-2. In this dialog box, select a name in the Name list, and then click Required or Optional to designate whether that person’s attendance is critical. (This choice will be reflected in the meeting request you send to these individuals.) After you have finished adding names, click OK to close the dialog box.

Figure 21-2. In the Select Attendees And Resources dialog box, you can add the names of the individuals you’re inviting to your meeting.
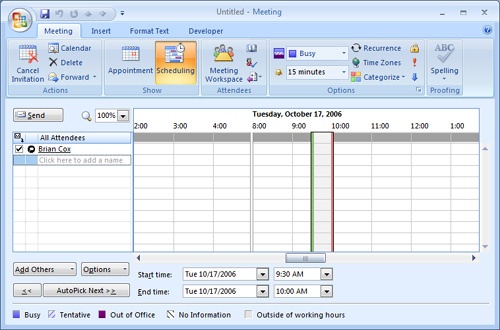
Clicking Scheduling on the Meeting tab displays the Scheduling page, shown in Figure 21-3. You can click in the designated box in the All Attendees column and type a name or an e-mail address. Alternatively, you can click Add Others and select the location from which you want to add the names. For example, if you want to add individuals from the Global Address List (GAL), click Add Others, and then select Add From Address Book to open the Select Attendees And Resources dialog box. As before, select a name, click Required or Optional, and then click OK.
After you have added the names of the individuals you want to invite, the Scheduling page on the meeting form displays free/busy information for all the people you selected. In Figure 21-4, the Scheduling page shows information for the meeting organizer (you), required attendees, and optional attendees.

The icons you see beside each name have the following meanings:
Icon | Description |
|---|---|
The magnifying glass icon indicates the meeting organizer. | |
The arrow icon indicates a required attendee. | |
The icon containing the letter i indicates an optional attendee. | |
The building icon indicates a scheduled resource. |
After you have identified a time slot that fits everyone’s schedules, you can schedule the meeting for a particular time slot using the Meeting Start Time and Meeting End Time drop-down lists.
If you want Outlook 2007 to fit the meeting into the next available time slot, click AutoPick Next. By default, AutoPick selects the next time slot in which all attendees and at least one resource are free.
You can specify whether the Scheduling page’s display of free/busy information should show only working hours (the default) or the entire day. To define working hours for your calendar, choose Tools, Options, and then click Calendar Options. To set displayed hours for a meeting, click the Options button on the Scheduling page and set or clear the Show Only My Working Hours option. Working hours are a way of displaying your time in the Calendar folder and controlling which hours are displayed on the Scheduling page. In most cases, including nonworking hours on the Scheduling page would become unmanageable.
After you have selected all the attendees, found an available time slot, and filled in all the necessary details on the message form, click Send on the form to send the meeting request to the attendees.
If it’s more convenient, you can initiate meeting requests from the Contacts folder instead of the Calendar folder. Right-click the contact entry for the person you want to invite to a meeting, and then choose Create, New Meeting Request To Contact. The meeting form opens, with the contact’s name in the To box. From here, you can select more attendees and enter meeting details such as subject and location.
If the contact entry contains an address for an Internet free/busy server (on the Details tab of the contact entry, in the Address box of the Internet Free/Busy area), you can download the contact’s free/busy information by clicking Options on the Scheduling page and then selecting Refresh Free/Busy Information. You can also download the contact’s free/busy information from Microsoft Office Online, if the contact uses that service, or from another free/busy server if one is specified in the Free/Busy Options dialog box. (This will be explained in detail in Chapter 36.)
Note
For details about Microsoft Office Online, see "Managing Your Free/Busy Information" in Chapter 36.
To change any part of a meeting request, including attendees, times, or other information, first double-click the meeting item in the Calendar folder to open it, and then make your changes. Click the Save icon on the Quick Access Toolbar to save the changes to the Calendar folder, or click Send Update to send an updated meeting request to the attendees. If you make changes that affect the other attendees, such as adding or removing attendees or changing the time or location, you should click Send Update so that the attendees get the new information.