
Chapter 19
Setting Up a Publishing Site
SharePoint 2010 is a multifunctional product. Among its many features is its capability to be used as a fully fledged web content management system when you enable the publishing infrastructure at the site collection level for existing sites, or create a Publishing Portal After you create a publishing portal or enabled the publishing features, you can find many differences from a standard SharePoint team site.
Figure 19.1 shows an out-of-the-box SharePoint publishing site. A site has two core perquisites enabled: the publishing infrastructure and additional specific publishing features. The publishing infrastructure provides publishing ability to the site collection as a whole, whereas the publishing features can be enabled for the site collection and subsites as required. Both must be enabled before you can take advantage of SharePoint publishing.

The publishing infrastructure and features also provide you with several useful tools to aid in content management.
After a publishing portal has been created, several additional document and system libraries, user groups, and Web Parts are available within the site structure, including the following:
- Site Content and Structure Reports: Reports that will provide information on aspects of the publishing process, for example all pages due to be published within the next seven days.
- Site Collection Documents: Documents to be used throughout the site collection.
- Site Collection Images: Images to be used throughout the site collection.
- Content Query Web Part: Allows you to publish information from your publishing portal by using a query. For example, if you have information in a subsite list you can use this Web Part to display that information on the portal homepage.
- Media Web Part: Used to add video and other multimedia content to your web page.
- Summary Links Web Part: Used to group related links and present them to the user in a much more friendly way than the standard links Web Part.
- Table of Contents Web Part: Used to generate a site map for the publishing portal.
One of the other major changes you can find within publishing sites as opposed to standard SharePoint team sites, is your ability to change the look and feel of the site completely. For example, http://sharepoint.microsoft.com/en-us/pages/default.aspx is a SharePoint-based site that has been completely changed from the default look and feel usually associated with SharePoint.
Another nice place to view custom SharePoint 2010 site designs is http://www.wssdemo.com/livepivot/ — this site is worth a look! Changes to the look and feel of the site are achieved by using a combination of Master pages and Cascading Style Sheets, both of which are discussed in Lesson 21, “Setting Branding Options in Publishing Sites.”
Pages
When you add a new page to the publishing site, things change. Before your page is published, it will have to be created, submitted for approval, and approved. SharePoint helps with this process by enabling you to begin an approval workflow.
Pages can also be scheduled for publication and you can include a start and end date for publication and a requirement that you be notified before publication ends. To prevent stale content, you can also set up a notification schedule for page review; the schedule can last for days, weeks, months, or even years. When the review date is reached SharePoint sends an email to a reviewer requesting that he or she check the page content.
Navigation
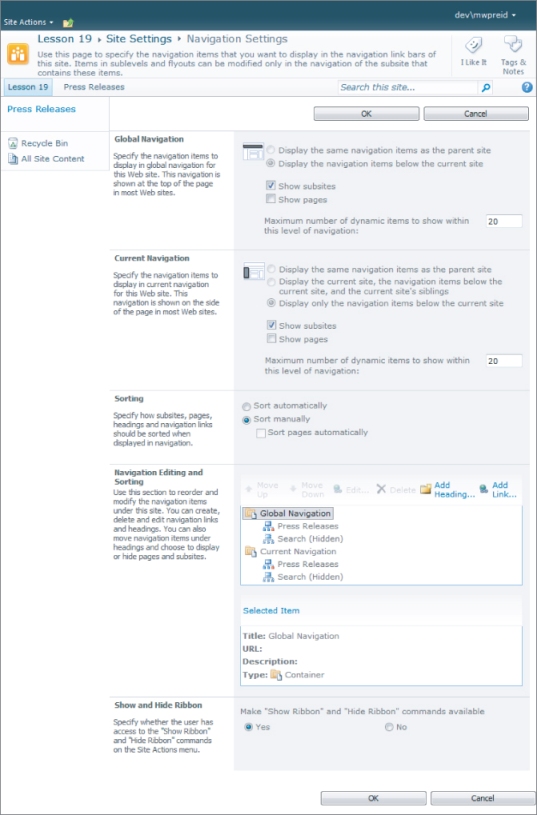
One of the major differences from SharePoint team sites you will find when working with a publishing site is the difference in control you will have over navigation. With a standard team site, you have a limited range of navigation options available to you. With a publishing site, you have much more control over how the navigation works and, in fact, you can customize it to meet your own specific needs. Once the publishing features have been enabled (they are enabled out of the box for a publishing portal), you have access to a range of new navigational features. A non-publishing site enables you to customize the Quick Launch menu, add a tree view for navigation, and add and reposition items on the top link bar. Beyond these options you will find that you are limited in how much you can customize the navigation. Figure 19.2 shows the navigation screen in a publishing site. Lesson 20, “Setting Navigation Options in Publishing Sites,” examines navigation in more detail and provides some examples of customization.
Site Administration
You will also find many additional options available to you in terms of site administration aimed at web content management and page publishing. These administration options are not available when you do not have the publishing features activated. For example, navigation management and customization can be managed within the Site Administration menus.
When creating a publishing site you have several options. From SharePoint 2010 Central Administration, you can use the default publishing template to create site collections with the publishing infrastructure and features already enabled. From an existing site, you can create a publishing site with a Workflow or you can enable the publishing features on an existing site. In the Try It section, you will create a publishing site with a Workflow and enable publishing on an existing team site.
When you have a publishing site with a workflow and you want to create subsites, the choice of site templates is limited. However, from your publishing portal site settings page, you can make other templates available. Under the Look and Feel section, click the Page Layouts and Site Templates link. Using the subsite list box on the left, you can pick those site templates that you want to make available. This is also a good way to hide templates you may not want your site owners using.
In this exercise, you will create a publishing site with a Workflow and enable publishing features on a team site. After each site is enabled, you will look at some of the new features available to you, including the approval workflow.
Lesson Requirements
To complete this Try It exercise, you need the following:
- Site collection administrator permissions.
- Existing SharePoint team site.
- Access to SharePoint Central Administration to create a site collection.
Hints
- Add your username to the security group Approvers.
Step-by-Step
To create a publishing portal from Central Administration, perform the following steps:
1. Click Application Management.
2. Click Create Site Collections.
3. Enter Example Publishing Site as the title.
4. If required, change the website URL to /sites/ and enter demopub as the rest of the example URL.
5. Click the Publishing tab in the Template section.
6. Select Publishing Portal.
7. Enter your username as the Primary Site Collection Administrator
8. Leave the Secondary Site Collection Administrator field blank.
9. Click OK to confirm and save the publishing portal.
10. Click the new site URL to open the site after it has been processed. Figure 19.3 shows the newly created publishing site in the browser.

To examine some of the features and objects in the new site, click Site Actions and select View All Site Content. This will give you some appreciation of the range of new objects available to you.
The next example takes a standard team site and enables the publishing features. To continue with this exercise, it is useful to have a new team site to see the full effect of the new objects and functionality. To continue, perform the following steps:
1. Click Site Actions.
2. Click Site Settings.
3. Select Manage Site Features in the Site Actions category.
4. Scroll down through the list of features until you get to SharePoint Server Publishing. Click the Activate button to enable publishing.
At this point you may get an error message, part of which is shown here:
“…The feature being activated is a scoped feature, which has a dependency on a Site Collection scoped feature, which has not been activated. Please activate the following feature before trying again: PerformancePoint Services Site Collection Features a1cb5b7f-e5e9-421b-915f-bf519b0760ef.”
We missed one important thing: Publishing features depend on the publishing infrastructure's being enabled for the site collection first, and this has to be done at the site collection level. To continue, do the following:
1. On the error page, click the Go Back to Site hyperlink.
2. Click Site Actions.
3. Click Site Settings.
4. Click Site Collection Features in the Site Collection Administration category.
5. Scroll down to and activate SharePoint Server Publishing Infrastructure by clicking the Activate button.
6. Return to your team site's homepage and click the All Site Content link to view the additional objects now available on your site.
Notice that there is another publishing feature that you can enable, the publishing approval workflow. To enable the workflow, return to the Manage Features form and click the Activate button. You have now enabled the publishing infrastructure for the site collection and enabled the publishing workflows. Now you can return to the Manage site Features screen for the site to enable publishing features. Repeat Steps 1 through 3 of the preceding list to perform this action. After the features are activated, publishing will be enabled on your team site.
The publishing process includes a workflow that can handle the approval process. To see this workflow in action, return to the publishing portal you created in the first example and do the following:
1. Click Site Actions.
2. Click New Page.
3. Enter DemoPage as the new page title.
4. Click Create.
5. Enter This is an example of a publishing page for Lesson 19 as the page content.
6. Click the Publish tab.
7. Click the Submit icon on the Ribbon to submit the page for publishing approval.
8. Enter First Publishing Page as the comment.
9. Click Continue.
Figure 19.4 shows the page approval workflow form that should immediately open. The workflow is automatically assigned to members of the SharePoint security group Approvers, so you are not required to enter the information it asks for.

When creating the workflow, you are required to complete the following:
- Request: The message you want to post to those who are responsible for approval.
- Due Date for All Tasks: The date the task is due for completion.
- Duration Per Task: Enter a number in Days, Weeks, Months.
- Duration Units: Applied to the preceding number, for example, days, weeks, or months.
After the workflow is complete, as a member of the Approvers group, you should receive an email requesting that you approve the content. Figure 19.5 shows the form you will be required to complete as part of this process.

The first thing you should do is click the Claim Task link at the top left of the form; this will let the other members of the approval groups know you are working on the approval.
The status of the task should change to In Progress, and you will have five options:
- Approve: Approve the publication of the page.
- Reject: Reject the page and return the form with comments.
- Cancel: Cancel the current progress.
- Request Change: Send a request for change back to the author.
- Reassign Task: Reassign the task to another approver for approval.
To approve the page, simply click Approve; this changes the page status from Pending to Approved. The page can now be published to the Internet site.
Please select Lesson 19 on the DVD or visit www.wrox.com/go/sp2010-24 to view the video that accompanies this lesson.