
Chapter 4
Using Custom Themes
A SharePoint theme is a quick means by which a user can apply some branding to his or her site, primarily with text and background color schemes. The advantage of themes is that they are available to any user with owner or designer rights on the site and do not require administrative or developer resources to create. Themes have changed quite a bit from previous versions of SharePoint, offering more flexibility in some areas and less in others. In this lesson we examine the process for creating a simple theme using the SharePoint UI and also walk through an example of creating a theme for your SharePoint site using Microsoft Office 2010 products.
Accessing the Site Themes Page
Custom themes are created on the Site Themes page. The link to this page is located on the Site Settings page, under the Look and Feel heading. Access to the link requires either owner or designer permissions on the site.
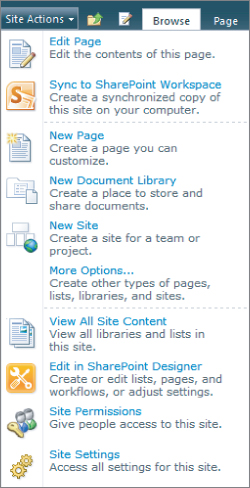
First, access the Settings page by expanding the Site Actions menu. The Site Settings link is the last link on the Site Actions drop-down menu. See Figure 4.1.
On the Settings page, under the Look and Feel heading, click the link titled Site Theme. Figure 4.2 shows the options under the Look and Feel heading, including the link to the Site Themes page.

The themes page is divided into three sections. Let's take a look at what you need to do in each to create your theme.
Select a Theme
Figure 4.3 shows the list of available themes. Each theme's associated color scheme is displayed on the left side of the screen.

Changing your theme selection changes the color schemes. Later in this lesson we'll look at how the different columns displaying the color scheme correspond to various elements in the SharePoint site. For now, browse through the theme choices on the right and select one that looks appealing. For this chapter I'm using Azure.
Customizing Themes
After you have chosen your basic color scheme you can customize it for each major color category in the theme and for unselected and selected hyperlink colors. In addition you can choose the prevailing fonts for headings and body text on the site. You have a much greater ability to customize your theme than in previous versions of SharePoint, in which the color scheme was much more of a take-it-or-leave-it proposition, unless you were prepared to do some more serious customization work beyond the level of the average user. Figure 4.4 shows how the interface for customizing the color scheme is presented to the user.

Notice the 10 columns in the color scheme squares on the left. (The page does not appear this way on the site; the color scheme squares have been transposed in this figure for clarity.) From left to right, the columns relate to the first 10 items on the right side of the screen, the four text/background colors and the six accents. In addition, you can modify the color of hyperlinks and previously selected hyperlinks. Finally, the two drop-down boxes enable you to change the font types of headings and the body fonts. A lot of the customization process is going to be trial and error to work out the shades of color you like for each column and where you want those colors to appear on the page.
Selecting Colors
When you click the Select a Color link next to a section, you are presented with the screen shown in Figure 4.5.
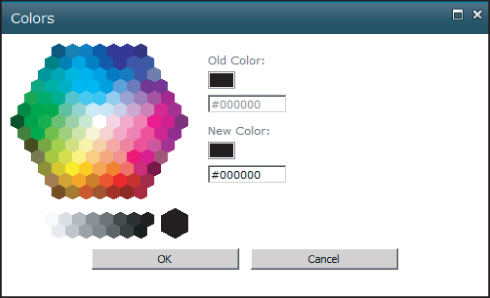
At this point you have two options for selecting a custom color. The first and simplest is to select a color on the color wheel and click OK. You will notice a box under the heading New Color, whose value changes as you select colors on the color wheel. The other color-selection option is to enter your own color value in this box.
The advantage of typing your own value in this box is that it enables you to choose from a vast array of shades far beyond what is available on the color wheel. The disadvantage is that the color box requires you to enter a value in hexadecimal format. This is why the number in the box is preceded by a number sign (#). However, unless you spent your high school and/or college years programming for fun and playing Dungeons and Dragons on the weekend, you may not have any idea what hexadecimal numbers are. Here is a crash course on picking colors using hexadecimal notation.
Notice that the color number consists of six digits. This does not represent one large number but in fact is three two-digit numbers, each with a value between zero and 255. The first two digits designate the level of red shading, the second green, and the third blue.
With normal numbers you enter the digits 0 through 9. With hexadecimal notation you can enter the digits 0 through 9 and the letters A through F. Don't worry about how it works, just understand that A is 10, B is 11, and so forth. The largest value you can enter for any two digits is FF (representing 255) and the smallest is 00. For example, if you want pure red you enter #FF0000. The number sign (#) is required for hexadecimal notation, the FF for the first two digits maxes out the red shading. The second two digits represent zero, or no green and the last two digits indicate no blue shading at all. From there you can create any shade you want by modifying the mix of red, blue, and green shades.
Preview the Theme
Figure 4.6 shows the Preview button at the bottom of the page. Use this button if you want to see what the theme will look like before you actually make the change.

This is also a good way to see how your modifications to color choices will look.
In this section, you open Microsoft PowerPoint 2010 and create a theme for a PowerPoint presentation from a list of available choices. Then you save that theme, import it into SharePoint, and apply it to a SharePoint site.
Lesson Requirements
- A SharePoint site and Microsoft Office PowerPoint 2010.
Hints
You can also use Microsoft Word to create custom themes similar to what is shown in this walkthrough.
Step-by-Step
1. Open Microsoft PowerPoint 2010.
2. Click the Design tab on the top menu bar.
3. In the Theme group of toolbars, select a theme for the presentation.
4. Click the File tab on the top menu bar, select Save As, and choose to save as type office theme. Save the presentation to your machine. The file will have a .thmx extension. The Save As dialog box is shown in Figure 4.7.

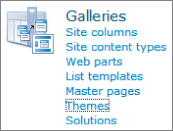
5. Open your SharePoint site and browse to the Site Settings page. Under the Galleries page, select Themes. The Galleries menu is shown in Figure 4.8.
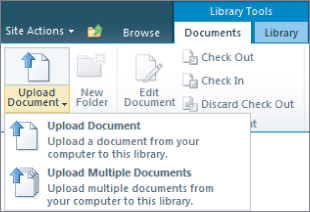
6. On the Themes gallery page, select the Documents option under Library Tools. Then select Upload Document, as shown in Figure 4.9.
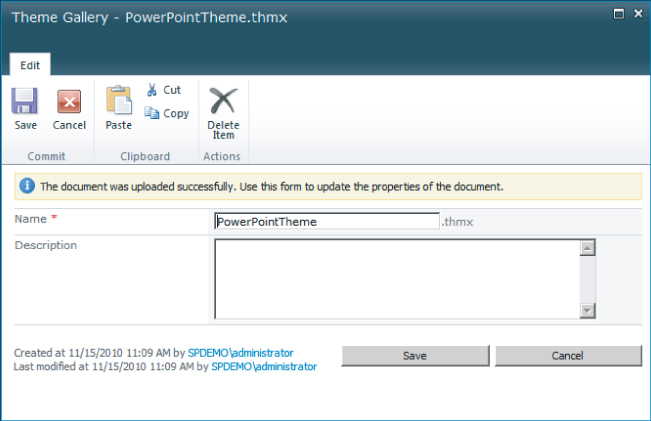
7. Browse to where you saved the file in Step 4 and select it. Add a description if you wish, and then click Save. See Figure 4.10.
8. Look at the list in the Themes gallery. You should now see the theme you just uploaded.
9. Browse to the Theme selection page as described earlier in the chapter (Site Actions ⇒ Site Settings ⇒ Select a Theme link under the Look and Feel heading).
10. In the list of themes, you should see the theme you uploaded to the gallery. Select it and click Apply. Notice the change in color scheme on the page.
You can also select and export themes from Microsoft Word and you can import them into SharePoint.
Please select Lesson 4 on the DVD or visit www.wrox.com/go/sp2010-24 to view the video that accompanies this lesson.