
Chapter 20
Setting Navigation Options in Publishing Sites
As you saw in Lesson 19, “Setting Up a Publishing Site,” one of the major site management changes from team sites you'll encounter when working with publishing sites is in navigation. There are many changes awaiting you and much more control over how SharePoint navigation is controlled within a publishing site. In this lesson, we look at a SharePoint site with publishing features enabled.
The navigation options when publishing features are enabled on the Site Settings screen for a publishing site are as follows:
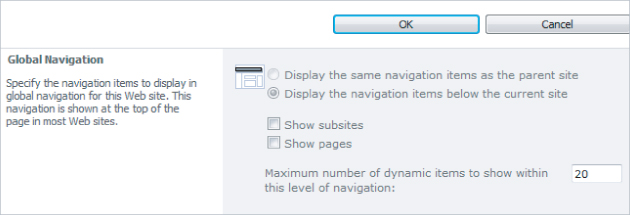
- Global Navigation: Navigation links available to all sites within the site collection. You can choose to display subsites and pages within the site collection global navigation.
- Maximum Number of Dynamic Items to Show Within This Level of Navigation: This is used to display a drop-down submenu showing subsites within a site on the global navigation. The number defines how many levels of information to make available on the drop-down.
- Current Navigation: Navigation links for the current site which are located on the Quick Launch–type menu on the left side of the web page. In the current navigation, you can also choose to show subsites and pages within the menu.
- Sorting: You can choose automatic sorting of navigation subsites, pages, headings, and individual navigations links, or have SharePoint sort these items automatically. If you choose automatic sorting, you can choose the column under which you would like to sort using a drop-down list that is made available. You can choose to sort by title, created date, or last modified data.
- Navigation Editing and Sorting: In this section, you have almost total control over how navigation is presented. This section also provides you with the opportunity to edit existing links, add new links, group links together under standard or custom headers, and hide links you may not want to appear within navigation. You can edit both global and current navigation menus using this area.
Figure 20.1 shows the global navigation settings available to you within a site collection.
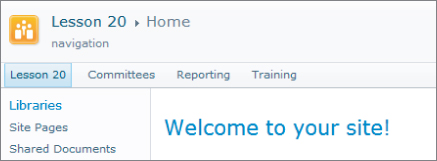
Global navigation is the navigational links that display on the top of every page within your SharePoint site. Figure 20.2 shows the global menu items on a team site with publishing features enabled. In this case the global links, Reporting and Training, take you to the appropriate subsite. If a user is in either of the subsites, the global navigation remains the same and includes a link back to the home site.
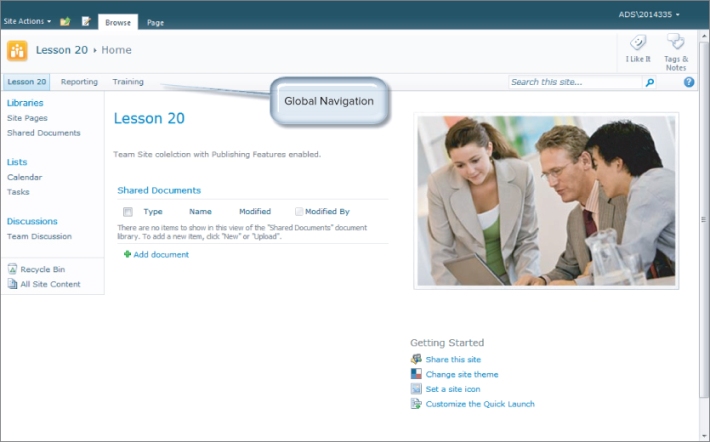
The Navigation option used in the subsite was Display the Same Navigation Items as the Parent. This was set within the navigation options for each of the two subsites. That's one of the problems with this approach: You need to set the same global navigation settings on each of the subsites in the site collection. Although this is not a complex task, it can be annoying when you have a lot of subsites in a site collection.
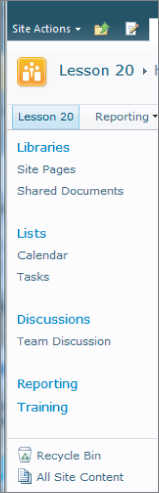
Instead of automatically picking up subsites and pages for global navigation, you can manually enter this data directly into the navigation options within the site. This gives you almost total control over what is actually displayed. Figure 20.3 shows the main Global Navigation menu with another feature, a fly-out menu, displaying two subsites within the Reporting site.

This is achieved by using the navigations settings in the Reporting site to display its subsites. If you want this feature in the Global Navigation menus, you need to change the settings for the subsite to Show Subsites. At this point, the settings made for sites Lesson 20 (the site collection home site) and Reporting (the subsite) are as follows:
- Lesson 20: Global Navigation; Display the navigation items below the current site, Show subsites, and Show pages.
- Reporting: Global Navigation; Display the same navigation items as the parent site, Show subsites.
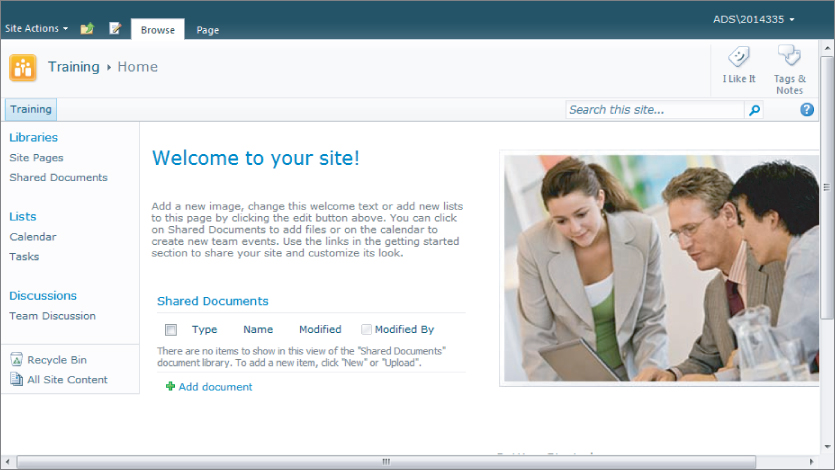
The settings for the third site, Training, have not been changed from the default Global Navigation settings which are Display the navigation items below the current site and do not show subsites or pages. Figure 20.4 shows the global navigation on the Training site homepage with these default settings. Figure 20.5 shows the same menu once the settings for Global Navigation are changed to match those of the Reporting site.

As you can see, the settings shown in Figure 20.5 provide a much more consistent navigational structure across the site collection. Consistent and obvious global navigation is important to site users to help them find their way around SharePoint sites, and becomes even more important when site structure is complex.
In addition to the automatic inclusion of sites and pages on the Global Navigation menu you can add links manually. For example, Figure 20.6 shows the site collection global navigation with an external link, which in this case goes to SharePoint training materials on www.microsoft.com. We will be looking at how the external link is created in the Try It section later in the lesson.

Local Navigation
In addition to global navigation, you also have to give some consideration to local navigation within the site itself. Local navigation is normally navigation relevant to where the person is in the site collection. In addition to using the standard features of a team site, such as the ability to add an item to the Quick Launch when you create it, you are able to work directly with navigation once publishing features are activated. The following section of the navigation form offers the following options:
- Display the same navigation items as the parent site
- Display the current site, the navigation items below the current site, and the current site's siblings
- Display only the navigation items below the current site
- Show subsites
- Show pages
Figure 20.7 shows the current navigation set to Show Subsites. In this case, the links simply duplicate those shown on the global navigation and do not serve any useful purpose.
In this exercise, you create a site collection containing three subsites. After the sites have been created, you will do the following:
- Enable publishing infrastructure
- Enable publishing features
- Implement global navigation across the site collection
- Add manual links to both global and local navigation
Lesson Requirements
To complete this Try It exercise, you need the following:
- A site collection that contains three subsites, which you can create as part of the Try It (Reporting, Training, and Committees)
- SharePoint Publishing features activated at the site collection and individual site level
Step-by-Step
From the homepage of the site collection, you need to enable the publishing infrastructure and publishing features. To do this, follow these steps:
1. Click Site Actions.
2. Click Site Settings.
3. Click Site Collection Features in the Site Collection Administration category.
4. Click the Activate button for the SharePoint Server Publishing Infrastructure feature.
5. Click the Site Collection Administration breadcrumb to return to the Site Settings page.
6. Click Manage Site Features in the Site Actions category.
7. Click the Activate button for the SharePoint Server Publishing feature.
To continue with the example, create the three team sites within your site collection:
- Reporting
- Training
- Committees
When this is done, ensure you are on the homepage of the site collection before continuing. At this point, global navigation is not set up. To begin the process, do the following:
1. Click Site Actions.
2. Click Site Settings.
3. Click Navigation in the Look and Feel category.
4. Click Show Subsites in the Global Navigation section of the screen.
5. Click OK.
You should now have three subsites showing in the global navigation of the site collection parent site. Figure 20.8 shows the navigation at this point.
6. Click Committees to open the Committee subsite. Note that the global navigation is not available.
7. Click Site Actions.
8. Click Site Settings.
9. Click Navigation in the Look and Feel category.
10. Click the Display the Same Navigation Items as the Parent Site radio button.
11. Click OK to save the changes and create the global navigation.
12. Repeat Steps 6 through 11 for the Reporting and Training sites.
It is also possible to add manual links to the SharePoint navigational system. To proceed, open your training subsite, and then follow these steps:
1. Click Site Actions.
2. Click Site Settings.
3. Click Navigation in the Look and Feel category.
4. Scroll to the bottom of the Navigation screen to the section entitled Navigation Editing and Sorting (see Figure 20.9).
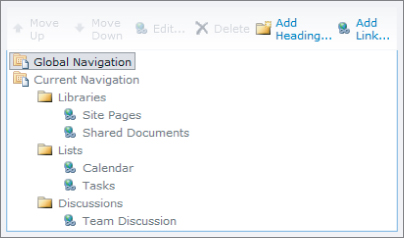
Look at the section heading Current Navigation. This is the menu to which you are going to manually add a heading and a link. Follow these steps:
1. Click Current Navigation to select it.
2. Click the Add Heading link.
3. Enter Microsoft Training as the title.
4. Enter # (the hash symbol) in the URL field.
5. Click OK to save and create the new heading.
6. Click the new heading to ensure it is selected.
7. Click Add Link.
8. Enter Microsoft Resources as the title.
9. Enter the following URL into the URL field: http://sharepoint.microsoft.com/en-us/resources/Pages/End-User-Training-Guide.aspx
10. In the description box, enter Microsoft SharePoint 2010 end user materials.
11. Click OK to save the changes.
12. Click OK to save the navigation changes and return to your Site Settings page.
You should now have a new section on the Quick Launch, Microsoft Training, containing a single link to an external website, Microsoft Resources. You can reposition the Microsoft Training heading on your Quick Launch by returning to the Navigation screen, clicking the heading to select it, and then selecting Move Up in the Screen to move the heading and link up one place in the current navigation structure.
Please select Lesson 20 on the DVD or visit www.wrox.com/go/sp2010-24 to view the video that accompanies this lesson.