
Chapter 17
Setting Up Records Management
Records management is a somewhat vague term, but in the SharePoint world it usually refers to a specific set of functionalities, and the concept of a “record” in this case is fairly specific. A record in SharePoint is a document or other element marked for special treatment (usually long-term, read-only storage) or redirected to a special site for long-term storage.
The Record Center site template, used to create sites to which items can be redirected, is covered in Lesson 37. In this lesson we examine how to declare items as records without moving them, and some of the special options that are available once an item has been declared a record.
Following are examples of reasons to declare items as records in SharePoint.
- The item should permanently retain its current status and be stored for the long term, so that even people with editing rights to a document cannot modify or delete it. A good example would be an invoice document that you would not want to change once the transaction is completed, even by accounting staff who would normally have edit rights on the item.
- The item should kick off a business process after some amount of time. For example, users may upload a request form to a library that another user is supposed to approve. If the document sits there for more than a week, you may want it automatically routed to someone for final approval.
- You want the item to eventually automatically delete. In addition to storing data for the long term, you can use records to help you “clean out the attic.” For example, you may want to retain the company newsletter articles for six months, after which no one will read them. Instead of leaving them to clutter up your site, you can have them declared as a record after six months and then set up a date after that to be removed automatically.
- You want to move a document to another location, usually to a long term archive site. Items marked as records can be transferred to Record Center sites, as described in Lesson 37.
As noted earlier, there are two ways to handle records. One is to ship it off to a special long-term storage site (the Record Center). The other is to leave it where it is and give it special “record” status. Assigning this status is called in-place record declaration and is new for SharePoint 2010. To enable in-place record declaration you must first activate the feature. It is a site collection–scoped feature, so you have to go to the Site Collection Features link on the Site Settings page of the top level site in your site collection. Once you activate the feature you can perform the tasks in this lesson.
In addition, at the site collection level you can define the sort of treatment a file will get when it is declared as a record. This is demonstrated in the Try It exercise.
The following list identifies different ways to declare an item as a record. We cover them all in the Try It exercise.
- You can individually and manually declare an item a record by using the Compliance Actions option from the drop-down action menu for a list or library item.
- You can declare a record as part of a retention policy attached to a content type. A retention policy determines how long the record should remain in its current location and what should happen when that time expires.
- You can declare a record as part of a retention policy attached to a document library or list. Declaring a record in a content type affects that item everywhere the content type is used. Declaring in a single library or list only affect items in that library or list.
In this Try It exercise, you will declare some items as records and examine the various options that exist for documents designated as records.
Lesson Requirements
To complete this lesson you will need a SharePoint site with SharePoint Server 2010 installed. This feature is part of the SharePoint standard version. It is not available on SharePoint Foundation.
Hints
These features all require activation. Until the features are activated, many of the links and pages displayed on the screenshots in this walkthrough are not available. There are two required features, the in-place records definition feature and the SharePoint Server standard site collection feature. You will activate them in step 1 of the walkthrough.
Step-by-Step
1. Activate the records management features by going to the Site Collection Administration heading on the Site Settings page. Make sure the SharePoint Server Standard Site Collection Features and the In Place Records Management, shown in Figure 17.1 and 17.2, are both activated. Activating these will activate the links, pages, and actions for in-place records management.
2. To view or change the default record settings for a site collection, click the Record Declaration Settings link in the Site Collection Administration settings. You should see the Record Declaration Settings page as shown in Figure 17.3.
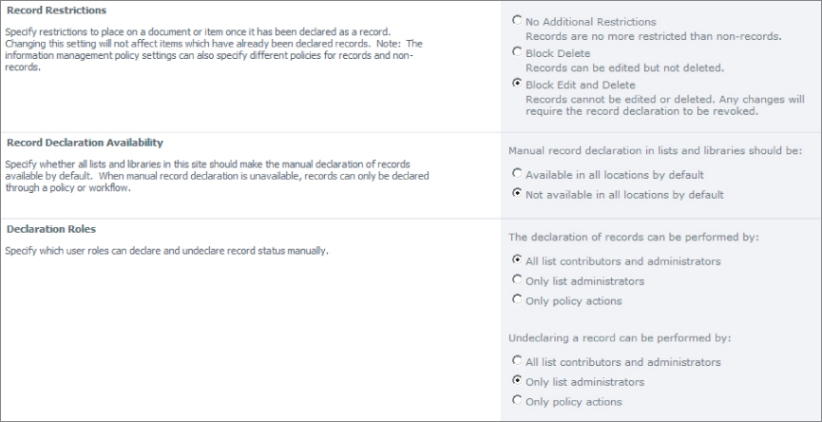
Here you can set the records policy for the entire site collection. The first section, Record Restrictions, defines the editing policy for any file declared as a record.
The Record Declaration Availability section defines the default status for manual record declaration. As shown previously, this can be changed for each library. Manual record declaration means the user will select an item to be marked as a record as opposed to it occurring as part of an automatic retention policy or a workflow.
Finally, the Declaration Roles setting determines who can mark an item as a record or return it as a regular document. This setting also determines who can see the menu items in the examples that follow. If you select All List Contributors and Administrators, then anyone with rights to add items to a list can declare items in that list as a record. If you select Only List Administrators, then only users with administrator rights on a list can declare items in that list as records. Finally, Only Policy Actions refers to the process of setting a policy either for an individual content type, or setting a policy at the site collection level. A policy refers to a security policy which can be applied to a content type. If you select this option, you will not be able to manually mark an item as a record. It can only be done by a policy declaration.
3. Browse to a library on your SharePoint site. In the toolbar, select Library under the Library Tools section on the toolbar. On the right side of the toolbar, select Library Settings to open the Document Library Settings page. In the right column you should see a couple of new links, as shown in Figure 17.4.
4. Click the Record Declaration Settings link. This page gives you two options. The first set of radio buttons enable you to override the settings for the site collection for just this document library. (We look at how to set the site collection default settings in just a moment.)
The second option enables you to declare that any record added to this library will automatically be declared a record, so that you can create a record repository without the manual effort of declaring documents to be records.
5. Another link on the Library Settings page is Information Management Policy Settings. This link enables you to change how a retention schedule affects the setting of records for this library. Click this link to open the Information Management Policy Settings page.
Every content type can have a retention schedule applied to it. This schedule determines how long a file sits around before another action is taken on it. (Usually it is deleted or moved to another area for long-term storage.)
In the first part of this page you can specify whether the content types of the items in the library will use the retention schedules of their content types or of the library itself. This is useful if you have a special-purpose library and wish to override the content type settings. In most cases you will want to use the settings you established for the content types. For example, for a content type of Tax Return, you might have set a retention policy of seven years before auto-deletion. This is the period beyond which a return cannot be audited. But perhaps you have also created a document library to permanently store tax returns. You don't want the seven-year rule to apply to tax returns placed in this library, so you select the library instead of the documents' content types as the source of the retention schedule. You can do this by clicking the Change Source link, shown in Figure 17.5. In addition, this page gives you a rundown of the content types this library uses and their retention schedules, if any.

6. Click the Change Source link, shown in Figure 17.5. On the following page, select Library and Folders. This reveals more options. (If you select Content Types, these same options exist, but you would have to go to the Content Type Gallery and change the settings there). See Figure 17.6.

7. You can set two types of retention schedule: one for records and one for non-records. Using the Site Collection Settings page and the retention options shown here, you essentially create the options that separate “records” from “non-records.” Usually the purpose of record retention is to put certain types of documents in long-term storage or delete them as obsolete after a time. As you will see, however, the actions you can take on items declared as records are practically limitless because you can fire off any sort of workflow as part of a record retention schedule.
For this example you will not add any retention policy to non-records, but you will add one to records. Click the radio button near the bottom of the screen titled Define Different Retention Stages for Records. A retention stage is one step in a multi-step process that you can define for what happens to records after the previous stage is complete. In other words, you can define several actions that apply to a record that will execute in order. Each retention stage represents one such action.
8. Add a retention stage for records. Note that you can add multiple stages. In this example you will add only one for demonstration. A common retention policy is to move something to the Recycle Bin after a certain period of time has passed. Click on the Add a Retention Stage… link to open the dialog as shown in Figure 17.7.
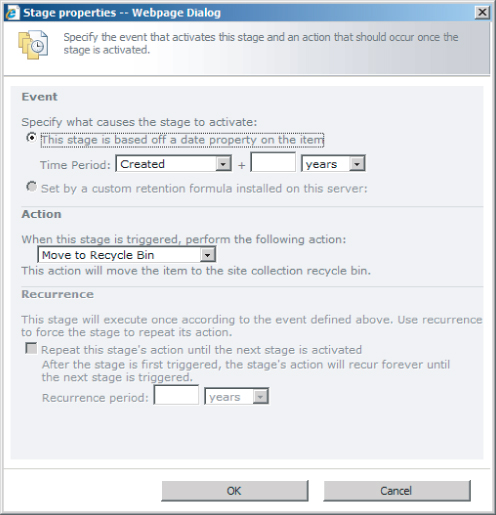
As you can see in Figure 17.7, retention policy always begins with an event, either a period since a file was last touched, or its being declared a record — either manually, via workflow, or via a previous retention stage.
9. Select Declared Record. (This will make testing the event later easy.) Select +0 days, so the retention stage will start right away. Notice the grayed-out button labeled Set by a Custom Retention Formula Installed on this Server. Clicking this button makes it possible via custom coding to create your own events here. This option is beyond the scope of this book.
10. Select an action to take (Figure 17.8). Notice that most options involve moving the item or deleting it. However, you can also start a workflow or move to another stage. For this simple example, select Move to Recycle Bin. You can see in the drop-down control there are several other options as well.
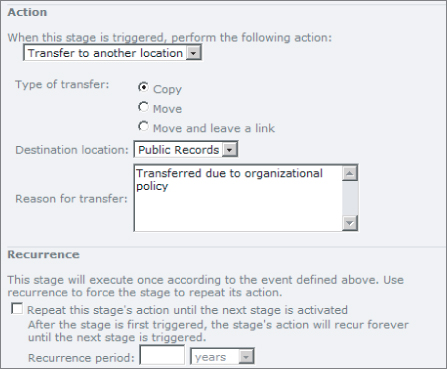
Finally, you can determine under Recurrence if this action will recur regularly. Not every action features this setting so it might be grayed out at times.
11. You will see the retention policy. Click OK to return to the Information Policy Settings. You have created a policy that will execute for any item in this library that is declared as a record. The policy will run immediately and will cause the file in question to be moved to the Recycle Bin.
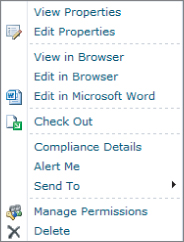
12. Return to the library itself to examine how to mark an item as a record manually. Use the drop-down menu for an item in the document library and you will see another drop-down menu, similar to the one in Figure 17.9. Select the Compliance Details option.
13. The dialog box that opens shows several options and pieces of information. Note the one called Record Status. Here you can toggle on and off the status of this item as a record. Figure 17.10 shows the dialog box.

14. Select Declare as a Record and note how the retention policy moves the item to the Recycle Bin. This might not happen right away because even though we selected “move in 0 days,” the actual move will not occur until the completion of a timer job, which runs on its own schedule behind the scenes. A timer job is a procedure that runs behind the scenes on a schedule. It is a source of confusion for SharePoint administrators when results of an action do not appear instantly as they might expect.
Finally, note how the icon for the document has changed to denote its status as a record with a small yellow lock. See Figure 17.11.
In this lesson, we looked at the many options available for declaring items in a SharePoint site as records. In addition, we experimented with several options for manipulating items declared as records.
Please select Lesson 17 on the DVD or visit www.wrox.com/go/sp2010-24 to view the video that accompanies this lesson.