
Chapter 14
Setting Up the Content Organizer
One of the challenges of setting up a content management system is creating a consistent method to categorize and store information. Even if you have a well-defined set of criteria and metadata to organize your data and documents, the users who ultimately contribute material to the system do not always understand your organization system. This leads to several undesirable results: duplicated documents, documents placed in the wrong locations, and frustration among users who cannot find the information they need.
The content organizer is a feature that enables users to submit documents to a central location and then uses a set of rules to automatically route the documents to locations that you specify. This takes the guesswork and inconsistency out of document storage.
This lesson will describe how to configure and use this feature to enable users to more efficiently and consistently organize their documents and data. Note that this feature does not exist in SharePoint Foundation 2010. You need at least the standard license to access this functionality.
The Content Organizer's Functionality
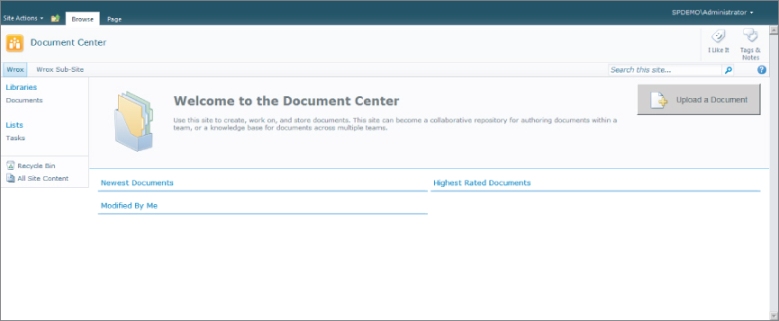
The content organizer creates a special document library called the drop-off library at the site where the content organizer feature is located. Users can submit documents to the Document Center using the button on the home page of a Document Center site template or simply by adding documents directly to the drop-off library as they would to any SharePoint library. Once a document is in the drop-off library, its properties and content type are checked against a series of rules that can be created to determine where the documents are routed after that. Figure 14.1 shows the Document Center home page. The Document Center is a built in site template that automatically activates content organizer functionality.
There are many uses for a content organizer. It is a much-underappreciated SharePoint feature, probably because it does take a few steps to configure it. But setup isn't difficult, and if you watch the video for this lesson and follow along in the Try It section, you should be able to set up a content organizer application with ease. The content organizer functionality is provided automatically when you create a new site using either the Record Center for Document Center template. One thing that is important to understand is that you do not have to use the Record Center or Document Center site template to use a content organizer. You can activate the feature on any site. The Record and Document Center site templates simply activate the necessary features for you during template creation.
This section discusses some example scenarios in which a content organizer is useful. The first usage is for a document library with a lot of folders. Each folder represents a supervisor to whom employees are to upload a status report. It takes a lot of unnecessary maintenance to create individual security for each folder so it is available only to a given supervisor's employees. In addition, you may not want employees to see what their colleagues have uploaded to their common supervisor.
In order to deal with this situation, you can create a content organizer for a status report document. The status report should have a field in which the employee can list her supervisor's name. In the content organizer you can set a rule that automatically routes a document to a library created for holding employee status reports, into a folder with the same name as a document property. Each employee submits to the drop-off library, and the document is automatically routed to the folder that is set for the supervisor. Employees do not have access to the supervisor's folder and all the supervisors get their status reports without any security maintenance or overhead.
Similar to the previous example, but with a twist, in some scenarios, you might want to set up a document library for Excel-based expense reports. Each employee sends an Excel file to the drop-off library. Based on the value of the expense report it is routed to one of two document libraries. One library runs a workflow for approval by the employee's supervisor. Reports above a certain dollar value are routed to a different library, where a different workflow sends the report to both the supervisor and a vice president. The employee does not have to be aware of the logic behind this policy. They just submit the document and note the total dollar value. This reduces errors and increases automation.
Finally, a portal site may have a variety of document libraries. By setting up a content organizer you can route everything to the proper location by content type. When users submit documents to the portal, they do not have to try to figure out your filing system. They just note the content type of a document and the content organizer routes it automatically. If an item is a vacation request form (and is associated to a vacation request content type), it is routed to one place. If the item is a company news article, it is routed somewhere else. The user doesn't need to know where these locations are, they upload both documents to the same place.
Setting Up the Content Organizer
You can activate the content organizer in a few different ways. You can activate it on any site by activating the content organizer feature on the Site Features page. (Note that the content organizer is available only with the SharePoint Standard license or higher. The feature is not included with SharePoint Foundation 2010.) It can also be activated by default when you create a site using the Document Center or Report Center template. The content organizer is the same regardless of how it is activated.
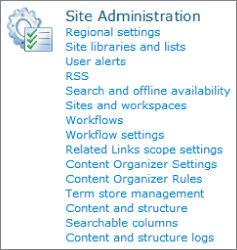
After the feature is activated, additional links become available under the Site Administration heading of the Site Administration page. The two links are:
- Content Organizer Settings
- Content Organizer Rules
The new Site Administration list is shown in Figure 14.2.
The Content Organizer Settings page enables you to determine a range of parameters for your sites. These elements are covered in detail in the Try It section of the lesson.
The Content Organizer Rules page is where you determine how to route a document that is placed into the Content Organizer drop-off library. You can make routing decisions according to content type or other properties. Content organizer rules will also be demonstrated in the Try It section of the chapter.
After you have activated the feature, determined the settings, and created the rules, your content organizer is complete.
Integrating E-Mail into the Content Organizer
There are two different ways to integrate e-mail into the content organizer. The first is to enable the drop-off library to accept incoming e-mails as you would do with any SharePoint library. Before you do this, the following two things must happen:
- Incoming e-mail settings must be set by the farm administrator in the Central Administration site.
- Incoming e-mail settings must be set on the Library Settings page for the drop-off library. If the e-mail settings have not been set in Central Administration, the link to the page to set up e-mail for the library will not be visible on the E-mail Settings page under the Library Settings page.
When e-mail is set up for a document library, documents attached to e-mails sent to the document library are saved into it. The content organizer then applies rules to the documents and routes them accordingly.
The second way to integrate e-mail functionality into the content organizer is to activate a feature on the site called the E-Mail Integration with Content Organizer feature. Figure 14.3 shows the feature you need to activate on the Site Features page.

After the feature is activated there is an additional link on the Content Organizer Settings page, as shown in Figure 14.4, for configuring the e-mail settings. These settings are similar to those for an e-mail-enabled document library. Both types of e-mail integration are covered in the Try It section.

In this Try It section, we walk through the process of configuring the Content Organizer for typical use.
Lesson Requirements
To complete this Try It exercise, you need a SharePoint site with at least the Office SharePoint Service Standard license.
Step-by-Step
1. Open a SharePoint site in your environment where you would like to create a new sub-site.
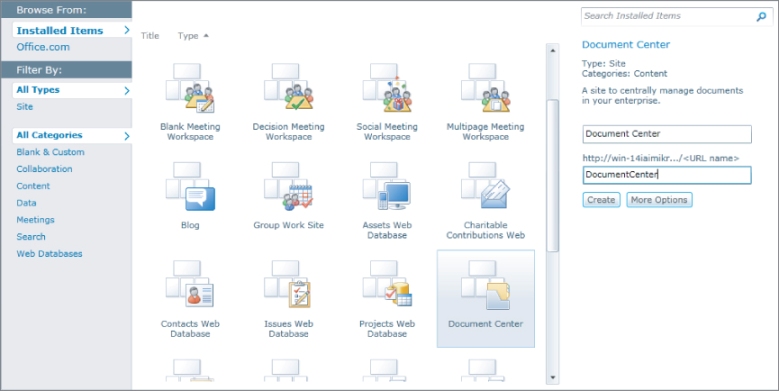
2. Create a new site and use the Document Center site template. See Figure 14.5.
If you do not see this template, one possible reason is that you have not activated the SharePoint Server Standard Site Features feature. To activate this feature, go to the Manage Site Features page, located under the Site Actions heading on the Site Settings page.
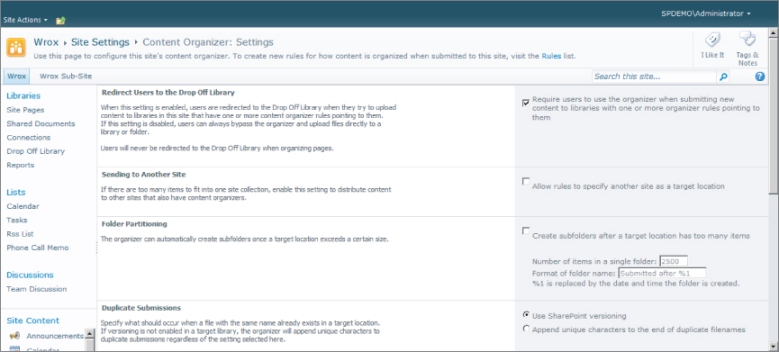
3. Browse to the Site Settings page on your new site. Under the Site Administration heading, select the Content Organizer Settings link (as shown previously in Figure 14.2). This opens the page shown in Figure 14.6.
4. Set the options on the page as follows:
- Redirect Users to the Drop-Off Library: If you check this box, users cannot directly place documents into the target libraries where content is to be diverted. Use this option if you want to force the use of the drop-off library and not give users the discretion to place documents wherever they wish.
- Sending to Another Site: You can redirect content across site collection boundaries if you select this option, which is most likely to be useful for large implementations spanning a large organization.
- Folder Partitioning: SharePoint does not recommend having more than 2,500 items in one folder. You can use this setting to auto create folders to avoid having to manually add folders as this may reach this item limit. Again, this is more common for large deployments. Note that you can use the symbol %1, which will actually name the auto-created folder based on the date it was created.
- Duplicate Submission: If a document gets routed to a location where a document with the same name already exists, you can either automatically create a new file name with appended characters, or you can version the document and keep the name. Keep in mind that versioning may not be appropriate.
- Role: Here you can set who is in charge of dealing with content that doesn't match the routing rules. This allows the appointed manager(s) to follow up and place malformed documents in the correct place.
- Submission Points: There are people who cannot shake the habit of e-mailing content, and you can let them e-mail it to the document organizer as if it were any other user. The content organizer picks up the e-mail and attaches documents and route them based on their properties.
5. Set up incoming e-mail settings. After you have determined the content organizer settings, you should configure the e-mail settings, which you can access via the link at the bottom of the Content Organizer Settings page. Figure 14.7 shows the options available. These settings enable the content organizer and the associated lists to be used as permanent e-mail storage.

- Allow this List to Receive E-mail: This sets up the content organizer as an e-mail store and provides an e-mail address.
- Save E-mail Attachments: Documents attached to an e-mail will be saved as attachments to list items.
- Save meeting invitations: This setting allows you to save the body of the e-mail message as well as the attached document.
- Save original e-mail: Attach invites to the e-mail as a list attachment.
- E-mail security policy: Allow anyone to e-mail the list or only people set up with rights to the list.
6. Set up the content organizer rules. In steps 4 and 5, we set up the content organizer settings. Now we will set up the content organizer rules. This is the second link, as discussed in Step 3 above, added in the Site Administration menu when you activate the content organizer feature. Content organizer rules determine how documents that find themselves in the drop-off library get routed to other locations within the site or in other sites and site collections. When you click on the Content Organizer Rules link, you are taken to an ordinary looking SharePoint list. Content organizer rules are stored in a SharePoint list. Figure 14.8 shows an example of this list.

When you add a new item to a list, you are adding a rule that will determine how content is routed. Figure 14.9 shows the dialog box and options presented when you add a new rule to the list.
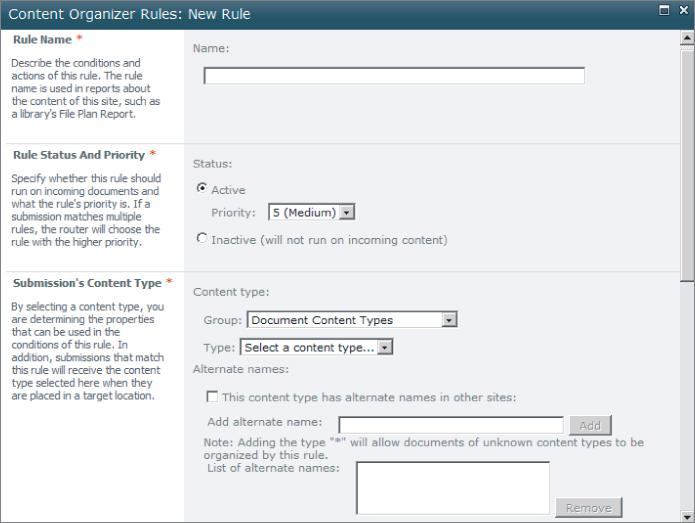
Here are the descriptions of the elements of a new rule, as presented in the dialog box:
- Rule Name: Each rule must have a unique name. Name this one Sample Rule.
- Rule Status and Priority: It is possible for rules to conflict within the same document. Set the priority to “1”. Conflicting rules are resolved based on the priority setting, with higher priority rules taking precedence over lower numbered ones.
- Content Type Group and Value: You can route documents based on content types and property values. For this example, choose the document content type by selecting Document under Type. Note that if you wanted to use the content organizer for e-mails, you would select the group value of “Content Organizer Content Types” here and the type value of “E-mail Submission”.
7. Go to the home page of the site where you have set up the content organizer and find the “Drop-off library”. Add a document to the library and make sure the title has the words status report in it. You will be presented with a dialog box as shown in Figure 14.10.
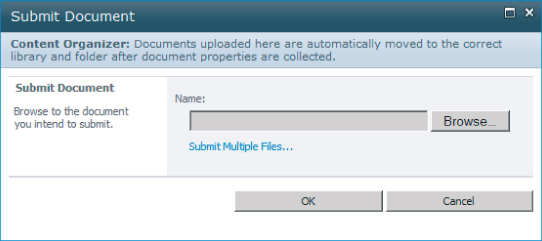
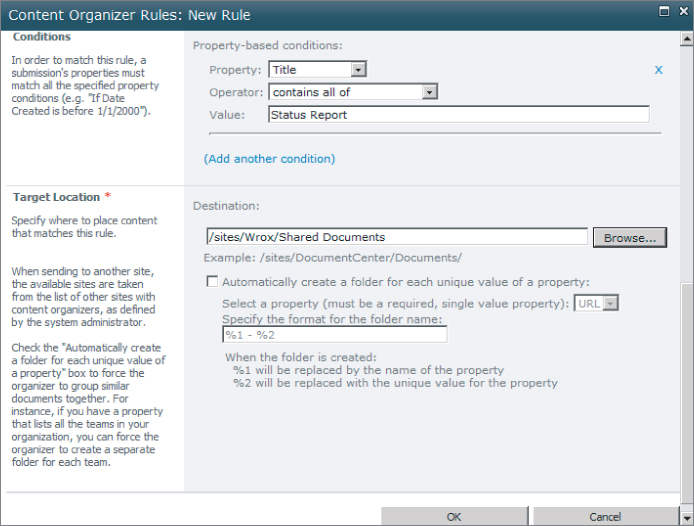
Figure 14.11 shows where the document properties that will determine how and if a document is routed to another location.
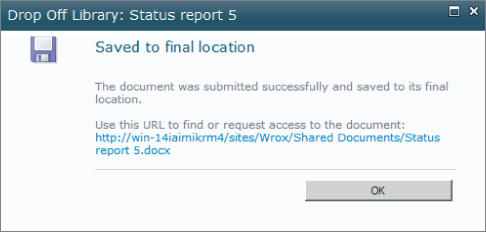
8. Finally, you can see the document has been successfully transferred to the Shared Documents library according to our rule, because it has the phrase “Status Report” in the title. Figure 14.12 shows the message indicating a successful routing of the document.
Please select Lesson 14 on the DVD or visit www.wrox.com/go/sp2010-24 to view the video that accompanies this lesson.