
Chapter 37
Using the Records Center Site Template
In this lesson you look at the uses of the records center site template. In Lessons 14, 16, and 17 you looked at several record management features. The records center is a preconfigured site created using the records center site template that uses many of these features and packages them together into a specialized site for the long term storage of digital records. The records center is useful for many tasks, including the following:
- Moving older records from an everyday portal site to a permanent storage location to reduce the amount of data that resides on the day-to-day portal.
- Saving records for the long term for legal or regulatory reasons in a location subject to more strenuous security requirements.
- Holding documents in a way that makes them difficult to modify and easy to audit.
In this lesson, we are going to examine using the records center site to perform a variety of record management functions. The specifics of many of these functions have been discussed in previous lessons, so the focus of this lesson will be to demonstrate how the records center site enables this functionality in a more centralized manner than using the record-management features individually in other sites.
Features of the Records Center Site
The records center is configured with the following features, most of which are available on any given site, but are active by default on a records center site:
- The hold and e-discovery site-level feature is activated.
- Metadata navigation and filtering are activated.
- Offline synchronization is activated to pull records to offline clients.
- The Content Organizer is activated.
- The Document ID search box is available on the front page to enable users to find documents by individual ID. The Document ID service is a site collection–based feature.
- A special link called Manage Records Center console page is added to the Site Actions menu. This link connects to a special page that offers the site administrator some hints about how to set up the records center. The page is titled, “Records Center Management,” and uses the page name of rcconsole.aspx.
Using the Records Center Management Console Page
The records center management console page lists several steps used to configure the records center site. In this section, we will discuss each configuration step and refer to previous lessons, where appropriate, that discuss the item in detail. This page includes two main columns. The left column is for general set up and planning, including:
- Create a New Record Library: This is a document library with one special feature. Any documents placed in it are automatically declared as “records.” The concept of record declaration is described in Lesson 17.
- Manage Content and Structure: use this tool to rearrange the location of sites, libraries, and folders within the records center.
- Create Content Organizer rules: This is a repeated link from step 3 above.
- Discover and Hold Records: The topic of e-discovery and holding is described in Lesson 16.
- Generate a File Plan Report: This link allows you to create an Excel-based report that summarizes the content and policies (such as retention schedules) for a given document library.
- Generate an Audit Report: Opens the auditing reports page for the site. The auditing reports page is a series of Excel-based reports that specifies what sort have operations have been performed on files in the site collection. This is one reason that records center sites are frequently created in their own site collections or web applications, so that the auditing report information is specific to the records center documents, and is not mixed with other items in other sites.
The right column is used for configuring specific records management settings, including:
- Create Content Types: Content types are discussed in detail in Lesson 12. Content types are used in records management to define different types of documents, to which different policies may be applied.
- Create Records Libraries: This step involves creating normal libraries and folders, and assigning them retention schedules. Lesson 17 discusses the concept of retention schedules in detail.
- Create Content Organizer Rules: A records center site automatically configures the content organizer feature. This is discussed in detail in Lesson 14. The process is the same in a dedicated records center site as described in that lesson.
- Design the Site Welcome Page: Use the built in content editor web parts, or add your own to customize the home page and explain the use of your site.
In this walkthrough, you will be creating a records center site and performing many of the functions listed above.
Lesson Requirements
To perform this lesson, you need a SharePoint site with SharePoint Server.
Hints
Activate the Document ID feature at the site collection level before creating a Records Center.
The steps in this walkthrough are not all dependent on previous steps. The steps cover a range of activities you can perform on a records center site that aren't all connected.
Step-by-Step
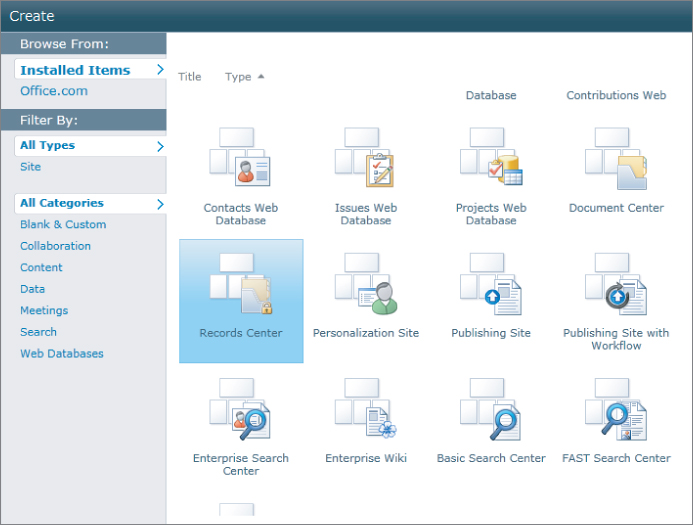
1. Create a records center site. Go to the Site Actions menu on any site and select the option to create a new site. If you do not see the option for creating a records center site, check the features activated in your site. You should have the SharePoint Server standard site features activated on this site. Activating features is covered in Lesson 2. See Figure 37.1.
2. Once the site is created, look at the special item added to the Site Actions menu for managing the Records Center, shown in Figure 37.2. Click it and view the suggestions for using the Records Center.

3. Set up routing options in Central Administration. You can set up a special connection to the records center that enables you to manually send any record to it from any document library in the farm by using the document's right-click menu. By setting this routing, a user can send any document in the farm to this record storage site with a simple command in that document's right click drop down menu.
In Central Administration, click General Application Settings. Then, under the External Service Connections link, click Configure Send to Connections.
4. On the Configure Send To Connections page there are several options. The first is a checkbox (shown in Figure 37.3) that enables the connection to cross subscription barriers. This allows the connection to be used across tenants in a multi-tenant architecture. Multi-tenant architecture is an advanced form of configuring a SharePoint farm and is beyond the scope of this book. The explanation here is simply to inform you of the meaning of this checkbox.

5. The Send To Connections list box shows you all the connections available on the farm. Select a connection choice from the list box. The choice you make here will be the record center used when you use the right click “send to” command from a document in a document library. See Figure 37.4.

6. Under Connection Settings, as shown in Figure 37.5, you can set the settings for the connection you chose in Step 5. Specifically, you need to enter a display name and URL. Display name is what shows up in the Send To menu of a document in a library, on the Items drop-down menu. The URL is the actual URL of the records center site. Notice the note below the URL box, showing you the protocol for entering a URL. If you do not follow this protocol precisely, the connection will fail. For example, if your records center site is called “archives” at server “foo” (http://foo/archives), then your URL should read http://foo/archives/_vti_bin/officialfile.asmx.

The Send To URL should be the full URL of the records center site followed by /_vti_bin/officialfile.asmx.
Allow Manual Submission from the Send To menu allows the option to appear in the drop-down menu of a document. If this option is not enabled, items can be directed to the records center only via workflow or policy.
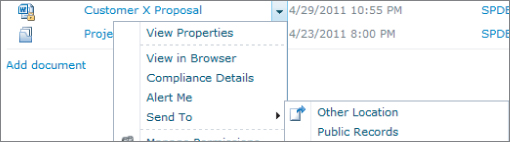
Finally, the Send To action dictates whether the submission will send a copy, move the document, or move the document and leave a link to its new location. Figure 37.6 shows an example of how the Send To menu looks on a document. This is the menu you can access from any document in your SharePoint site.
Please select Lesson 37 on the DVD or visit www.wrox.com/go/sp2010-24 to view the video that accompanies this lesson.