
Chapter 30
Creating Metadata Services
The Metadata Service enables you to tag content with notes, keywords, or brief canned phrases such as “I like it.” It also enables you to apply ratings to items in lists or libraries according to a five-star system. And it enables you to create content types that span site collections. (See Lesson 12 for more details.) Most people associate this service with the ability to create hierarchies of tags made up of things like sales division names or product line titles and then apply those tags to categorize data. You can use the data to enable better search and navigation.
This lesson departs slightly from the overall theme of this book. Most of the lessons deal with administrative elements of SharePoint that do not involve the Central Administration site or anything that requires farm level access. Because of the nature of the Metadata Service, we are making an exception for this lesson. SharePoint 2010 is a series of services. If you want to perform a search, you activate a service. If you want My Sites, you activate a service. And if you want to be able to tag your content, you activate the Metadata Service.
With all these services, it is possible to make an individual user an administrator for just one. Practically speaking, the average business user who is not a SharePoint expert or farm administrator isn't going to be put in charge of configuring search or the business intelligence features, for example. With the Metadata Service, however, it is generally much more appropriate for an everyday user to be an administrator. This is because the role of the administrator (and of some other permission levels as well) is to manage the collection of terms used for tagging content. This is an activity more suited to the people creating the content than to the IT people running the SharePoint farm. For this reason, it is not uncommon to see non-IT types with administrative control of this service.
This is an activity that needs to be performed by a farm-level administrator. We have included a brief discussion of it here only because if you are a business user or a site collection administrator you might want to use a Metadata Service. This section tells you what needs to be done to make that happen. If you go to the Central Administration main page you will see a link called Manage Service Applications under the Application Management heading, as shown in Figure 30.1.

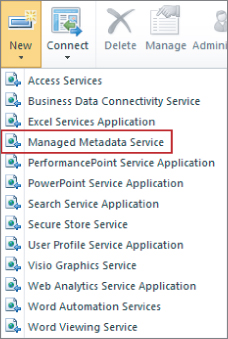
On the following page you can start a new managed Metadata Service by clicking the New toolbar button and selecting the Managed Metadata Service option. It is possible to create more than one, so make sure one hasn't been created already (unless you want a second one). See Figure 30.2.
You will be asked to name the service when you create it. (Usually it is named something like Managed Metadata Service.) After it has been created, you will see it in the list on the right of the screen. There are usually two items for each service: the service itself and its connection. In the case of this service, you can click either one and the Term Store Management Tool page will open.
Make sure the service has been started on the Services on Server page. This link is located on the Central Administration main page under the System Settings heading. See Figure 30.3, which shows the line item on the Services on Server page indicating that the service is stopped or started.
Now the service has been created and you can set up groups, term sets, and terms. Setting these up will be the focus of the Try It exercise and video lesson. In the next lesson you will see how to use the metadata on the site.
Metadata is organized in terms of groups, term sets, and terms. Here is the difference at each level:
- Groups: This is the highest level of organization for creating a structure for tagging. There are two levels of permissions for groups: administrator and contributor. Administrators and contributors in groups have the same privileges, except that administrators can add contributors to the group. Contributors can only add new term sets. Both administrators and contributors can create new term sets. Think of a term group as a division or department within a company. Within that department, perhaps there are an administrator and a couple of contributors. They can add new term sets. A term set is used to create a logical category under which to place terms used to tag documents.
- Term set: This is another abstract layer of organization. These are used for logical groupings of actual terms to be used for tagging documents and other items. For example, an HR department may create a term set for benefit documents. The terms in that set may be words like “401K,” “paid time off,” “insurance,” and so forth. These terms are then used to tag items in the SharePoint portal that relate to these terms. If you find a useful link on company 401K plans, you may tag it with the term “401K.” This makes it easier for other people to find this article later. Therefore, it is important for people in control of term sets to create a compelling and comprehensive list of terms for everyday uses such as this. Continuing with our HR example, imagine the group contributors creating a term set for benefit documents, another for legal compliance, and a third for company policies. Each term set has an owner who has full rights to modify that list of terms in that set. It has a contact e-mail for suggestions for items to be added to the term set. Finally, it has a stakeholder list of people who should be notified if the terms change.
- Metadata terms: These are the actual terms, arranged in a hierarchy, that will be used in the application for tagging, search, navigation, and so on. They can be added, deleted, and edited by term group contributors, admins, and term set owners.
In this exercise, you will create a term group, a term set, and some terms, and you will set some users with permissions.
Lesson Requirements
To complete this Try It exercise, you need the following:
- A SharePoint site with SharePoint Server and access to the Central Administration application on the server.
Hints
This exercise assumes the Metadata Service application has already been created, as detailed earlier.
Step-by-Step
1. Go to the Central Administration page. Click the Manage Service Applications link under the Application Management heading.
2. Click the link for the managed metadata service application. The actual name of this link is the name given to the service when it was created. This opens the Term Store Management Tool page.
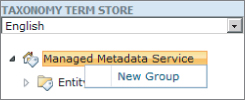
3. On the left side of the screen, the top-level item in the hierarchy is the name of the service: it will have a “home” icon. By clicking it you will get a drop-down option to create a new group. See Figure 30.4.
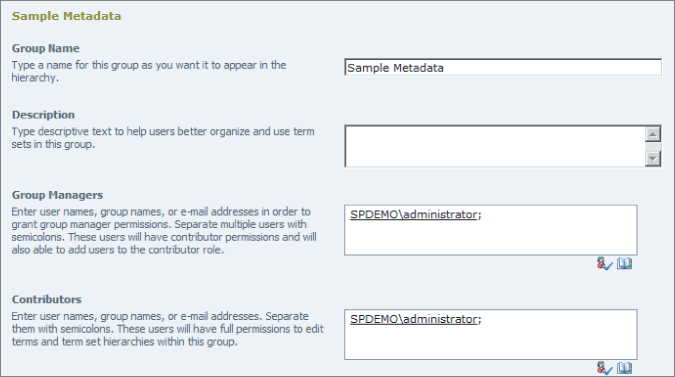
4. Set the settings for the term group:
- Group Name: The name as it will appear in the User Interface.
- Description: A description to help users understand the purpose of this term set.
- Group Managers: Users who can add term sets and contributors.
- Contributors: Users who can add term sets.
Figure 30.5 shows this page and options.
5. Click on the new term group. The drop-down menu gives you several options. You can create a term group, the option we will select. You can also import a term set from a specially formatted Excel file. Finally, you can delete a term group. Figure 30.6 shows the drop down interface. Select the option to add a new term set. A blank text box will appear with an orange background. Enter the name of the term set here. Notice the different icon for the term set as well.

6. After you name your new term set, the term set options page displays. Figure 30.7 and Figure 30.8 show the term set user interface.
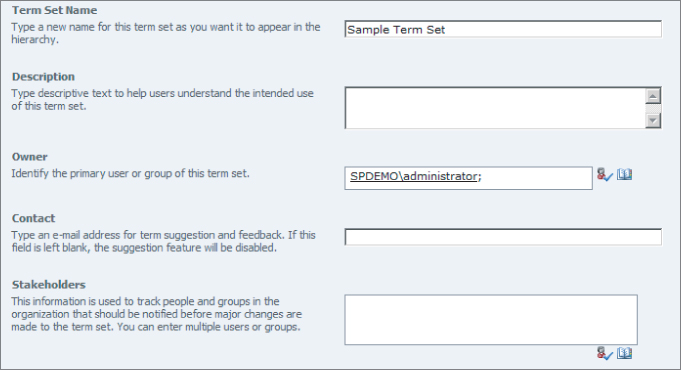
7. Set the options for the term set as follows:
- Term Set Name: The name as it will appear in the User Interface.
- Term Set Description: A description of the term set.
- Term Set Owner: The user with administrative rights over the term set.
- Contact: Enter an e-mail address to which users can send suggestions about content of the term set.
- Stakeholders: Users who should be notified before major changes are made to the term set.
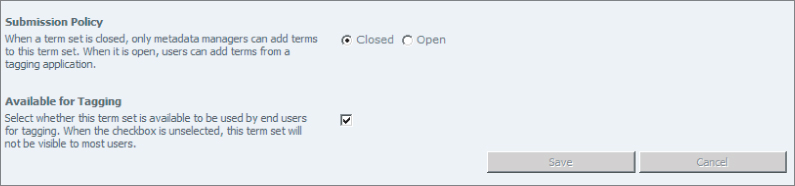
- Submission Policy: When adding metadata columns to lists or libraries, you can assign an option for users to add terms ad hoc. If you select a closed policy here, that option is not available at the list/library level and only terms already in the list can be used.
- Available for Tagging: If this box is selected, only administrators can use the term set for tagging.
Click the Save button when finished.
8. Once you have configured the term set, right click on the term set name and choose Create Term from the drop-down menu. This will let you create the actual terms used for tagging items in SharePoint. After adding the first term, you can either use the right click drop-down menu (Figure 30.9) from the term set each time to add a new term or simply hit enter after each term to automatically begin a new term. Set a few metadata terms.

9. You can create terms quickly by typing them and pressing Enter. There is one more drop-down menu for each individual term as well, offering you the following options:
- Create Term: Add a new term to the term set.
- Copy Term: Copy a term to use somewhere else in another term set.
- Reuse Terms: This will open a browser of all other terms that you can place into this term set to avoid retyping.
- Merge Terms: This will open a browser of all other terms and allow you to select any of them, which will be removed from their current locations and be replaced by the currently highlighted term.
- Deprecate Term: The term will still be visible, but additional tags may not use it.
- Move Term: Move the term to another set.
- Delete Term: Remove the term from the term set.
10. In addition to the drop down menu for each term, other options are available on the main portion of the page. To access these options, highlight the term in the term set by clicking on it. The options on the page are shown in Figure 30.10, and defined in the list which follows.
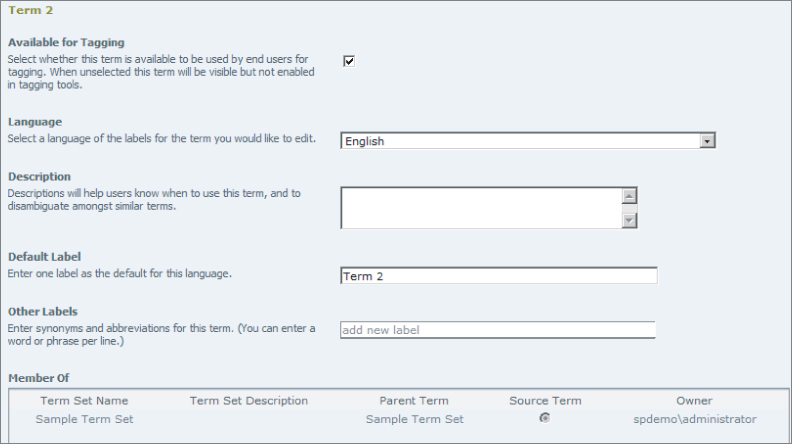
- Available for Tagging: When checked, this checkbox makes individual terms available for tagging by general users. If the box is unchecked, these terms are available only to administrators.
- Language: Select a language for this term from all language packs that have been installed on the server.
- Description: Describes the use of the term.
- Default Label: This is the label you set when you initially created the term. You can modify it here.
- Other Labels: Synonyms for the term. This is where other names are placed when you do a merge terms operation. You can also manually set your own synonyms. Synonyms are useful for anticipating other terms that users may want use to tag items in the portal which are similar to the term suggested in the term set. You may think of the term “helpdesk” for example, and add synonyms such as “desktop support” so that either term is related to the same tag. This helps to avoid redundancy in terms used for tagging.
- Member Of: An informational table that describes where the term is located in the term set hierarchy and who is the owner of the term set.
Please select Lesson 30 on the DVD or visit www.wrox.com/go/sp2010-24 to view the video that accompanies this lesson.