
Chapter 6
Site Collection Administration Settings
Individual web sites are the main context, through which most people experience and think about SharePoint. A site is a visible part of the portal and is easy to understand. A site collection, on the other hand, is an abstract administrative entity. In this lesson we discuss the purpose of the site collection and cover some of the administrative options available at the site collection level. Many of the site collection administrative options not covered in this lesson, such as search settings, are covered in other lessons.
A site collection is a group of individual SharePoint sites, grouped together to form a major administrative boundary. A lot of SharePoint features and functions are designed to work across sites but not across site collections. This boundary allows for different settings and configurations for groups of sites that have a clearly separate purpose. Site collections can be created at the farm level by farm administrators or, if the Configure Self-Service Site Creation option has been enabled by the farm administrator, site collections can be created by end users. The Configure Self-Service Site Creation option can be enabled in the Central Administration website in the Site Collections heading in the Application Management section of Central Administration.
Each site collection has a top-level site, also known as a root site. On the settings page of this site you'll find the site collection administrative options.
Following are a few examples of the SharePoint configurations that are restricted to an individual site collection. Each site collection will have its own set of configurations, named administrators, and other elements.
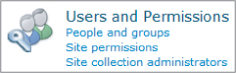
- Site Collection Administrators: A site collection administrator has absolute rights on any site within the site collection. These rights cannot be removed by the enforcement of unique permissions on sites, lists, or items at any level. The link to set site collection administrators is found under the Users and Permissions heading of the settings page of the top-level site of the site collection. Figure 6.1 shows the section of the Site Settings page where you can add site collection administrators by clicking on the Site Collection Administrators link.
- Navigation: Within a site collection, navigation items can be configured to appear identically on every site. However, sites in one site collection will not use the navigation items configured in another site collection.
Site Collection Administrative Options
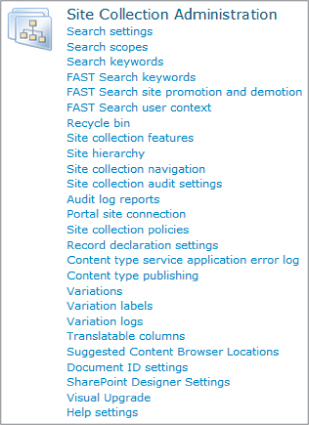
You can see site collection administrative options only in the Site Settings page of the top-level site of the site collection. If you visit the Site Settings page of any child site you will see only a link to the site collection administrative options. If you don't see any link at all, you are not listed on the site as a site collection administrator. Figure 6.2 shows a link on the settings page of a sub site to the Site Collection Administration options on the root site. If you are on the root site you will instead see a full range of options.
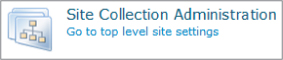
Table 6.1 lists various options and the settings that are necessary for various Site Collection Administration options to display on the screen. You will only see the link on the left side of the table if the prerequisite is met on the right side of the table.
| Site Collection Administrative link prerequisites | |
| Link | Prerequisite |
| FAST Search Keywords | FAST Search installed on the farm and SharePoint Server Enterprise Site Collection feature activated |
| FAST Search Site Promotion and Demotion | FAST Search installed on the farm and SharePoint Server Enterprise Site Collection feature activated |
| FAST Search User Context | FAST Search installed on the farm and SharePoint Server Enterprise Site Collection feature activated |
| Content Type Service Application Error Log | Content Type Syndication Hub feature activated for the site collection |
| Document ID Settings | Document ID Service feature activated for the site collection |
| Record Declaration Settings | In Place Records Management feature activated for the site collection |
| Variations
Variation Labels Variation Logs Translatable Columns Suggested Content Browser Locations |
SharePoint Server Publishing Infrastructure feature activated for the site collection |
The following links do not have any prerequisites. They always display in the Site Collections Administration menu if you are using SharePoint Server. Many of these links do not exist if you are using only SharePoint Foundation.
- Recycle Bin: The recycle bin is used to allow Site Collection Administrators to restore content that has been deleted. The recycle bin at the site collection level is known as the “second stage” recycle bin. Items only end up here after they have already been removed from site level recycle bins.
- Site Collection Features: This page activates different functionality that will affect all of the sites in the current site collection.
- Site Hierarchy: This page that shows all of the sub sites in this site collection.
- Site Navigation: This page contains options for how navigation options can be displayed across the site collection.
- Site Collection Audit Settings: This page contains options for how the content of the site collection can be audited and the audit logs stored in a separate database.
- Portal Site Connection: It is possible to have several (even hundreds or thousands) of site collections. You can use the portal site connection page to link them to an overall corporate portal site. The main benefit of this is to have a breadcrumb navigation element that will always link to the top level portal site, no matter how far down into the navigation you may be. SharePoint designer settings: On this page you can restrict what a user can do on this site collection with the SharePoint Designer program.
- Visual Upgrade: If you have upgraded from the previous version of SharePoint, but have maintained the old user interface, this page contains options to upgrade the interface to the 2010 version.
- Help Settings: On this page, you can choose which topics to display on the help screens, when a user clicks the help icon on the screen.
In this walkthrough, you will configure several site collection level settings.
Lesson Requirements
To perform this lesson you will need the following:
- Access to a SharePoint site
- Site collection administrator rights on the site collection
Hints
This lesson is a survey of the Site Collection Administration menu. Some elements of Site Collection Administration, such as search settings, are covered in other lessons which are targeted to those features.
Step-by-Step
Follow these instructions to complete the lesson:
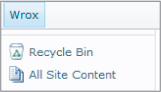
1. Navigate to the Site Settings page via the Site Actions menu. If you see a link as shown in Figure 6.3, it means you are in a subsite of the site collection, and not the top-level root site. You can only access the Site Collection Administration menu from the top-level site of a site collection.

Fortunately, if you click on the link, you will be taken to the root level Site Settings page and you will see the menu as shown in Figure 6.4. Note that the exact list of options should be similar, but not necessarily identical.
2. Click on the Recycle Bin link. That will take you to the Recycle Bin page as shown in Figure 6.5. The site collection level recycle bin is a second level recycle bin. When a user deletes an item, it is first stored in that site's recycle bin for a period of time as set by configuration options. After that time expires, or if a user empties the site level recycle bin, the content is moved to the site collection level recycle bin, where you have one more chance to reclaim it before it is permanently deleted. Notice on the recycle bin page at the site collection level you have 2 options on the left hand side, including End User Recycle Bin Items and Deleted from End User Recycle Bin. The former displays a view of items still in the site level recycle bin, while the latter displays items in the site collection level recycle bin. Restoring an item places it back on the site. Deleting it removes it permanently if in the site collection level bin. If in a site level bin, deleting it removes it from the site level to the site collection level recycle bin.

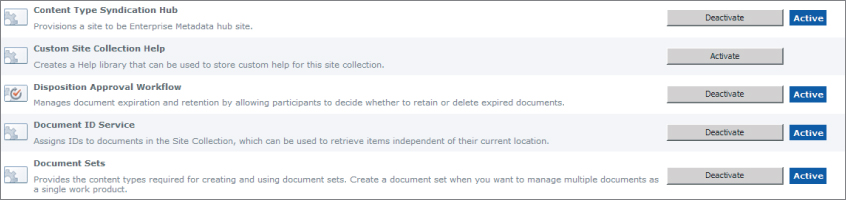
3. Click on the Site Collection Features link. Figure 6.6 shows a sample of the features listed on this page. The important thing to remember about this page is that many elements of SharePoint functionality must be activated at the site or site collection level, or both, in order to function properly.
Some common points of confusion among inexperienced SharePoint users or administrators that are caused by inactive features include:
1. Not finding web parts in the web part list when trying to add them to a page.
2. Not having access to publishing features and web parts unless the publishing features are activated at both the site and site collection levels.
3. Not having access to site or list templates when creating new sites or lists.
Take a moment to look at the list of features on this page and how they may relate to functionality you want active on your site collection. Looking for inactive features should always be one of your first options when you cannot find a certain type of SharePoint functionality.
4. Click on the Navigation Settings link. This will open the Navigation Settings page as shown in Figure 6.7.
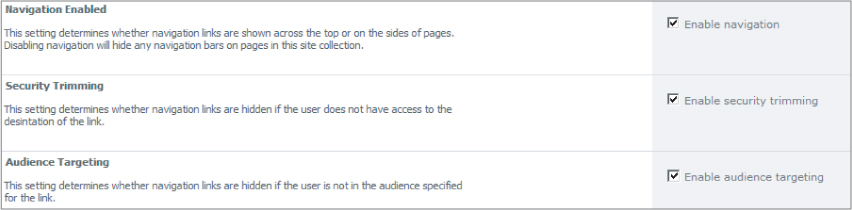
The Enable navigation button changes navigation behavior. Figure 6.8 shows a site with navigation enabled.
Figure 6.9 shows a site with navigation disabled. Note how the links across the top and left side are gone.
Disabling the security trimming button allows people to see links even if they do not have rights to the page it links to. This is sometimes desirable as a user may require access to a page and not realize it exists if they never see the link.
Disabling audience targeting will remove the ability to target navigation links to a certain group of users based on group membership.
5. Click on the link titled Site Collection Audit Settings. This will open the Configure Audit Settings page. This page allows you to configure auditing for the site collection. If you enable this feature, you will be able to track actions that users take in your site collection such as viewing documents, executing searches, or downloading items. Figure 6.10 shows the available options.
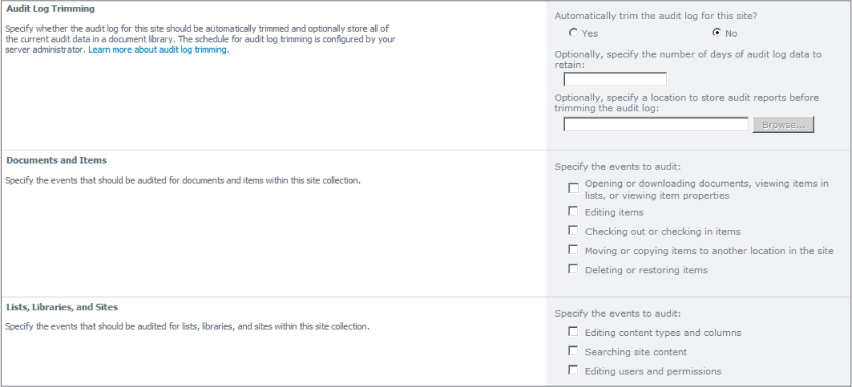
Many of the options for choosing events to audit are self-explanatory. The options at the top of the page are especially important:
- Automatically trim the audit results
- Specify the number of days to retain
- Specify a location to store audit reports
Auditing can occupy a large amount of disk space. A flaw with auditing in previous versions of SharePoint is that no viable option existed for removing auditing information from the database. It is important that you set the options for trimming if you are going to use site collection auditing. This will prevent the database from growing too large.
Auditing data can be viewed in one of two ways. First, the database can be examined to gather data. This type of task is usually per-formed by IT professionals. The other option is to use the link on the Site Collection Administration menu titled Audit Log Reports. The information from the audit logs is available in the form of Excel-based reports.
6. Click on the link on the Site Collection Administration menu titled Audit Log Reports. Figure 6.11 shows the page and the reports that are available to download. Click on a report to download audit data into Excel. You can use your Excel skills to further analyze the audit data.

7. Our final link in this walkthrough is the Portal site connection link. Figure 6.12 shows this page.

Normally site collections are autonomous units. The settings and data of one site collection are not available to other site collections. This includes navigation structures. In many cases, however, portal designers want to provide separate site collections for different areas of their organization and still provide an integrated navigation experience without having to configure the navigation elements manually for each site collection.
The portal site connection option allows site collections to link back to a single parent site collection. This is provided via the breadcrumb navigation control.
In this example, we will select the radio button option Connect to Portal Site. Then we will enter the address of the top level portal we want to connect to. In this case http://<servername>/sites/demo. Then we give the more descriptive title “Top Level Portal Site” in the portal name box. Figure 6.13 shows the result in the breadcrumb control on the ribbon. Notice that the top level of the breadcrumb is the “Top Level Portal Site”. We can use this same connection on every site collection to provide this linkage.
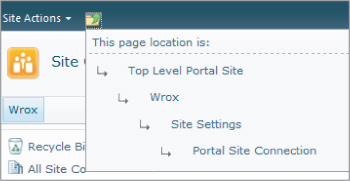
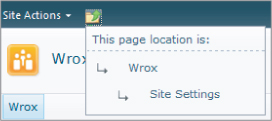
Figure 6.14 shows the same breadcrumb without the portal connection. Notice how it stops at the top of the site collection.
Please select Lesson 6 on the DVD or visit www.wrox.com/go/sp2010-24 to view the video that accompanies this lesson.