
Chapter 40
Creating an Enterprise Wiki Site
Wikis are a very useful means of creating documentation and sharing knowledge in an organization. They are more user-friendly for storing frequently accessed and updated information than lots of files on a hard drive or network folder. The information on a wiki is presented as a web page and is very easy to edit directly from a browser: users can easily add text, links, multimedia, and other content. By contrast, documentation and procedure-related content that sit in word-processing files may be accessed rarely and be less pleasing to use. Users have to open file after file to browse this information, and the files may soon become outdated or contradictory.
A wiki site is a good choice when you have content that will have many editors and many readers. Some of the types of content that wikis are particularly suited for include the following:
- Process documentation.
- General rules and procedures.
- Frequently asked questions.
- Technical documentation.
- Department policies.
There are two different ways to implement wiki functionality in SharePoint 2010. One is to create a wiki page library, which can be created on any site. The other is to create a site using an Enterprise wiki template. The basic functionality of a wiki is the same for both. The Enterprise wiki site has additional features conducive to large-scale use, such as the following:
- Custom page layout: Enterprise wikis are built using the SharePoint publishing infrastructure. This enables site developers to create more advanced layouts and customized page branding for a more refined user experience.
- Ratings: Each page is preset to allow ratings, to encourage user feedback on the content.
- Category tags: Wiki content can be tagged with descriptive terms, making it easier to filter and search information contained in larger wikis with many categories.
- Approval workflow: Content can be set to require approval before it becomes available for general users. This level of control over content may be more appropriate for corporate-wide communication than use by an individual department or project team.
There are differences between creating a site with an Enterprise wiki site template and creating a wiki document library on a SharePoint site. Wiki document libraries are typically created for smaller audiences, are less closely monitored and less likely to be accessed by the general employee population, and are more focused in scope. Consider a library created to document how to install software in an IT department. The wiki may be used only by the IT department, and there probably isn't much concern for page layout, approval, or other advanced features.
On the other hand, a corporate-wide information portal to be used by a majority of the company's employees is more likely to be an Enterprise wiki site. It includes preconfigured features for rating and tagging content, and supports customized page layouts to make it easier for users to create and lay out content. In addition, an approval workflow can easily be added to enable content review before publishing. These features will be demonstrated in the Try It section of this lesson.
In this walkthrough, we will create a site with the Enterprise wiki site template and examine some of the key features.
Lesson Requirements
To complete this exercise, you need the following:
- A SharePoint site with SharePoint Server.
Hints
This walkthrough will demonstrate some common features of SharePoint wikis and some features that are specific to the Enterprise wiki site template.
Step-by-Step
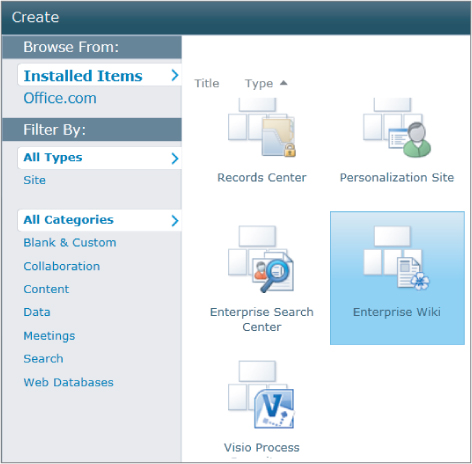
1. On a SharePoint site, create a new site (using the Site Actions menu) and use the Enterprise Wiki site template, as shown in Figure 40.1.
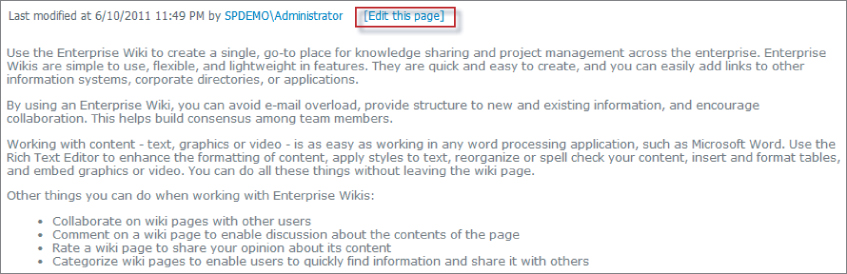
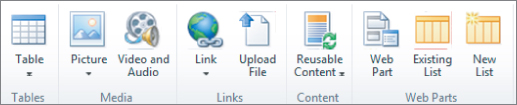
2. Edit the page. On the home page of the newly created wiki site, click the Edit This Page link shown in Figure 40.2. You can freely edit the page using the edit toolbars shown in Figures 40.3 and 40.4.

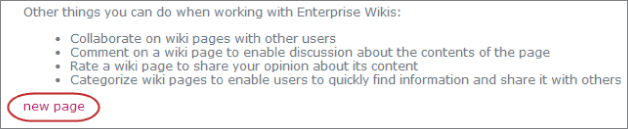
3. Somewhere in the editable area, type the following: “[[new page]]”. Surrounding text with double brackets creates a link to a page. If the page does not exist, the user will be prompted to create it. Click Save and Close in the page options on the toolbar. Figure 40.5 shows how the newly created link should appear on the page.
4. Click the new page link. A dialog will appear asking you to create the new page. Click Create. Boom! A new page is created, ready to go. Isn't this drastically easier than navigating endless word processing documents in a folder to create documentation and content? Return to the home page of the wiki site.
5. Notice that along the top navigation bar you can see the pages in the site as navigation elements. Over time, using the top navigation bar will become impractical, as it may contain dozens or hundreds of pages. You can modify this behavior by changing the navigation options in the Site Actions menu. For more information on this, see Lesson 3.
6. Use the page rating stars on the right side of the page to rate it. Page ratings are updated using a timer job that can be set by administrators to run on varying schedules. The update could take minutes, hours, or even days. Therefore, don't fret if your ratings aren't instantly reflected on the page.
7. Edit the page again. On the right-hand side, click the tag icon to the right of the category text box, shown in Figure 40.6. This will open a dialog box where you can add tags or choose from existing tags to describe the page's content. Save the page after applying a tag.

8. You will notice that if you click the tag you just created in Step 7, a page will open to display all pages using that tag. This gives you an easy way to browse content related to a certain topic.
9. In the toolbar, click the page tab and then the Page History toolbar link. A new view will appear on the left side of the screen, showing the history of the page versions. In the middle of the page you will see a limited view of some of the changes made to the page in each version. Figure 40.7 shows this view of the page history.
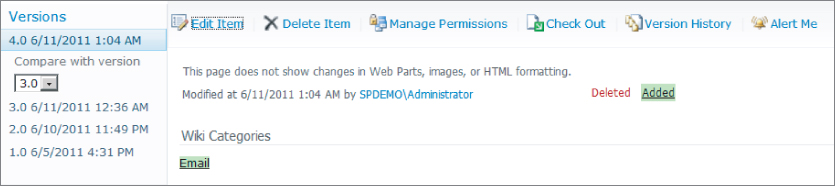
10. On the Page History view, shown in Figure 40.7, click the Version History toolbar. You will see an in-depth view of each version of the page. The time stamp on the modified column contains a drop-down menu that will allow you to view, delete, or restore the given version of a page. Figure 40.8 shows this menu.

Please select Lesson 40 on the DVD or visit www.wrox.com/go/sp2010-24 to view the video that accompanies this lesson.