
Chapter 12
Setting Up Content Types
In this lesson we discuss the concept of the content type. Information about how to set up content types is widely available in books, on blogs, and in many other sources of information on SharePoint. Yet despite the wealth of information available on this topic, it seems that content types are rarely used. As a SharePoint administrator of a site or site collection, you should know not only how to use content types, but also why using your own content types is a better means of organizing your information than relying on the default SharePoint settings.
This lesson and the accompanying video will attempt to accomplish two objectives. They demonstrate through practical examples why content types are useful and should be used as often as possible for organizing content. Second, in the walkthrough and video example, you walk through the creation of a sophisticated example to show you the power of the content type in SharePoint.
Using Content Types to Manage Content
Every organization manages a variety of content. Some obvious examples include:
- Documents
- Information kept in lists, such as employee rosters
- Web pages
- Images and multimedia
Many companies, before they consider a content management solution, attempt to organize their content by setting up a series of folders on a shared network location that everyone can access. Unfortunately people often simply duplicate the nested-folder method of data management even after installing SharePoint and do not use the powerful features that SharePoint has to offer.
A SharePoint content type is simply a structure that enables you to take a document, a list, or any of many other types of data, and attach to it descriptive columns, document templates, business processes, and other features. In this chapter, we look at the two most common types of data the average user creates: documents and list items.
Imagine for a moment that you have a particular type of document in your organization. Let's use the common example of a sales proposal. Think of the requirements that may exist for the sales proposal. As you read through this example, try to imagine some of the documents you deal with regularly. Think about how you can enhance the information concerning a sales proposal. For example, you could add a field that lists the salesperson who initiated the proposal, or you could add a field listing the total value of the sale. You could have a standard business process for reviewing and approving of the final proposal before sending it to a customer. You may want to keep an audit history of who has opened or modified the document. By using content types, you can attach data and processes to a type of information. Every time you create a new sales proposal, the data and processes will be available, without having to re-create it anew for each new document. In the example below, we will invent a fictitious document to illustrate the concepts.
Here are the requirements for a business proposal document at our fictitious company:
- Item #1: The sales proposal should be created from a common template so that each proposal has a standard look and outline and contains some light branding and perhaps a company logo.
- Item #2: There are three types of sales proposals, each for a different value of sale. The template for each type is slightly different, as is the approval level required.
- Item #3: Each sales proposal must go through one to three levels of approval, depending on its type. The more the sale is worth, the more the levels of management that must approve it.
- Item #4: Some people want to view proposals sorted by the seller's name. Others want to sort by industry, and still others by sales value.
- Item #5: The proposals should be designated as either “sold,” “in progress,” or “not sold.”
- Item #6: The division of the company has four distinct departments. Each department manages its own proposals separately. After meeting all the previous requirements they should be repeated for each of the three other.
These requirements seem like a headache. How do companies handle this? Even when SharePoint is installed it's unfortunately common to see a plain document library with a bunch of folders separately created in each department website and the same old process of death by a thousand e-mails to ship the documents around to everyone who has to sign off on them. If a company doesn't have a document management system, the use of file folders requires everyone to categorize and aggregate the data in the same manner as determined by whoever set up the folders. If the folders are organized by company division for example, people who would rather see them listed by salesperson are out of luck. To produce other views it's not uncommon for someone to make a spreadsheet or use some other manual process to present a summary of sales proposals and e-mail it to various users.
A content type can eliminate all of these problems while at the same time giving your end users a better experience with the SharePoint interface. You can then use the Try It section and the accompanying video lesson to create an example step by step. If you take the 20 minutes to work through this material, you will be far better equipped to take advantage of one of the most powerful content management features in SharePoint.
Now, let's examine how we can use content types to address the 6 example requirements listed above.
Item #1: A Common Template
When you create a content type, you can attach a custom template to the type of content you create. In this example, the type of content is a sales proposal, so you can upload your proposal template, which is probably a preformatted word-processing document such as a Microsoft Word template. Now each time someone creates a new proposal it will open in your standard template without any need to copy and save the template with a different name.
Item #2: Three Types of Proposals in the Same Library
With content types you can add several different types of documents to the same document library. When a user goes to the document library to start a new proposal, he or she will be presented with all three types of sales proposal templates, each with a more descriptive title than the common “document” title that you see with a standard document library. The user can pick the appropriate proposal type from the list.
Item #3: A Different Business Process for Each Type of Proposal
Each content type you create can have its own individual workflow attached to it. By making a different content type for each proposal type you can assign a workflow that automatically routes documents for one, two, or three levels of approval based on the type of proposal chosen.
Item #4: Different Views of the Documents for Different People
A content type can have its own descriptive fields attached to it. When someone creates or uploads a proposal, he or she can fill out the sales value, department, and other information. Separate views can be used so that each person viewing the list of proposals can choose to see the documents sorted and filtered differently.
Item #5: A Designation of Sold, in Progress, or Not Sold
By adding a choice column to this content type, you can set the appropriate value for each proposal.
Item #6: Repeating the Process for Multiple Departments
If you attach workflows to a content type, anywhere the content type is used the workflow follows. This eliminates the need to recreate all the necessary logic for multiple sites or document libraries.
Using content types we can place all three types of sales proposals into one document library. We can activate workflows that are common to all proposals while at the same time activating separate workflows for each type of proposal. We can add descriptive fields to automatically allow for many types of views of the same data. Most of what is described here is simple to set up, as you will see in the Try It section. However, one concept requires further discussion: the creation of a hierarchy of content types.
Creating a Content Type Hierarchy
Still looking at our example, you can see a couple of requirements that seem to be at cross purposes. First, common fields need to be added to every sales proposal. One field is common to all three types of proposal, which will mark its status as sold, in progress, or not sold. On the other hand, requirements vary by each proposal type, such as the number of approval levels required and the document template associated with each type of proposal.
The average SharePoint business user might be tempted to respond to this challenge, if he or she uses content types, by creating three completely separate content types and simply repeating the shared elements, such as the set of fields, in each content type. In doing so that user misses out on one of the most powerful features of content types, namely the ability of content types to inherit settings from other content types.
The proper way to create these content types is to create a hierarchy that allows each type of sales proposal to use a common set of elements while also containing elements unique to itself. You can tell if you are doing it properly if you are not repeating any elements in your content types. This type of structure uses what is known in the IT world as inheritance. The Try It! section clarifies the concept for the business user.
In this lesson we create three content types. One will be a parent in the hierarchy. Two will be child content types. The three content types together will form a content type hierarchy, with the two child content types inheriting elements from the parent type. We will add fields common to all three content types, and document templates unique to each.
Lesson Requirements
To complete this Try It exercise, you need the following:
- A SharePoint site and a Web browser.
- Three Microsoft Word documents. They should be titled Proposal A, Proposal B, and Proposal C. In a real-world application these would be three separate sales proposal templates, though their content here is not important.
- A pre-created SharePoint site with three document libraries. If you need to create the site, the Team Site template, provided as a default choice when creating a SharePoint site, will start you with a document library called Shared Documents. Create two other document libraries as well.
Hints
This Try It has a lot of steps and assumes that you are using a SharePoint site connected to a typical workplace network.
Step-by-Step
1. Open one of your three SharePoint sites to its home page. Use the Site Actions menu to access the site settings page.
2. In the Galleries heading, select Site Content Types (see Figure 12.1).

3. Click Create. Refer to Figure 12.2.
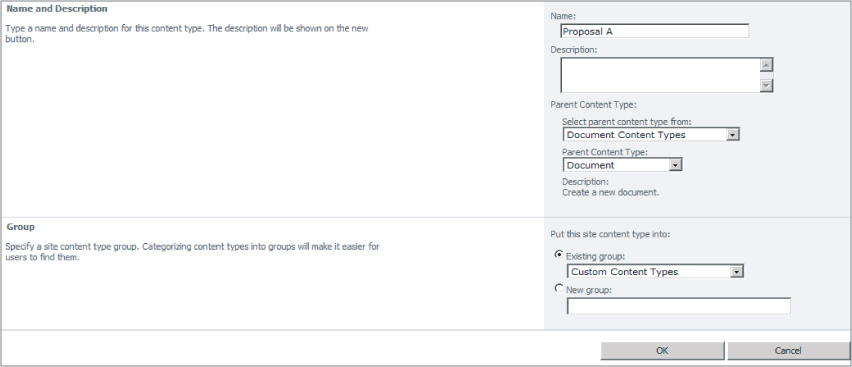
4. Enter the following values on the screen:
- Name: Proposal A
- Description: Leave blank
- Select Parent Content Type From: Document Content Types
- Parent Content Type: Document
- Put this Site Content Into: Existing group: Custom Content Types
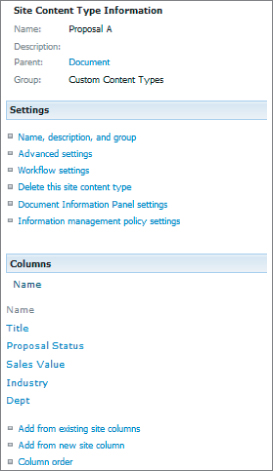
Click OK. You will see a screen like the one in Figure 12.3.
A content type that you create will be available at the site where you create it and at all sub-sites. If you want the content type to be available throughout the entire site collection, create it at the top-level site in the collection. If you want the content type to be available across site collections, that is covered in the next chapter.
5. In the Columns section on this screen, click the link Add from new site Column. Create a choice column called “Proposal Status” with three choices:
- Sold
- In progress
- Not sold
You can leave the other default settings for the column.
6. Using the same process as in Step 5, create three more site columns. Each should be of type single line of text. Name the columns as follows:
- Sales Value
- Industry
- Dept
In a real-world example, it may be a better practice to use choice columns or other field types for these types of fields. For our example the purpose is to illustrate how you can take a type of document such as a sales proposal and add specific columns to it. Now you can create different views of sales proposals and use these columns to sort or filter the list of proposals. This is a more flexible solution than just using folder structures. Your site columns should look like what is shown in Figure 12.4.

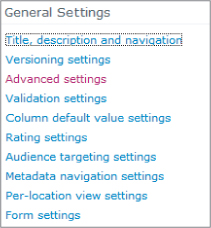
7. Under the Settings tab on the Content Type page, click Advanced Settings. You will see a screen as shown in Figure 12.5 below. In the Document Template section click the radio button titled Upload a New Document Template and use the Browse… button to upload the Microsoft Word document Proposal A.
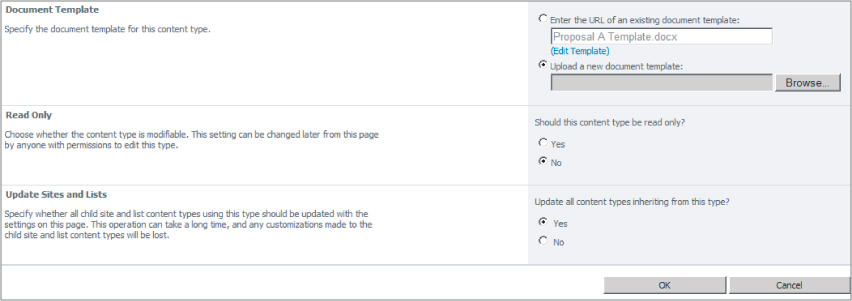
Now each time someone creates a new proposal Microsoft Word will open this document template, instead of the blank Word document that you would get if you just used the standard document library and its out-of-the-box “document” type.
8. At this point the base content type has been created and the next two content types, for Proposal B and Proposal C, will be based on this one. Return to the Site Settings page (using the Site Settings link on the Site Actions menu in the upper left corner of the screen is the quickest way). On the Settings page, under the Gallery heading, click the Site Content Types link. You will see a long list of content types. The content type you just created should be under the heading Custom Content Types as shown in Figure 12.6. Notice that it should be highlighted in blue. A content type created at the site you are currently browsing will show a blue link. A content type created at a higher level will display in grey, with a blue link to its source site in the column to the right. Since the content type was created on this site, it is available to use on this site and all sites below it. Later in the example you will see how to add it to a document library.

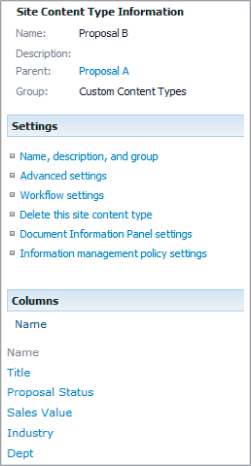
9. Click the Create button again to make the second content type. Enter the following values:
- Name: Proposal B
- Description: [Leave blank]
- Select parent content type from: Custom Content Types
- Parent Content Type: Proposal
- Put this site content into: Existing group: Custom Content Types
Notice that for this content type, instead of selecting the document content type for the parent, you choose the proposal content type that you created earlier in the example. What this means is that all the columns you created for Proposal A are now also available for Proposal B. You don't have to recreate the same columns. A child content type inherits everything that its parent can do. In this particular case, it will include the columns and document template that you created in the previous steps. It could also include other elements such as workflows, security policies and so forth. You can see this in Figure 12.7.
10. Because Proposal B uses a different template from Proposal A, you want to change the template this content type uses. You can keep the things you want from Proposal A as part of Proposal B, and change the things you want to be different. Once again, choose Advanced Settings under the Settings heading and upload the Proposal B template.
11. Create Proposal C using the same process and settings as for Proposal B. Notice that when you create Proposal C we name Proposal A or Proposal B as the parent. The choice you make in setting up a hierarchy depends on your business requirements. You should put some thought into the hierarchy before creating the first content type. In our example Proposals B and C should are both “children”: of Proposal A. As you did for Proposal B, upload a separate document template for Proposal C.
At this point you should have three content types, all using the same fields from Proposal A, but each using a separate document template. Note that you could also have added separate workflows for each content type to meet the requirements in the list.
12. Now let's add the content type to a document library. Open the Shared Documents library and click Library Settings on the toolbar. That will bring you to the document Library Settings page as shown in Figure 12.8. By default, libraries are not created to work with content types, so there is some configuration to do.
13. On the document library settings page click Advanced Settings.
14. On the advanced settings page select Yes on the radio button labeled Allow Management of Content Types?. Click OK to return to the document Library Settings page. You will notice a previously hidden section, Content Types, below the General Settings section, as shown in Figure 12.9.
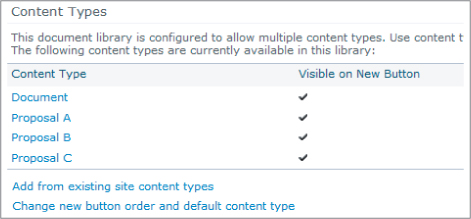
15. Click the link Add from Existing Content Types. From the drop-down select Custom Content Types. Finally, select Proposal A, Proposal B, and Proposal C and add them to the library.
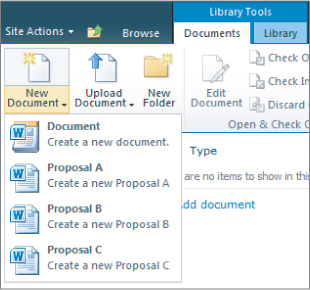
16. Go to the document library and create a new document. As shown in Figure 12.10, you are now presented with a choice of the standard documents as well as all three types of proposal. Each proposal has access to the same fields but uses a separate template when opened.
Please select Lesson 12 on the DVD or visit www.wrox.com/go/sp2010-24 to view the video that accompanies this lesson.