
Chapter 38
Creating a Meeting Workspace
Meeting Workspaces are useful templates for creating sites that meet a common need: the need to record information about meetings, such as the attendees and the topics discussed. The other nice feature of a meeting workspace is that you can easily link it to a calendar of events on your intranet and/or in your personal Outlook calendar. In this lesson we examine creating a meeting workspace and attaching it to a calendar of events.
There are several Meeting Workspace templates to choose from when creating meeting sites. They differ in the combination of pre-created lists and libraries that are provisioned when you create the workspace. When you create a Meeting Workspace, you are creating a separate subsite, and not just a list or library.
Unlike typical SharePoint sites, Meeting Workspaces can be directly connected to an events list and calendar on their parent site. This feature will be shown in detail in the Try It section of the lesson.
There are four out-of-the-box Meeting Workspaces:
- Basic Meeting Workspace: Use this template for everyday business meetings. It has a few pre-created lists and libraries to track meeting agenda, attendees, etc.
- Blank Meeting Workspace: Use this template if you like to make your own sites for meetings, and don't want pre-created lists and libraries. It includes only an attendee list, which is a special type of list you cannot create outside of the workspace templates. Otherwise, you will have to add all of the other elements that you want on the site.
- Multipage Meeting Workspace: This is the same as the Basic Meeting Workspace template, except that a few extra pages have been pre-created. Use this type of site for really large meetings for which you may need multiple pages for the agenda.
- Social Meeting Workspace: Use this template for creating a site to hold information about the company picnic, the sales conference, and so on. It includes pre-created libraries for image uploads.
Other than the ability to connect to event lists and calendars, and the attendees list type, Meeting Workspace sites operate just like any other SharePoint site. Any user that can create a SharePoint site can create a Meeting Workspace. The other list types used in Meeting Workspaces, such as the document library, or the agenda list, are available in other sites as well. In the Try It section below, we will examine the unique feature of workspace sites; connecting them to event lists and calendar views.
In this walkthrough, we will create a Meeting Workspace site and examine how you can connect it to an event list to create multiple unique meeting instances using just one workspace site.
Lesson Requirements
To perform this lesson, you need a SharePoint site with SharePoint Server or SharePoint Foundation installed.
Step-by-Step
1. Select New Site from the Site Actions menu on a SharePoint site. Select Multipage Meeting Workspace, give it a name and URL, and then click Create. You should see a page similar to Figure 38.1.

2. Fill out the provided list and libraries, such as the meeting objectives, agenda, and attendees. You can also add a document library if you want to provide the materials for the meeting. Also note the additional pages provided on the left navigation menu, as shown in Figure 38.2. The pages are empty and each contains three columns for adding Web Parts. If you are holding a large conference or meeting, these additional pages, Web Parts, and list views can contain information about each day's events, for example.

3. Now that you have a meeting workspace, let's link it to events on a calendar. Go back to the site from Step 1 and create a calendar list.
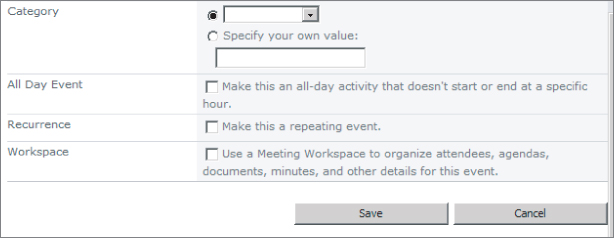
4. Create a new event on the list you just created. Give it a name and start and end times and, as shown in Figure 38.3, select a Category.
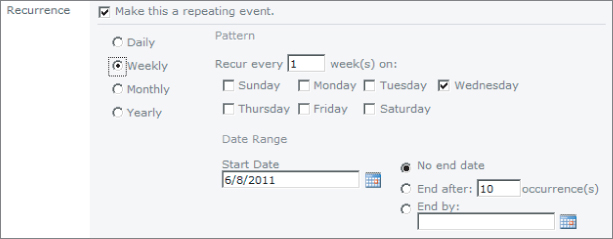
Check the Make This a Repeating Event checkbox. This creates multiple instances of the meeting on a schedule you can determine. When you select the checkbox for a recurring event, more controls display. Select a weekly occurrence. See Figure 38.4.
The category field is added to a calendar list by default. Select a category. Check the All Day Event checkbox if you would like to block out the entire day on the SharePoint calendar or your outlook calendar.
5. Also select the checkbox with the caption Use a Meeting Workspace to Organize Attendees, Agendas, Documents, Minutes, and Other Details for This Event. Finally, click Save.
6. On the next page there should be a section titled Create a Link, where you can choose from existing workspace sites to link to the recurring event. Select the site you used in Step 1. The rest of the page will be grayed out. Click OK. See Figure 38.5 to see a view of the form.

Keep in mind that if you do not have a meeting workspace already created, you will not see Figure 38.5. Instead, you will be taken to a slightly different screen without the option to choose an existing site. Figure 38.6 shows this form.
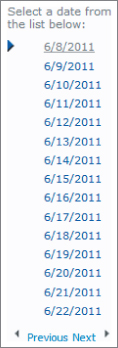
7. The meeting site you created in Step 1 is displayed. Notice on the left side a link for each occurrence of the meeting, listed by date. Each link opens a different version of the meeting workspace, which gives you a convenient way to track meetings in your organization. Figure 38.7 shows the meeting navigation dates you should see on the left side of the screen. Each date listed represents a new instance of the meeting site created until the final date as configured.
Please select Lesson 38 on the DVD or visit www.wrox.com/go/sp2010-24 to view the video that accompanies this lesson.