
Chapter 18
Setting Up Related Lists
Relational data structures are a feature that SharePoint users have requested for years, but have not yet been fully implemented. A simpler solution known as related lists does however exist, where the items in one list provide the detail for items in another list, with the two lists related to one another by a field such as an ID or other column. SharePoint 2010 adds some features to make modeling list relationships easier and provides some new functionality for maintaining the lists.
Using related lists makes it easy to create sophisticated views with a master-detail type of presentation. For example, one list may contain sales orders, while another list may contain detail about the customer that made the purchase. Related lists enable you to create a view showing the orders from one list, combined with the customer's address from the other list.
The main element used to create related lists is the lookup column. You need at least two lists, though it is possible to create relationships that span multiple lists. Each list provides detail for and refers back to a column in the list above it. In this chapter you will learn how to connect two lists.
A lookup column enables you to draw values from other lists on the same SharePoint site and use their values in the current list. Using a lookup list and a column from the parent list, you can create a relationship to the child list, also known as the detail list.
In this lesson we are going to examine the pieces that go into creating related lists and walk through the steps to create two lists and display the related records as Web Parts on a page.
Once you have placed a list view Web Part on a page, if the list represented in the view contains a lookup field that refers to a parent list, you will have the option to automatically connect it to its parent list and create the master-detail view immediately on the page. In this walkthrough, we will connect two related lists that share a common field and display of view that combines data from both lists.
Lesson Requirements
To perform this lesson, you need a SharePoint site with SharePoint Foundation or SharePoint Server.
Hints
Prior to completing the walkthrough, create the following lists:
- List 1: Orders, derived from the custom list type.
- Rename the Title field to Order Name.
- Create a new record. Enter My first order for the Order Name field.
- Create another new record. Enter My second order for the Order Name field.
- List 2: Order Details, derived from the custom list type.
- Rename the Title field to Items.
- Create a new record. Enter Some wine for the Items column and select 1 for the Order ID column.
- Create a new record. Enter Some cheese for the Items column and select 1 for the Order ID column.
- Create a new record. Enter Some music for the Items column and select 2 for the Order ID column.
Step-by-Step
1. Go to the list settings for the Order Details list.
2. Create a new column of type lookup. Name it Order ID.
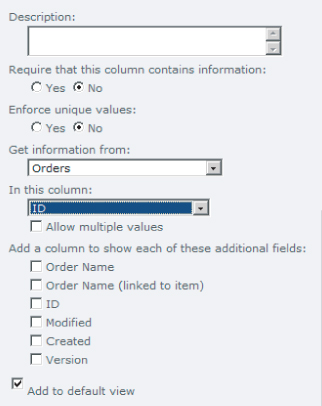
3. In the Additional Column Settings section, select Orders from the Get Information From drop-down. Figure 18.1 shows the interface.
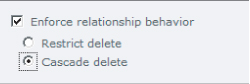
4. In the Relationship Settings section, select Enforce Relationship Behavior. If you choose Restrict Delete, you will not be allowed to delete rows in the Order list if records exist in the Order Details list. If you select Cascade Delete, deleting a row in the Orders list will delete every associated row in the Order Details list. Select Cascade Delete. Figure 18.2 shows this option.
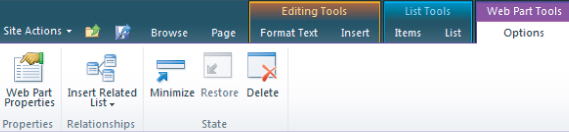
5. Browse to any web page and add a list view Web Part of the Orders list to the page. To add the Web Part, you will need to place the page into edit mode. Select the Edit Page option from the Site Action drop down menu. Then you can select the Insert Web Part option from the toolbar. Once you have placed the Orders Web Part on the page, assuming you are still in edit mode, you should see the toolbar option called Web Part Tools. Select Options below it. Make sure the Orders Web Part is still your selected Web Part. You should see an Insert Related List command, as in 18-3.
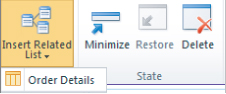
6. When you click Insert Related List, you will see an option for Order Details. Select the list and the Web Part will be automatically added to the page and connected to its parent list, the Orders list view Web Part above it. Figure 18.4 shows the detail.
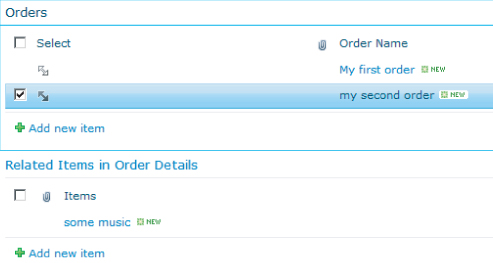
7. Notice the Select column in the Orders list. Clicking the double-arrow image for a given record in the Orders list will show the associated orders in the Order Details list below it. Figure 18.5 shows the double-arrow image you should click.
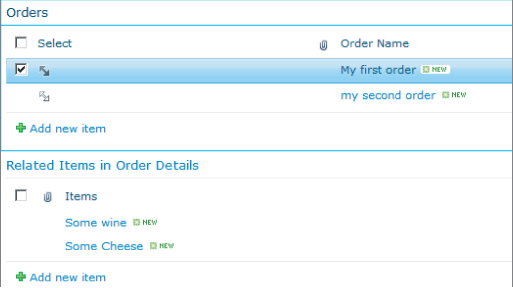
Figure 18.6 shows the effect of selecting a particular item in the master list. The detail list shows only the related items.
Please select Lesson 18 on the DVD or visit www.wrox.com/go/sp2010-24 to view the video that accompanies this lesson.