
Chapter 39
Personalization Sites
This lesson covers one of the most powerful and least used features in all of SharePoint, the personalization site. A personalization site is a special kind of site template. Its purpose is to create sites inside your portal, but present each of these sites as an individual experience to each user, with content customized for her.
Imagine for a moment you have a company portal. This portal has a human resources site. You would like people to have a personalized view of the site. For example, you would like to arrange it so each person sees state income tax documents based on the ZIP code of his home address. Or perhaps your business has different employee bonus schedules for different types of employees. Salespeople get one bonus schedule and the janitor another. You can present a bonus schedule to each employee based on job title.
For another example, you could have a collaboration site in which everyone is uploading documents related to some large project. A personalization site could present a special view that shows only those documents authored by the user who is logged in. It could also show a view of the logged-in user's tasks for a project as assigned on a task list and imported into Outlook and presented on a site in the portal. There are endless possibilities for content that is presented differently for each user. That is the purpose of a personalization site.
A personalization site can be built anywhere within the portal, just like any other site template. Note that the User Profile Service must be active in order for the personalization site template to be available for use. Starting and configuring a User Profile Service is beyond the scope of this book, but you should be aware of this important prerequisite to avoid the confusion of not seeing personalization sites as an option on your SharePoint farm. If this is the case, check with your farm administrator to make sure a User Profile service application is running.
You can link a personalization site to the top navigation bar of a user's My Site by setting some properties in the User Profile service in Central Administration. Figure 39.1 shows the links to the MY HR site created in another section of the portal but pushed to the My Site navigation bar for the logged-in user.

There are a number of Web Parts that are particularly suited to placement on My Sites. They include the following list:
- Outlook Web Parts: This list includes MyCalendar, MyInbox, MyTasks, etc. These Web Parts show information from Outlook.
- Colleagues Web Part: This shows coworkers as set in the user profile properties.
- SharePoint Documents: Aggregates a list of documents authored by the user. It will reach across sites to collect the information.
- RSS Feed: This can be used to collect favorite feeds from the Internet or other SharePoint lists.
In this lesson, we will create two Personalization sites. We will examine the options available for personalizing each site to reflect different views based on the identity of the logged in user.
Lesson Requirements
To complete this Try It exercise, you need the following:
- A SharePoint site with SharePoint Server.
Hints
This walkthrough assumes a User Profile service application has already been created and configured. It also assumes you can perform some minor tasks such as adding and editing Web Parts on a page.
Step-by-Step
Follow these steps in order to complete the goals of this lesson:
1. Create a personalization site from any other site, using the Create Site command from the Site Actions menu. Select the personalization site template. Once the site is created, copy the URL from the browser address bar. You will paste the link in Step 5.
2. Access the Central Administration site to set up the user profile service. At a minimum, you need rights to manage the User Profile service. The easiest way to access the Central Administration site is by logging into the server, clicking the Start menu and the All Programs link, and then opening the Microsoft SharePoint 2010 Products folder. In this folder is a link to open the Central Administration website.
3. From the home page of the Central Administration site, click the Manage Service Applications link under the Application Management heading.
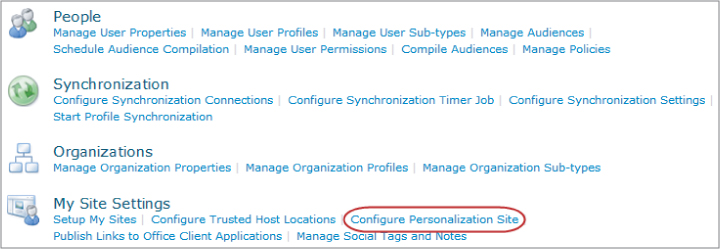
4. From the list of service applications highlight the User Profile Service Application, and click the Manage toolbar on the ribbon. The User Profile Service management page should be displayed. Figure 39.2 shows the page and highlights the Configure Personalization Site link.
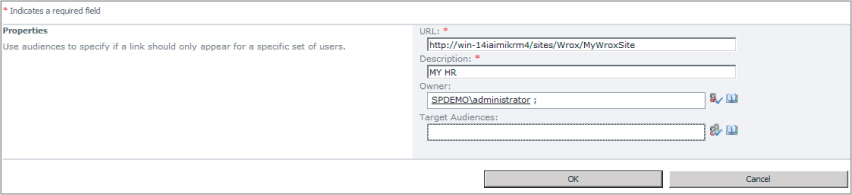
5. Click the New Link button on the Personalization site links page. Paste the value you copied in Step 1 into the URL field. Enter a description. What you type in the description field will show up as the link on the user's My Site. The Owner field will usually contain the name of the personalization site owner or a farm administrator. Finally, you can target the link to show up only in the My Sites of users who belong to certain audiences. Audiences can be compiled on the User Profile Service Management page under the People heading by clicking on the link titled Manage Audiences. However, this task is not the focus of this lesson. If no audience is specified, the link will be visible for all users. Click OK after completing the form. Figure 39.3 shows a form filled out for a site link called MY HR, which links to an HR personalization site.
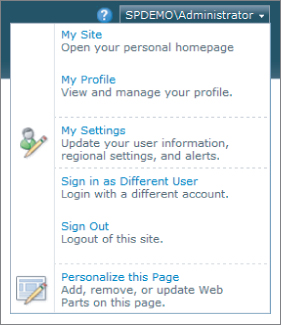
6. In the upper right corner of any site, you will see a control that shows the logged-in user and a drop-down menu, as shown in Figure 39.4. Click the drop-down menu and select My Site.
7. On the My Site, in the upper left-hand corner, you will see the top navigation bar, which should include the link you have just added. Figure 39.5 shows the MY HR link on the navigation bar.
8. Create a new personalization site, as you did in Step 1. This example features another personalization site called My Projects. In this case we will not add a link in Central Administration, but will see how an individual user can pin a link to her individual My Site, which will be seen only by her. Figure 39.6 shows that we have navigated to the new My Site. By hovering over the link you enable the option to pin it to your personal My Site.

9. Return to the My Site and you will see the site you just pinned to the top navigation bar. No one else who doesn't also pin this link will see it.
Please select Lesson 39 on the DVD or visit www.wrox.com/go/sp2010-24 to view the video that accompanies this lesson.