
Chapter 9
Search Scopes for Site Collection Administrators
A search scope enables you to allow your site collection users to carry out highly targeted searches within their site collections. However, such a search is limited to a subset of content defined as its scope, rather than encompassing the entire SharePoint index. For example, you can set up a search scope that looks only for Microsoft Word documents from among hundreds of different file types. In this case, the scope is defined as Word documents as opposed to the entire index.
Another example of when you can use scopes is where Sites use content categories to classify documents according to subject. Search scopes can help to narrow down search criteria and results to documents in a particular category or file type. Many users simply want see results that do not include information they are not particularly interested, and anything you can do to help reduce the number of results that they have to trawl through can be helpful and make your sites much more user friendly and efficient.
A search scope can be applied at the site collection level or set by a SharePoint administrator in Central Administration for the Search Service Application. If the scope is created in Central Administration, it is available in every site collection for the web application. If set at the site collection level, it is available only in that specific site collection. Setting a custom scope is a two-stage process. In stage one, you need to enable Custom Scopes (if it is not already enabled), and in stage two, you create the scope itself. To create a new scope, follow these steps:
1. Click Site Actions.
2. Click Site Settings. This opens the Site Settings page, which contains various management tools grouped into categories.
3. In the Site Settings page, click the Search Settings link located in the Site Collection Administration category. The Search Settings page enables customer scopes for the site collection. Figure 9.1 shows the Search Settings page.
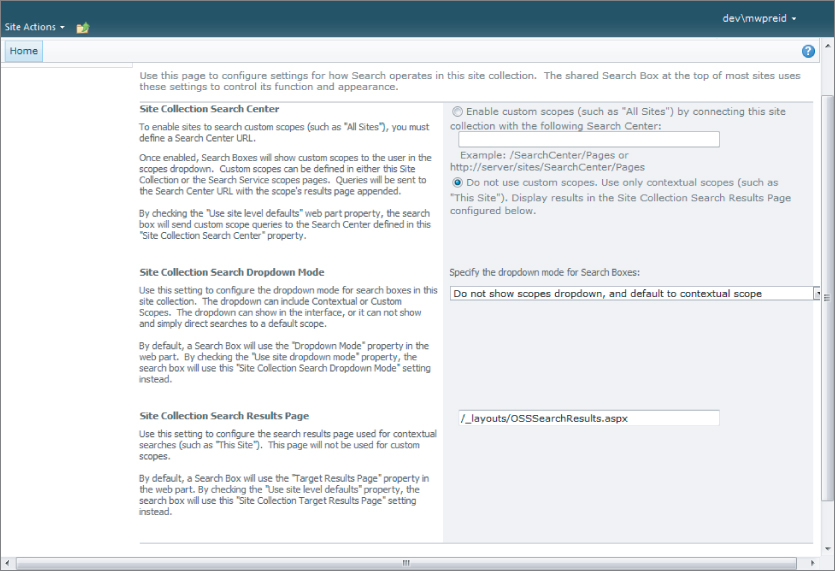
Several settings are available to you on the Search Settings screen related to Scopes, their presentation, and how the results are delivered to your users. You need to think about how users will search within the site collection and how scopes will be used. When a user searches for information, the results page returned is the default results page for the site collection using the search results page located at the default URL, which is \_LayoutsOSSSearchResults.aspx. This results page is stored on your instance of SharePoint Server and is the default search results page used by all site collections. As shown in Figure 9.1, you can redirect the results to your own search page after you enable custom scopes. However, you need to be careful because each scope could be using a different results URL, which can be confusing for the user. For example, using a custom scope may return the user to results page A. Using another scope could return the user to results page B. The options available are as follows:
- Site Collection Search Center: Rather than use the default Search Center provided out of the box, you can create your own and point your search to this area for results.
- Site Collection Search Dropdown Mode: This option enables you to control how scopes are displayed in the scopes drop-down list on your site collection. Figure 9.2 shows the options available under Specify the Dropdown Mode for Search Boxes. (I have to add that the programmers behind this list of options will never win an English award for this!)
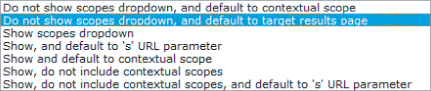
- Do Not Show Scopes Dropdown and Default to Contextual Scope: This option simply hides the drop-down list on the site. If you look at the homepage of a new team site, you can see that a drop-down list is not available next to the search text box. Searches default to the All Sites scope. Contextual means that you can search within your current context. For example, if you have a list open, the drop-down displays This List, or your current context.
- Do Not Show Scopes Dropdown, and Default to Target Results Page: This defaults to the configuration of the target results page, which, if it is not set up to use custom scopes, returns all results. If the target page is configured to use a custom scope, your search results here reflect that.
- Show Scopes Dropdown: Displays the scopes drop-down list beside the search text box. The scopes available will usually default to This Site, All Sites, and All People.
- Show and Default to “s” URL Parameter: If you have carried out a search on a SharePoint site you may have noticed that the URL passed to the search results page. For example, with a custom scope, the following is passed to the results page:
http://dev/_layouts/OSSSearchResults.aspx/Results.aspx?k=martin%20reid&s=My%20Documents
Notice s=My%20Documents, this is a keyvalue pair, which is part of what is often referred to as a querystring. In this case the s parameter is a custom scope (My Documents) that you will create later in the “Try It” section. Also note the use of the escape value, %20 to indicate a space in the querystring. In the absence of the s parameter the scope will be the default scope for the site.
- Show and Default to Contextual Scopes: This option will mean a default to the contextual scope, for example This Site or This List. However, all other scopes will be available in the drop-down.
- Show, Do Not Include Contextual Scopes: This setting will remove the contextual scopes (List and Library) from the drop-down.
- Show, Do Not Include Contextual Scopes, and Default to “s” URL Parameter: This setting can function as the preceding setting with the difference being that the “s” parameter will be added to the querystring.
- Site collection Search results Page: This setting may not be used for custom scopes (which can have their own results page) and will be set at the default (_Layouts/OSSSearchResults.aspx) when you open the form.
Managing Where the Scope Appears
When you create a custom scope you can also decide where you want the scope to appear. You can display the scope in the standard search drop-down list used on the team site homepage, add it to the drop-down available within the advanced search page, or use it in both. In addition you can also create a new display group to contain your custom scopes. Of course you can also choose not to display the scope at all. In this case the only way to use the scope is through the s parameters in the query string. You will have to pass the scope within the URL to the results page.
In order to use a scope you must add a rule or rules that will be applied to content when the scope is populated. When you create a new scope it does not contain any rules. A scope rule can be any of the following:
- A web address, such as http://www.yoursite.com. This also includes file shares, a domain (for example www.microsoft.com), and sub domain.
- A property query (file extension = document). A scope can be restricted to a meta data property held within SharePoint for example where file extension = doc. Managed properties are available and can be used to set this rule. A default set of properties is available on the Add Scope rule screen and other properties can be added by SharePoint admins from Central Administration.
- All content.
A scope rule also contains instructions for how it is to be applied to content. You can include content that matches the rule, exclude content that matches the rule, or set the rule to be required, meaning that only content matching the rule will be included.
The real power of the scope rules is that you can associate multiple rules with a given scope. For example, using managed properties you can create a set of rules where:
![]()
AND
![]()
OR
![]()
This scope would be limited to documents authored by Martin Reid that have either a .doc or a .docx extension. These rules are created one at a time but used collectively to make up the search scope. Figure 9.3 shows the Scope Properties and Rules screen for the preceding rule.

The Settings screen will also provide information on the approximate number of items indexed by each scope rule and the total number of items within the scope. As you can also see in Figure 9.3 this screen can be used to manage the scope and the rules, and it is here that you would edit or delete a scope. You may have to wait a few minutes for your changes to a scope to take effect.
In this exercise, you create a new scope, set the scope options, and add a rule to the scope.
Lesson Requirements
To complete this Try It exercise, you need the following:
- A document library containing some Word files with both .doc and .docx extensions. These files are required when you carry out a search using the scope created in the exercise. If you have additional files in the library, you can extend the example to include their extensions.
Step-by-Step
To begin creating a new scope, you need to open the Search Settings page. To do this, follow these steps:
1. Click Site Actions.
2. Click Site Settings.
3. Click Search Settings (Site Collection Administration Category).
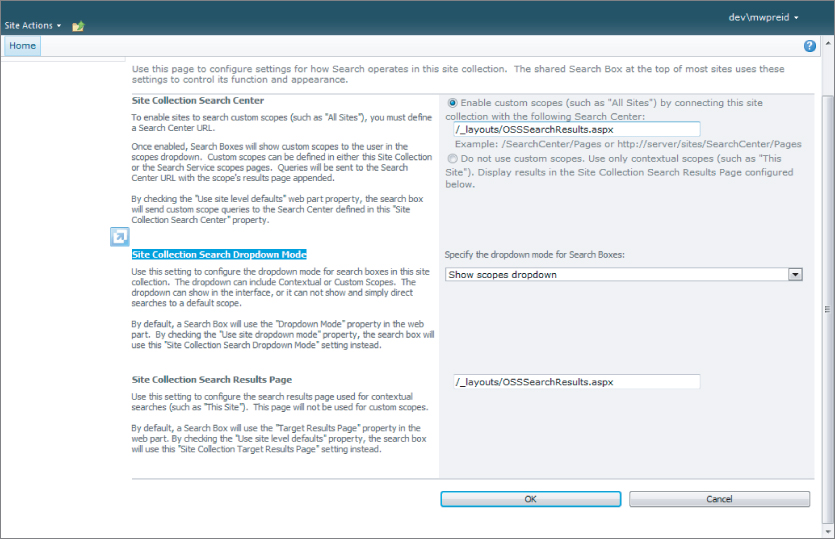
4. Click the radio button titled Enable custom scopes (such as “All Sites”) by connecting this site collection with the following Search Center:
Enter /_layouts/OSSSearchResults.aspx into the Search Center text box. This is the default Search Center.
5. Select the Show scopes dropdown from the Site Collection Search Dropdown Mode list.
6. Click OK to save the changes and enable custom scopes. Figure 9.4 shows the Settings screen.
Now that you have enabled the use of custom scopes, create a new scope in the Site Collection Administration category by following these steps:
1. Click Search Scopes.
2. Click New Scope.
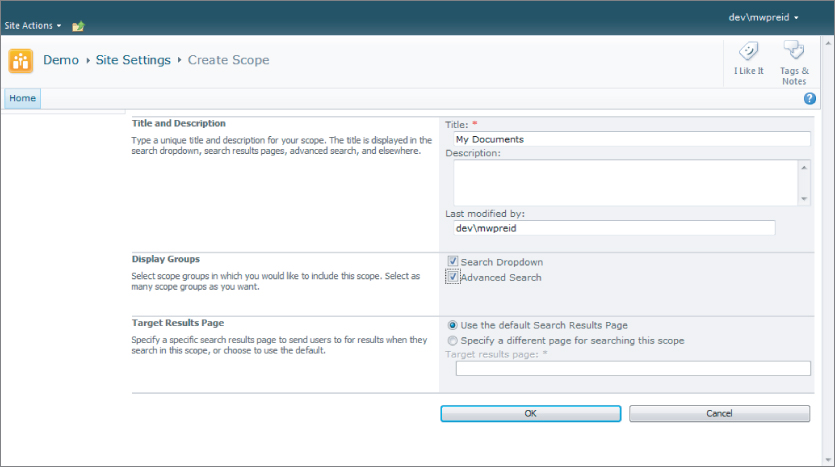
3. Enter a title for the scope (My Documents, for this example).
4. Enter a brief description, such as Search scope restricted to documents authored by me.
5. Click both the Search Dropdown and Advanced Search checkboxes to display the scope in both drop-downs.
6. Accept the default for the Target Results Page, Use the Default Search Results Page, and then click OK. Figure 9.5 shows the completed Create Scope form.
Now that you have enabled custom scopes and created a new scope, it's time to add rules to the scope. Follow these steps:
1. In the View Scopes page, look for your newly created scope (titled My Documents in this example).
2. On the right, click Add Rules.
3. Click the Property radio button. The screen changes, enabling you to select a property. From the Property Query drop-down, select Author.
4. Enter your own name in the text box immediately below the drop-down.
5. Accept the default behavior of Include.
6. Click OK to save the rule.
To add additional rules to the scope, click the scope name and on the Scope Properties and Rules screen click New Rule. Repeat Steps 2 through 4, selecting FileExtension from the Property Query drop-down and adding .doc to the text box. Repeat this process to add a rule for the .docx extension.
If you look at the Scope Properties and Rules screen, you will see a message telling you when the scope will be updated and available to the site. In my case, the scope will be available in four minutes. When the scope is available, you can begin to use it to search within your site.
Please select Lesson 9 on the DVD or visit www.wrox.com/go/sp2010-24 to view the video that accompanies this lesson.