
Chapter 8
Setting Search Options at the Site Collection Level
Once you begin to use SharePoint to store documents and other content, you need a way to search through what's there and make it available. SharePoint Search provides you with a powerful tool to assist your users in finding information. Lesson 9 examines how to configure and use search scopes to help users find information. In this lesson you will look at the overall approach to working with Search on your site and how to configure it.
When you search within a site collection your results are displayed on a default search page, which is used by the entire site collection. This page results.aspx is actually stored on the SharePoint server. For example, searching a site with the URL http://martinreidpc/sites/demo/SitePages/Home.aspx will display results using a results page located at the URL http://martinreidpc/_layouts/OSSSearchResults.aspx/Results.aspx?k=test&s=All%20Sites.
Clicking the Home link on the results page will send you to the URL http://martinreidpc/Pages/default.aspx. This is not the site where you started searching. You are now outside the context of the site on which you started the search. This is because the search results page is located at the top level of the site collection not within the team site you started on. This can be confusing for your users, who can get lost in complex site structures. This is one of the reasons SharePoint enables you to customize the search results page and change its location. We'll look at doing this later in the lesson.
Search is managed by site collection administrators from the Site Settings page. From here you can work with scopes: you can create custom scopes, add or remove items from the search scopes drop-down list, add new items to the list, and more. In terms of search results you can create your own results page and customize its layout.
Figure 8.1 shows the top section of a newly created site collection. Notice the search box, which will enable you to enter a search term and get results.

Now look at Figure 8.2, which shows the same search box but with a configuration change made. In this case the search scopes drop-down list is now available. This enables your users to conduct searches restricted to specific areas of the site or indeed specific content types. In this case the search scopes drop-down has been configured to display Lesson 8.

Figure 8.3 shows the same list with the search settings changed again, this time to make more items available for targeted search.

People and All Sites are now available, enabling users to conduct searches within those specific categories. As you progress with SharePoint and search you will begin to understand what information your users search for and how, and you can then begin to customize search and scopes to make searching for common terms easier. This is discussed in Lesson 9 when you look at search scopes in more detail.
SharePoint 2010 has also improved how results are displayed to the user. Figure 8.4 shows the results for a simple search using the word test. (Note that some areas of the screen that display user account information have been blanked.) The left-hand side of the results page enables you to further filter the results by:
- Result Type: Filter for all results, or for web pages, PowerPoint documents, or Microsoft Word Documents.
- Site: View results from all sites or specific sites listed.
- Author: Filter results by content author.
- Modified Date: Filter results by date modified.
- Tags: Filter results using metadata tags associated with content.
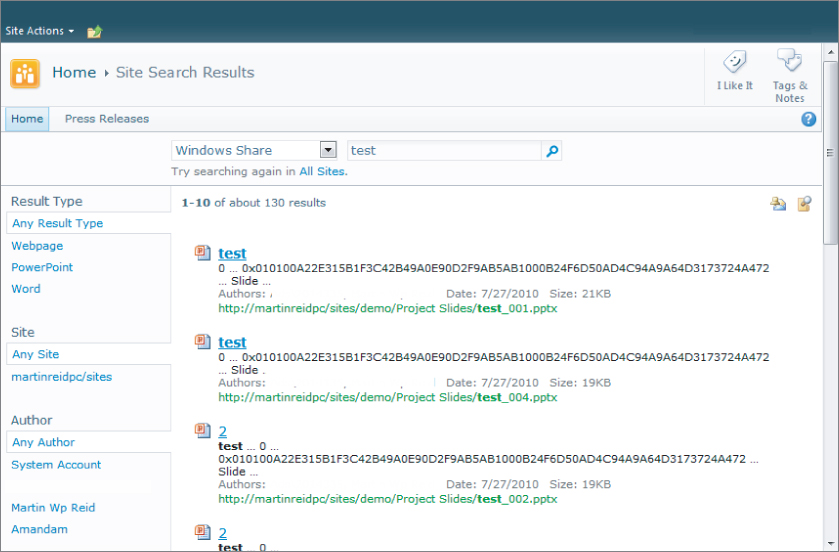
These options enable you to filter results directly on the screen according to your requirements. When working with a custom Search Center you can also change the way in which results are displayed to your users by editing the Search Core results Web Part. This is the main Web Part used to display results within the results page.
For this exercise you will be changing the search drop-down mode to display additional items to help users find content. You will also be examining the advanced searching and filtering results of the search results page.
Lesson Requirements
- A new site collection with default settings.
- Content copied into the Shared Documents library, such as Word, Excel, and PowerPoint files.
Step-by-Step
To change the Search scopes drop-down to include additional search scopes, proceed as follows:
1. Click Site Actions.
2. Click Site Settings.
3. Click Search Settings (Site Collection Administration).
4. Select the Show Scopes drop-down from the Site Collection Search Dropdown Mode drop-down list. Accept the rest of the defaults on this screen.
5. Click OK to save the changes and return to the site settings page.
Return to the home page of your site collection, where you may need to refresh the page to see the changes. In this case the search scopes drop-down should now be added just before the search text box. Figure 8.1 shows the drop-down list. In this case only a single scope has been made available. To add further scopes to the list you will change one other setting in the search configuration. To proceed, click Site Actions, Site Settings and return to your search settings page.
1. Click the Enable Custom Scopes radio button (such as All Sites) by connecting this site collection with the following Search Center. This option enables the custom scopes and allows you enter a new Search Center or use the existing one.
2. Click in the Site Collection Search Results Page text box and copy the URL.
3. Paste the copied URL into the text box below the Enable Custom Scopes radio button.
4. Click OK to save the changes.
5. Return to the homepage of your site and refresh the page.
6. There should now be three scopes available in the drop-down list: All Sites, This Site, and People.
When conducting a search from the home page users can now choose to search any of the following:
- All Sites: All SharePoint sites within the site collection.
- This Site: The current site only.
- People: Only people within the profile stores.
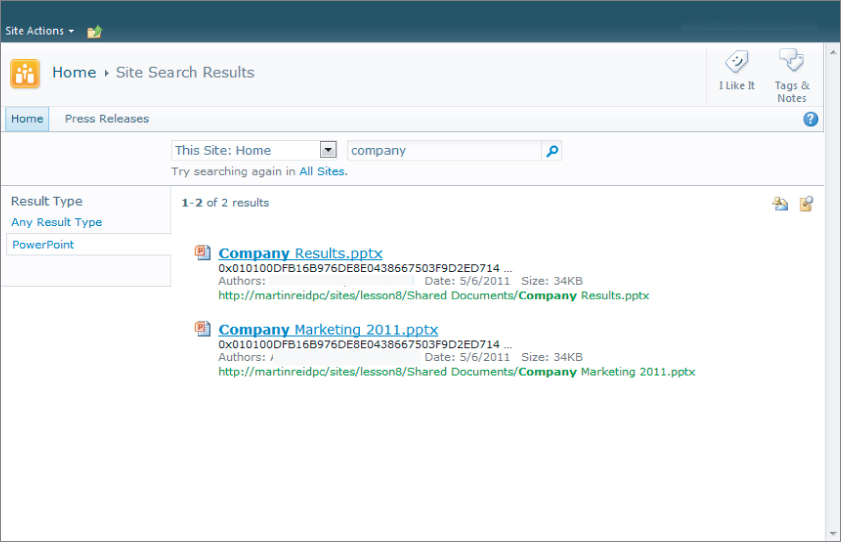
Results will be displayed on the default search results page within the top level of the site collection. Within the Shared Documents library I have uploaded four documents:
- Company marketing (PowerPoint)
- Company results (PowerPoint)
- Monthly budgets (Excel)
- Staffing report (Word)
Running a search for the word “Company” will return several sets of results, including these documents. The Search results page will permit you to further filter the results by using the Result Type filters on the page. In this example clicking PowerPoint in the Result Type area will narrow the results to PowerPoint files only. Figure 8.5 shows the results page filtered for PowerPoint results only.
The search results page also enables you to set preferences and carry out advanced searches. The Preferences link located beside the search text box enables you set the search language and turn search suggestions on or off. To view the advanced search form click the Advanced link beside the search text box. Figure 8.6 shows the options available to you on this form.

Advanced search enables you to create highly targeted searches. You can search using the following document properties:
- Author
- Description
- Name
- Size
- URL
- Last modified date
- Created by
- Last modified by
For example, to create an advanced search to return PowerPoint files containing the word company, for which the document author is Reid, you would do the following:
1. In the All These Words text box enter company.
2. From the Result Type drop-down select PowerPoint Presentations.
3. In the first property restriction drop-down select Author.
4. In the second drop-down select Contains.
5. Enter Reid into the third text box.
You can add additional rules to the property restrictions by clicking the green plus sign at the end of the first line. In that case you need to decide if the second line is an “And” or an “Or” line — whether documents must match the properties defined in both rows or only one in order for a result to be returned.
In Lesson 9 you will be looking at how you add your own search scopes to search drop-downs to help your users discover content.
Please select Lesson 8 on the DVD or visit www.wrox.com/go/sp2010-24 to view the video that accompanies this lesson.