
Chapter 32
Configuring PerformancePoint Services
In Lesson 33 you will get an introduction to how PerformancePoint works from a SharePoint perspective. In this lesson you learn how to set up and configure the PerformancePoint Services application. At one time PerformancePoint was a distinct product, but with this new version it is an integral part of SharePoint 2010 and enables you to build highly informative and interactive Business Intelligence (BI) SharePoint sites.
Activating Business Intelligence Features
Before you can use PerformancePoint there are several configuration steps that must be completed:
- Set up and configure the Secure Store Service if you haven't already done so.
- Create the PerformancePoint Services application.
- Start PerformancePoint Services on the application server that will host the service.
- Enable PerformancePoint on your site collection.
You will find that this lesson is mostly “hands-on,” as several stages of the configuration are easier to understand with a demonstration.
Secure Store and Unattended Service Account
The unattended service account is an Active Directory domain account used by PerformancePoint to access external data sources such as SQL Server 2008. This account works in conjunction with the Secure Store Service, which must also be configured in order for PerformancePoint to use the unattended service account. In fact, if you add an account and the store is not configured you will be notified that it needs to be set up.
The Secure Store Service (like the single sign-on service in SharePoint 2007) is used to store credentials for systems and users. For example, if you log into SharePoint with one account but access another system using a different account, the second account can be placed into the Secure Store and matched with your SharePoint credentials. When you require access to the second system from SharePoint, your Secure Store credentials are used. This gives you the seamless access to external systems that you had with SharePoint 2007 Single Sign-On. The Secure Store credentials can then be used to allow external content types to access external data.
When setting up the Secure Store Service in Central Administration you will be required to enter a passphrase, which is used to create the encryption key for the stored credentials. Once this is done you can configure a target application, for example an SQL Server that maps the Secure Store credentials to the external system. When creating a Secure Store Service you are required to provide the following:
- Name for the Secure Store Service.
- Database details, including authentication method.
- Failover server name (if applicable).
- Application pool details.
- Name of an existing managed account (you can also create a new account for this service).
PerformancePoint Services Application
Once the Secure Store Service has been created and configured you can then proceed to create the PerformancePoint Services application and complete the configuration. As part of the configuration process you will be required to select the Unattended Service Account and associate the application with the Secure Store Service.
In the Try It example that follows we will look at many of the detailed features required to get PerformancePoint up and running.
In this exercise you will do the following:
- Create the Secure Store Service application.
- Add a passphrase.
- Create a target application.
- Create a new PerformancePoint application.
- Enable the PerformancePoint service for the farm.
- Set the unattended service account.
- Set miscellaneous settings.
- Associate the new service with a web application.
- Enable PerformancePoint on a site collection.
- Create a Business intelligence site.
Lesson Requirements
To complete this Try It exercise, you need the following:
- Access to Central Administration with appropriate permissions to create the required services.
- Site collection administration permissions.
Step-by-Step
To create the Secure Store Service application you need to open SharePoint Central Administration. To proceed from Central Administration, do the following:
1. Click Manage Service Applications in the Application Management category.
2. Click New.
3. Click Secure Store Service.
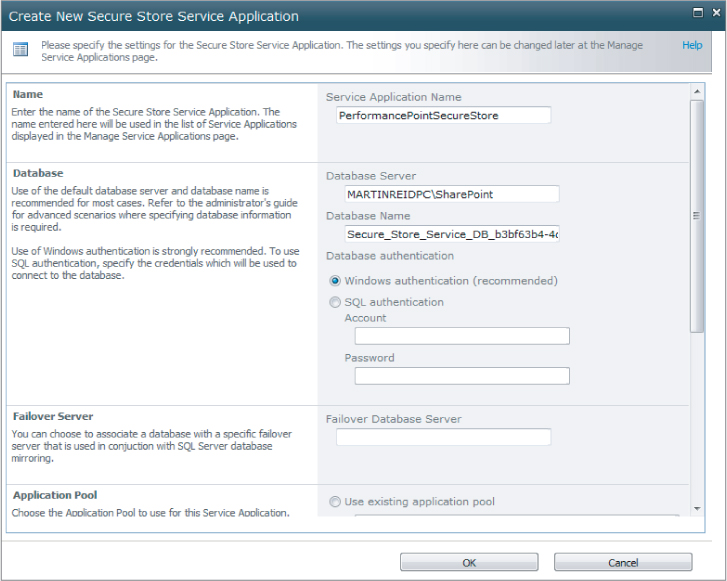
4. Enter PerformancePointSecureStore as the Service Application Name.
5. Accept the default Database Server and Database Name.
6. Accept the default database authentication of Windows.
7. Click the Create New Application Pool radio button and enter perpointapppool as the application pool name.
8. Select the account to use for the application pool.
9. Accept the defaults for audit logs (30 Days and Enabled).
10. Click OK.
11. Click OK in response to the dialog box.
12. Locate the new Secure Store Service application and click to highlight the name.
13. Click Manage on the ribbon.
14. Click the Generate New Key icon on the ribbon in response to the onscreen message, before creating a new Secure Store target application, you must generate a new key for this Secure Store Service application from the ribbon.
15. Enter a passphrase of MARTIN123!%$ (make sure you write this down and store it safely). The passphrase must be a combination of letters in both uppercase and lowercase, digits, and symbols or it will be rejected.
16. Reenter the passphrase as confirmation.
17. Click OK to generate the encryption key.
Figure 32.1 shows the Create New Secure Store Service Application form.
Once the Secure Store Service and encryption key have been created you can proceed to create the target application and select the authentication method. To continue, follow these steps:
1. Click New.
2. Enter a Target Application ID, such as CompanySQL. This cannot be changed once the application has been created.
3. Enter a Display Name, for example Company Data.
4. Enter a Contact E-mail address. This is the primary contact for the target application.
5. Select the target application type using the drop-down. There are two basic options, Group and Individual. Choose Individual here: this option is for mapping individual user credentials to distinct credentials on the data. Choose Group when you want to associate a group or groups with a single credential on the external data. For both Group and Individual you can choose Restricted or Ticket. Choosing Restricted and Ticket, respectively, allows you to work with data stores that support claims-based authentication. Choosing neither (selecting Individual or Group) enables standard authentication communication.
6. Select the Target Application Page URL: accept the default of Use Default Page.
7. Click Next.
8. Enter the name of the Windows user for the SQL Server database.
9. Enter the Windows password for the user entered in the previous step.
10. Click Next.
11. Enter your own credentials as the application administrator.
12. Click OK.
Figure 32.2 shows the Target Application Settings form.

Once we have the Secure Store and target application created we can proceed to create the service application itself. To create the service application from within Central Administration, do the following:
1. Click Manage Service Applications in the Application Management group.
2. Click New.
3. Click PerformancePoint Service Application.
4. Type Lesson 32 PerformancePoint as the name.
5. Check the box entitled Add This Service Application's Proxy to the Farm's Default Proxy List. This will associate the service with existing web applications. If you do not check this box you will be required to manually associate the service with specific web applications.
6. Enter PerformPointApppool as the application pool name.
7. Select the managed account for the application pool using the drop-down.
8. Click Create.
Now that the PerformancePoint Services application has been created it must be configured. To proceed:
1. Click the service application name, Lesson 32 PerformancePoint.
2. Click PerformancePoint Services Application Settings.
3. Enter the domain user name and password for the Unattended Service account for the service application.
4. Accept the remaining defaults for the following options:
- Cache
- Data Sources
- Filters
- Select Measure Control
- Show Details
- Decomposition Tree
5. Click OK.
Figure 32.3 shows the initial section of the PerformancePoint Settings form at this stage in the process.

You can now specify the trusted locations used by SharePoint to store data sources. These trusted locations can be every site within SharePoint, or you can choose to allow only particular sites. To configure this setting click Trusted Data Source Locations. If you select Specific Locations the screen will refresh and you can then enter the URLs of your preferred sites. The default is All SharePoint Locations, which may not be appropriate for your circumstances. For this example accept the default of All SharePoint Locations.
Trusted Content Locations
The options for trusted locations for your PerformancePoint content are the same as for SharePoint data sources: all SharePoint locations or specific SharePoint sites. For this example follow these steps:
1. Click Only Specific Locations.
2. Click Apply.
3. Click Add Trusted Content Location.
4. Enter the full URL of your SharePoint site collection. This should be the URL of the site collection home and not of an individual document library.
5. Accept the default location type of Site Collection (and subtree).
6. Click OK. The new trusted location will now be listed on the screen.
Now that you have configured the PerformancePoint Services application you are required to enable the PerformancePoint features on your site collection. To continue from the home page of your site collection do the following:
1. Click Site Actions.
2. Click Site Settings.
3. Click Site Collection Features.
4. Click the Activate button for PerformancePoint Services Site Collection Features. This will also activate the publishing infrastructure if it is not already activated.
5. Return to the settings page and click Manage Site Features.
6. Click the Activate button for PerformancePoint Services Site Features.
At this point you are ready to create your first BI SharePoint site and make use of its PerformancePoint features. From the home page of your site collection do the following:
1. Click Site Actions.
2. Click New Site.
3. Click Data.
4. Click Business Intelligence Center.
5. Enter My BI Site as the title.
6. Enter BISite as the URL.
7. Click Create.
Lesson 33 continues with this example and focuses on using the features of PerformancePoint.
Please select Lesson 32 on the DVD or visit www.wrox.com/go/sp2010-24 to view the video that accompanies this lesson.