
Chapter 24
SharePoint Security Groups
Security in SharePoint is something that many people new to the software can find confusing, especially those who are not used to managing sites and security. At a basic level SharePoint security is fairly straightforward to set up and manage; at a more complex level it has broken the heart of many a SharePoint administrator as security and users got out of control. One of the major problems with SharePoint is that it does not enable you to quickly see who has access to what within your site collection. SharePoint 2010 addresses this problem, but not completely, as you will see in this lesson.
Out of the box SharePoint security is based on permission inheritance when you create a site. Initially your users will have access to all objects based on their permissions to the site itself, including for example the Shared Documents library and calendar. Users who have access to the site will have access to these libraries and lists.
People and groups are given access to a SharePoint site; as a result they will have access to document libraries, individual documents, and lists. When you create new objects, those objects also inherit the permissions of the site and users of your site have access to them. This process also applies to subsites. When you create a subsite, users with permissions to the main site collection (the parent site) will also by default have access to the subsite and its objects. In many cases this is not what you want. Fortunately, SharePoint provides you with a way to break this inheritance, enabling individual permissions to be set for objects down to the individual document level. This is where new problems can begin, however, as the more you break inheritance the more you have to manage, and the fewer tools you have to manage security with.
SharePoint and Active Directory Groups
Groups are the basic tools used to organize and manage user security within your site collection. SharePoint will create groups, you can create groups, and you can reuse Active Directory groups if they are available. A group within SharePoint is assigned a permission level that controls how the group and thus its users interact with the environment. (Permission levels are discussed in Lesson 25.) Groups provide you with a basic tool for managing security on your site collection.
Active Directory groups are usually managed outside the SharePoint environment and populated from business systems for example, for example human resources data. In addition, AD groups are normally based on business groups. For example, you could have AD groups called Finance, Purchasing, and IT. Each of the preceding groups contains employees working in the designated area. This should make managing SharePoint security easy.
However, many organizations simply use AD as an authentication tool and do not use it to its full potential by creating and managing users in groups. In such cases you are left with no alternative but to use both built-in and custom SharePoint groups for site and content management. In this lesson you will look at AD groups, built-in SharePoint groups, and creating custom groups.
As previously stated, a group is assigned a permission level that specifies the rights it has to SharePoint objects and functionality. This gives you an easy way to manage users and their access to business areas and sites. Once a user is added to a group and the group is given permission to a site or object, the user immediately receives the same permissions. Similarly, when you revoke permission for a group, all members of that group will have their permissions revoked. This is a much easier system than managing the permissions of individual users. However, on occasion this is exactly what you need to do, as at times fine-grained user permissions are required to meet business needs.
An AD group is treated like a built-in SharePoint group in that it is given a permission level within the site environment. One difference is that you have no direct control over the membership of the AD group. Membership is normally handled by your system's management team and is generally automatic that is populated into the AD based on employment role or business area. Another difference between AD groups and built-in SharePoint groups is that you cannot see inside AD groups — that is, you cannot view the individual memberships from within SharePoint. With SharePoint groups you have total control and can view, add, edit, and delete memberships as required. Unfortunately, you cannot add a SharePoint group to an AD group; you can, however, add an AD group to a SharePoint group, which can be useful.
Default SharePoint Groups
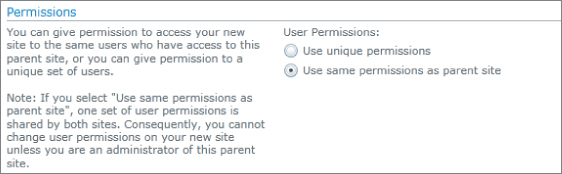
What happens when you create a new team site depends on the options you choose. By default the new site will automatically inherit its permissions from its parent site. If you need to break this inheritance you can do so later using the Site Actions menu. It is also possible to break inheritance at the point of site creation and create unique SharePoint groups to manage security. In this case your subsite will have its own unique set of users and associated permissions. Figure 24.1 shows the security options available: Use Unique Permissions and Use Same Permissions as Parent Site.
In general, when you are using SharePoint groups three groups are created for you by the system. They are normally named after the site in which they are created, as follows:
- Sitename Owners: This group has all permissions on the site. It contains the site owners and administrators.
- Sitename Members: This group normally contains all other members of the site's user community who have contribute permissions.
- Sitename Visitors: This site contains visitors to your site who do not require extensive permissions.
In addition to these groups you could use an AD group within, for example, your site's Owners or Members group. This AD group will already contain members who automatically have access to the site.
A useful practice is to include all your users in the site's Members group. This is to ensure that the membership Web Part in SharePoint My Site picks up all site memberships. If you are in the Owners group but not in the Members group the site will not be listed in your site memberships.
In this exercise you are going to do the following:
- Create a new team site and break permission inheritance.
- Add a SharePoint group to an existing site.
- Add an Active Directory group to a SharePoint group.
- Create a new group.
Lesson Requirements
- Site collection administrator permissions.
- Access to an Active Directory account.
- A test user account.
Step-by-Step
To begin the process you will create a new team site, break permission inheritance, and create custom security groups. To continue from the home page of your site collection, follow these steps:
1. Click Site Actions.
2. Select New Site.
3. Select Team Site from the options.
4. Enter Lesson 24 Groups as the site's title.
5. Enter Lesson 24 Groups as the URL.
6. Click the More Options button to open the Detailed Options form. It is from here that you will break security inheritance.
7. In the Permissions section click the radio button labeled Use Unique Permissions. This will result in the screen's changing to allow you to create the custom groups. The existing group's drop-down list will be removed.
8. Accept the remaining default selections and click the Create button.
Figure 24.2 shows the Set Up Groups for This Site screen. At this point note that two custom groups for the site have been made available: Members and Owners. Also note that the default visitors group has been used.
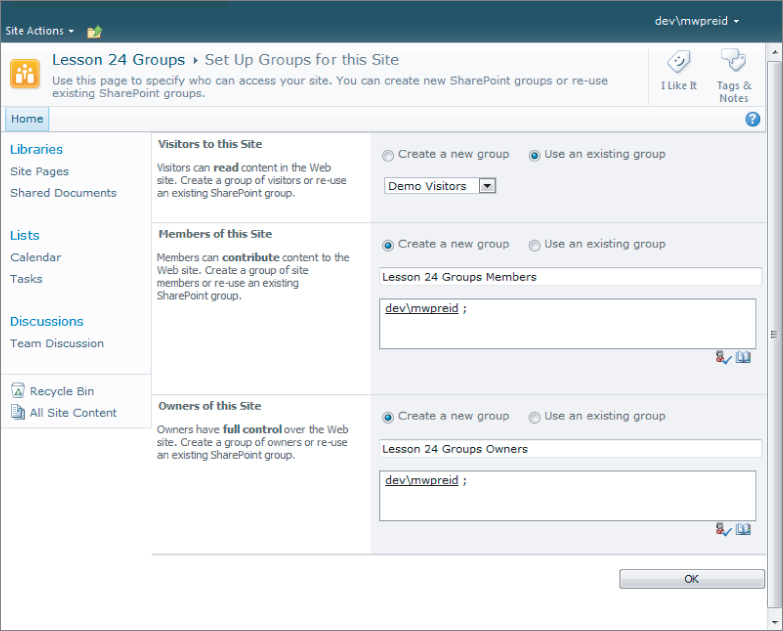
9. Change the default visitors group to a custom group by clicking the radio button labeled Create a New Group. The name will default to Lesson 24 Visitors and have no members. You can if you wish overwrite the group names. You do not need to add a member to this group at the moment.
10. Accept the two additional new groups, Members and Owners (in which you will automatically be given membership to both groups), and click OK to create the site using the custom security groups.
Figure 24.3 shows the Site Permissions screen once the site with the unique groups has been created. The ribbon contains a message confirming that the site is using unique permissions.
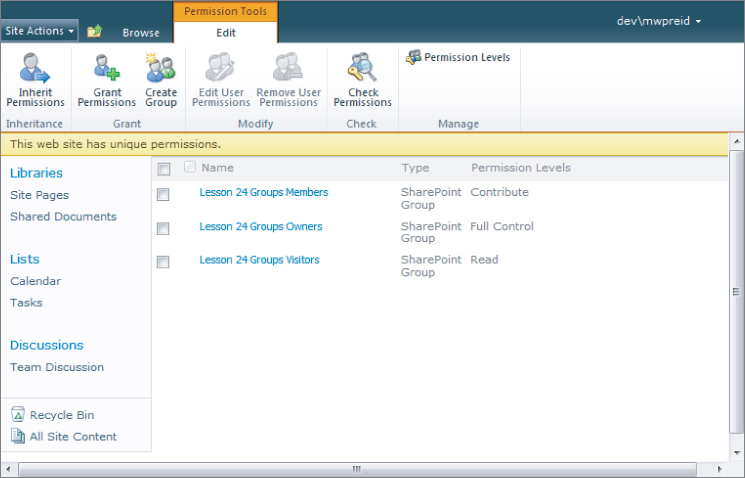
If you find that you have made an error you can at any time reset the site to inherit permissions from the parent by clicking the Inherit Permissions icon on the ribbon.
Of course at this point you are the only user in the groups. The next stage is usually adding another user. To add a user to the group called Lesson 24 Groups Members, from the Site Actions menu select Site Permissions.
1. Click the Grant Permissions icon on the ribbon to open the Grant Permissions form. Figure 24.4 shows the Grant Permissions form before user selection. The Browse (book) icon enables you to search for users while the Check Names (person) icon will check that a user entered directly into the User/Groups box is valid.

2. Enter the name of the user or group (remember you can place an AD group within a SharePoint Group) you wish to add, or click the Browse icon to begin searching for users and groups.
3. Once you have entered or selected a user or group, the name will appear in the Users/Groups box. If a user or group is not valid, a red wavy line will be placed below the name to indicate there is an problem. You can remove the name and enter the correct information.
The Grant Permissions form enables you to assign permissions directly to individual users or groups. If, for example, you want to grant an AD group direct permissions on your team either search for or enter the name of the group. You add an AD group just as you would a standard SharePoint group. To enter an Active Directory group by searching the directory, proceed as follows:
1. Click the Grant Permissions icon.
2. Click the Browse (book) icon to search for an AD group.
3. Enter the name of an AD group. In this case I entered Finance Department.
You may be required to add the AD domain if you are using Active Directory. For example, in the preceding case I would have entered devFinance Group using dev to indicate the AD domain. Figure 24.5 shows the Grant Permissions dialog.
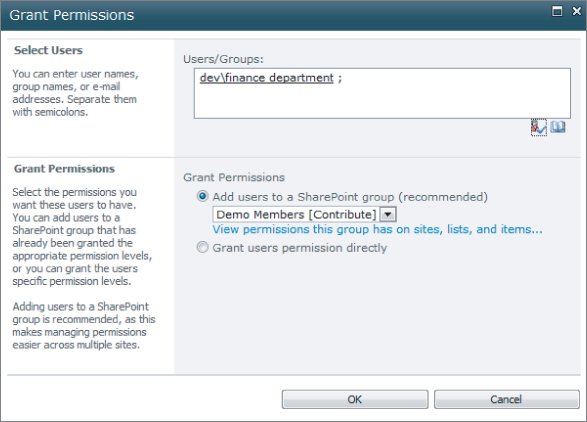
4. The Finance Department AD group will be added to the site's default Members group with contribute permissions. To continue click OK. This will add the AD group to the Members group. As a result the members of the AD group Finance Department will now have access to the SharePoint site.
As previously stated, you can create your own groups to help with site permissions. To create a custom group, from the Site Permissions screen proceed as follows:
1. Click Create Group.
2. Enter a name for the group into the Name text box, for example Personnel Managers.
3. Enter a short description for the group into the About Me Description text box such as, Managers from HR who will manage areas of the site.
4. You own username will be added as the default site owner. You may change this if required for example if you are handing a site over to someone else and they become the site owner.
5. In the Group Settings section accept the default settings.
Group Settings enable you to manage who can view the membership of the group, group members only, or everyone, and who can edit the membership of the group, the group owner, or all members. It is usually better to allow only the owner to manage membership, as this simplifies things.
6. Accept the default for membership requests. The Membership Request section enables you to manage how people request access to the group. You can permit requests to join or leave the group, or have requests automatically sent to the e-mail address entered in the Email Address text box. The group owner's e-mail address should probably be the one entered here; e-mail must be configured on your SharePoint server if you want to use this feature.
7. Click the Full Control checkbox in the Give Group Permission to this Site section. This section enables you to set the explicit permissions this group has on your site.
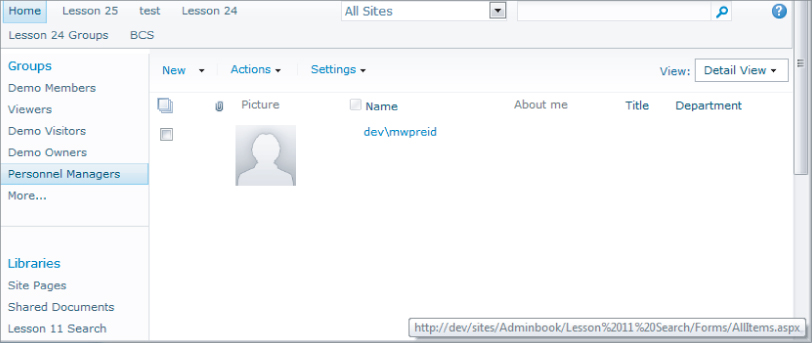
8. Click the Create button to finish the process and create the group. You will be taken to the People and Groups page for the new group, where you can then add new members as required.
Figure 24.6 shows the People and Groups screen for the new group, which has a single member.
Please select Lesson 24 on the DVD or visit www.wrox.com/go/sp2010-24 to view the video that accompanies this lesson.