
Chapter 1
Using the Site Administration Menu
A SharePoint application is largely organized around the concept of the individual site. Every SharePoint site must have at least one owner who will have available to him or her the full range of administrative options at the site level.
In many cases the people responsible for building and maintaining a SharePoint site are not IT professionals. More often they are business users charged with organizing documents, posting meeting information, and uploading photos of the company picnic. The purpose of this chapter is to explain the basic administration functions that are available to a user who has administrative access to a site. Typically, this person is known as the site owner.
The SharePoint administration interface is displayed by a browser and is security-trimmed. This means that many of the menu options, links, and other parts of the interface can be viewed only by people who have a certain level of rights. If you are following the steps in this chapter and the accompanying video walkthrough, and you are not seeing the links and menu items described, it's likely that you do not have a sufficient level of rights to the site. Someone with a higher level of access will have to increase your security level.
Accessing the Site Administration Menu
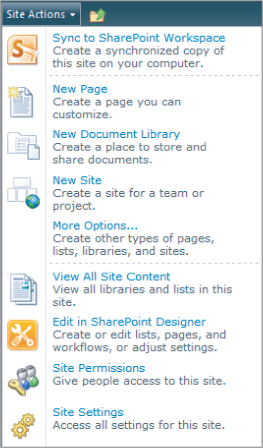
Every SharePoint site includes a Site Settings page. This page consists of various link groupings that contain all of the various administration and configuration options available to a site owner. You can access the site settings page from any page on a SharePoint site using the site actions menu. The site actions menu is usually found in the upper left corner of a SharePoint site. If the page has been modified from its original layout, it could be located somewhere else.
Figure 1.1 shows the site actions menu and the drop-down list of choices. If you click the drop-down arrow on the Site Actions menu, you will see this list of options and links. The links in your environment may differ from the ones shown in Figure 1.1. The choices you see in this menu vary based on a wide array of settings, options, and other variables, but near the bottom of the list should be an option called Site Settings. Clicking this link takes you to the Site Settings page.
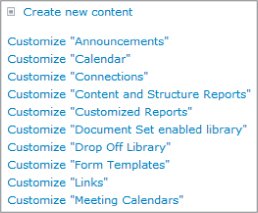
On the Site Settings page for any SharePoint site, you will find a large collection of links organized under several categories. See Figure 1.2.
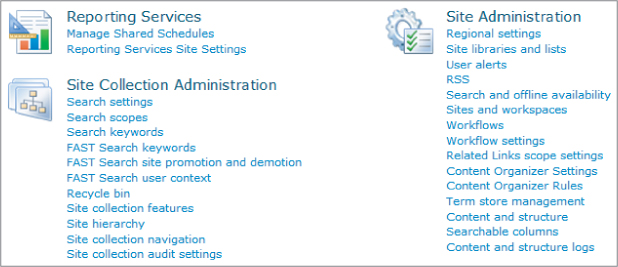
For this chapter we focus on the links under the heading Site Administration. (Later chapters discuss the other headings.) These links deal with a range of functions and settings common to every SharePoint site.
You may notice that the links under your Site Administration heading are different from the ones in this book. SharePoint offers a dizzying array of options, features, and configuration settings. The links that appear on the Site Actions page depend on the version of SharePoint being used and the type of site that was created; in addition, optional features may have been activated.
Links that are the result of optional configurations will be discussed in later chapters. In this chapter we will deal strictly with the site administration options found on all (or at least most) SharePoint sites.
A SharePoint installation typically contains a number of individual sites. Each option in the site administration menu must be set separately for each SharePoint site. Other items we will look at later have a larger scope and will affect the behavior of several sites at once.
In the following sections in this lesson, we will discuss the purpose of each link in the site administration menu. The links found in the Site Administration menu common to all SharePoint sites include:
- Regional Settings
- Site Libraries and Lists
- User Alerts
- RSS
- Content and Structure
- Content and Structure Logs
Exploring these administrative functions will be the focus of this lesson.
Setting the Regional Settings Options
The Regional Settings link in the Site Administration menu opens the Regional Settings page. The Regional Settings page is used by administrators to determine how SharePoint displays certain elements that change according to a user's time zone or location. Let's walk through the various options and discuss the effect each one has on the site. Figure 1.3 shows the Regional Settings page.
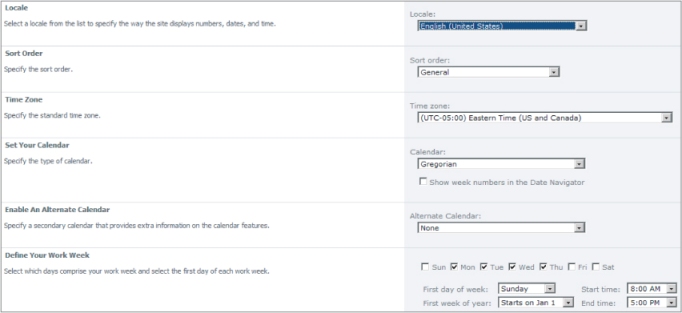
- Locale: Selecting a locale causes SharePoint to display numbers, dates, and time-related elements in the formats used in the locale selected. It will also cause some less obvious behaviors such as showing the names of months on a calendar view in the chosen locale.
- Sort Order: If you have the proper language pack installed for the selection you make in this drop-down box, items in lists and libraries are sorted in alphabetical order according to the chosen language. Language packs should be installed by a SharePoint farm administrator.
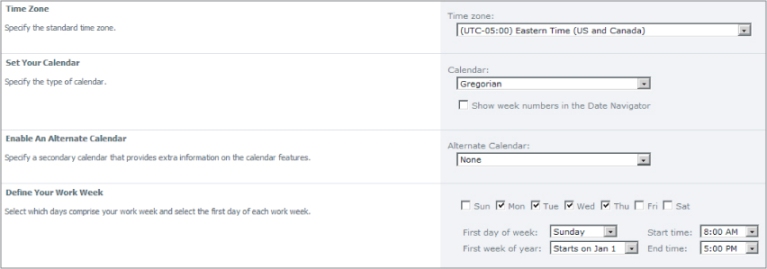
- Time Zone: This setting is important to set properly because often the users of a SharePoint portal are in a different time zone from the physical server that SharePoint is hosted on. Users expect time and date stamps on documents and items to reflect local time. If a server sits in California, but users are in New York, leaving the default setting here causes the time stamps of the users' documents to be three hours too early. If you are the owner of a site, make sure this setting is correct for the predominant location of your users.
- Set Your Calendar: This setting affects the presentation of calendar views (usually used for events lists). The default is the standard Gregorian calendar. To see how different settings change the presentation, complete the Try It walkthrough at the end of this chapter.
- Enable an Alternate Calendar: The alternate calendar presents an alternate month and year next to the month and year in the chosen format for calendar views. In addition, next to each day of the month shown in the calendar view, the alternate day is shown in parentheses to highlight differences between the chosen and alternate calendar formats.
- Define Your Work Week: This option is reflected in calendar views, as the weekday shown on the far left side of a calendar view will be the day chosen here as the first day of the week. Options for the work week and for the start and end times for the workday affect which days and times in the calendar views are shaded darker. Non-working days and hours are shaded, while working hours have a white background.
- Time Format: The 12-hour format shows time in the more common format, with a.m. and p.m. indicators. The 24-hour setting is military time, such as 15:00 for 3 p.m. (12 p.m. plus three hours).
The Site Libraries and Lists link provides a shortcut by which a site administrator can access the list and library settings page for all the lists and libraries on a site. This page presents a link for each list and library in the site. Clicking the link takes you to the settings page for that list or library.
Viewing and Managing User Alerts
Alerts are a method for users to receive notification when content in the site are added, changed or deleted. Users can voluntarily set alerts that will send e-mails to them when the contents of lists or libraries change. Note that you cannot set up alerts for other users using the browser interface provided in SharePoint. Users must elect to receive them and set the alerts themselves. However, this page enables you to view alerts that users have set up and to delete them at your discretion. Sometimes users decide they no longer wish to receive alert notifications and ask an administrator to remove them.
For alerts to work, the SharePoint farm administrator must have previously set up an e-mail server. Because alerts rely on the SharePoint server using e-mail, commands that enable users to set alerts are not visible unless an e-mail server has been set up and associated with the SharePoint farm. This must be done by someone with farm administration rights. Figure 1.4 shows the Share & Track toolbar on the ribbon. If the e-mail server has not been set, the Alert Me bell icon will not be visible.

Configuring RSS Feeds
RSS stands for Really Simple Syndication. As with most technical acronyms, the individual words don't have any meaning to people who aren't already information technology professionals. So what does Really Simple Syndication mean? RSS is a means people who have some content, usually on a website but not always, to publish that content and have it subscribed to on other websites, iPods, and a host of other medium. It enables updates to the source information to be reflected in all the locations that show the source content.
SharePoint lists can use RSS in a variety of ways. For instance, using the RSS Web part, content from other sites that have RSS feeds can be pulled into SharePoint. In addition, SharePoint lists and libraries can serve as sources of feeds for others to subscribe to. The Configuring RSS Feeds page deals with using SharePoint lists and libraries as feeds for others to subscribe to.
On the RSS Settings page you will see either one or two checkboxes, titled Enable RSS and (if applicable) Site Collection RSS (see Figure 1.4). You will see the Site Collection RSS checkbox only if the site is the top-level site of a site collection. The Site Collection checkbox enables or disables allowing RSS feeds for lists and libraries for every site in the collection. That includes the current site and any site below it. Disabling this checkbox overrides any setting that may be set on sites below it. The Enable RSS checkbox will allow or disallow feeds for the current site only.
In the Enable RSS setting you can allow RSS feeds for an individual site. If the Site Collection RSS setting is not enabled, the Allow RSS Feeds in this Site setting will be grayed out. If RSS is not enabled for a site or site collection, the RSS Feed option in the ribbon (see Figure 1.5) will be grayed out as well.

Finally, in the Advanced Settings section, you can enter some information about the RSS feed that will appear to someone who subscribes to the feed. The Time to Live setting affects how often the feed will update to subscribers. Decreasing the Time to Live will cause the feed to be updated more often and increase traffic on the site. See Figure 1.6 for an example of how these options appear.

Managing Content and Structure
This feature and related links are available only if you have the licensed version of SharePoint 2010, SharePoint Server 2010, installed. If you are using SharePoint Foundation 2010, you will not see this link under Site Administration. In addition, you will have the publishing feature activated for these links to appear. Lessons 2 and 6 discuss the concept of activating features.
This feature consists of two separate links under the Site Administration heading: Site Content and Structure, and Content and Structure Logs. The first presents a tree view of the site collection, sites, and various site elements. Furthermore, it enables the user to view settings and permissions on the objects and move them around the hierarchy of the site collection. The second link (Content and Structure Logs) shows the same page but with an additional view of long running background processes.
In this lesson, you will review the Site Administration menu and how the options affect a SharePoint site. To participate in this walkthrough, you can either follow along with the accompanying instructional DVD or visit www.wrox.com/go/sp2010-24, or try a more hands-on approach via a SharePoint site using your Web browser.
Lessons Requirements
To perform this lesson you will need the following:
- Access to a SharePoint site
- Administrator rights to the site
Hints
This lesson is a survey of the Site Administration menu. It covers only the elements common elements to all (or most) SharePoint sites. Many optional features will be covered in other lessons in this book.
Step-By-Step
1. From the home page of a SharePoint Site, locate the Site Actions drop-down menu. You should find it in the upper left-hand corner of the screen. Select Site Settings. This will open the Site Settings page. You should be presented with a page full of various links under different headings. Look for the heading titled Site Administration. If you are following along on your own website the links you see may differ from what is displayed on the video or in the screenshots in this walkthrough. There are many factors that affect which links will become visible based on configuration choices, licenses, and a host of other options. Figure 1.2, from earlier in the lesson, shows the Site Administration menu as it is presented on the Site Settings page.
2. Click the Regional Settings link under the Site Administration heading. Make the following changes to the settings on the page (see Figure 1.7):
- Change the time zone to (UTC-9:00) Alaska.
- Change the Calendar setting to Japanese Emperor Era (a popular setting in Alaska).
- Set the checkboxes for the work week as Mon–Thu. Leave the others blank. (No real work gets done on Friday anyway.)
- Click the OK button at the bottom of the screen.
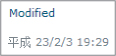
3. Create a list of type Calendar. You will see the calendar displaying Japanese characters reflecting your choices from Step 2.
4. Upload or create a file in a document library. You will see the time stamp on the Date Created field reflect the choice of time zone. In addition, the date portion of the time stamp will reflect the calendar setting from Step 2 (see Figure 1.8).
5. Return to the Site Settings page and click the Site Libraries and Lists link. This will open a page that will contain a link to the settings page for every list and library on the site, as shown in Figure 1.9. This page makes it easier for administrators to manage their lists and libraries.
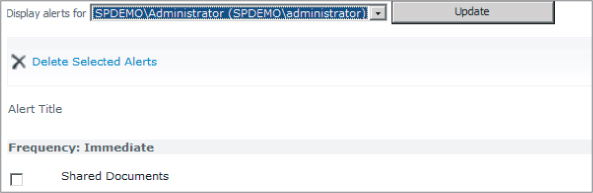
6. On the Site Settings page, click the User Alerts link to view the Alerts Management page. On this page you can view the current alerts and delete them at your discretion. Note that there is no way to set alerts for users in the interface. They must set their own alerts, or you can use programming to set them. To view alerts, choose a user name from the drop-down box and click the Update button. The details of the alert will be shown below on the page and you can delete it by selecting the appropriate checkbox and clicking the Delete Selected Alerts link. See Figure 1.10 for an example.
Please select Lesson 1 on the DVD or visit www.wrox.com/go/sp2010-24 to view the video that accompanies this lesson.