
Earlier chapters discussed the standard views that Microsoft® Office Outlook® 2007 provides for its many folders and data types. Those chapters also discussed customizing standard views by grouping and sorting items and by adding and removing columns, changing column order and properties, filtering the view, and so on.
In this chapter, you’ll learn how to create custom views in Office Outlook 2007 to present the information you want in a format that suits your needs. Because generating a printed version of your data is often a byproduct of creating a view, this chapter also focuses on how to create custom print styles in Outlook 2007. For those situations in which the Outlook 2007 custom views and print styles won’t give you the results you need, you can turn to scripts and Microsoft Office Word 2007 to accomplish custom printing tasks.
Note
For more information about customizing existing views, see "Working with the Standard Outlook Views" in Chapter 4. You’ll also find information about specific views in the chapters that cover them. For example, for more information about working with and customizing views in the Contacts folder, see "Viewing Contacts" in Chapter 18.
If the options for customizing existing Outlook 2007 views don’t provide the information view you need, you can create your own views. You have two options for doing so: modifying an existing view or creating a new view from scratch.
You can create a new, custom view from an existing view if the existing one offers most of the view elements you need. This is usually the easiest method because it requires the least amount of work.
Follow these steps to create a new, custom view from an existing view:
Open the folder for which you want to modify the view, and then select the view to display it.
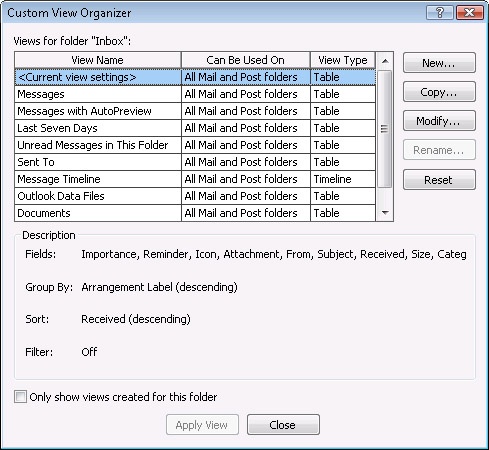
Choose View, Current View, Define Views to open the Custom View Organizer dialog box, shown in Figure 27-1.
In the Views For Folder list, select the view you want to use as the basis for your new view, and then click Copy.
In the Copy View dialog box, type a name in the Name Of New View box, and then select one of the following options:
This Folder, Visible To Everyone. Makes the view available only in the folder from which it was created. Anyone with access to the specified folder can use the view.
This Folder, Visible Only To Me. Makes the view available only in the folder from which it was created. Only the person who created the view can use it.
All Type Folders. Makes the view available in all folders that match the specified folder type. For example, when you create a custom view based on the Inbox, this option becomes All Mail And Post Folders, and Outlook 2007 makes the view available from the Inbox, Outbox, Drafts, Sent Items, and other message folders. If you base the new view on the Contacts folder, this option becomes All Contact Folders and makes the view available from all contacts folders.
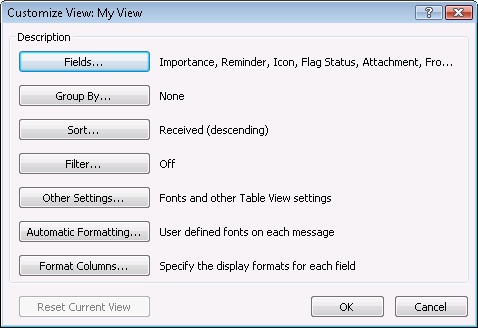
Click OK to create the copy. The Customize View dialog box opens, as shown in Figure 27-2.
Use the options provided in the Customize View dialog box to customize the view.
Note
For details on all the options that you can configure in the Customize View dialog box, see "Customizing a View’s Settings" later in this chapter.
After you’ve modified the settings as needed, click OK to close the Customize View dialog box and apply the view changes.
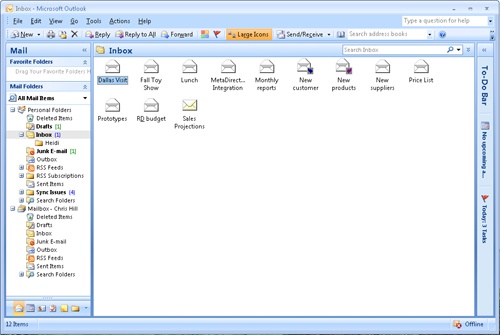
You can create an Outlook 2007 view from scratch if the view you want doesn’t have much in common with any of the existing views. For example, perhaps you want to create an Inbox view that displays your messages as icons rather than headers, as shown in Figure 27-3. You can’t modify a standard message view to display messages as icons, so you need to create the view from scratch.
The process for creating a view from scratch is much like the process of modifying an existing view. When you create a new view, however, you have additional options for specifying the view.
Follow these steps to create a view from scratch:
In Outlook 2007, open the folder or folder type for which you want to create a custom view.
Choose View, Current View, Define Views to open the Define Views dialog box.
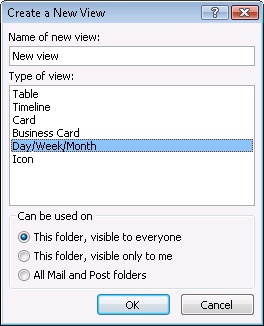
Click New to open the Create A New View dialog box, shown in Figure 27-4.
In the Name Of New View box, type a name for your new view.
In the Type Of View list, select the type of view you want to create, as follows:
Table. Presents information in tabular form with one item per row and columns according to your selections. The default Inbox view is an example of a table view.
Timeline. Displays items on a timeline based on the item’s creation date (such as the received date for a message or the event date for a meeting). You might find this view type most useful for the Calendar folder.
Card. Displays information using cards, as in Address Cards view (the default view in the Contacts folder).
Business Card. Displays information using customizable, graphical business cards, similar to Detailed Address Cards view.
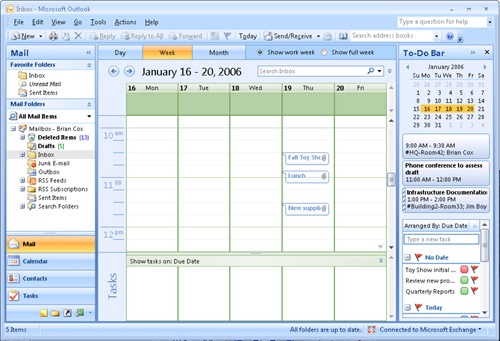
Day/Week/Month. Displays days in the left half of the window and monthly calendars in the right half. The actual view depends on the type of folder for which you create the view. Figure 27-5 shows a Day/Week/Month view created for the Inbox folder.
Icon. Displays the items as icons, much as a file system folder does.
In the Can Be Used On area, select an option as described in the preceding section, and then click OK. The Customize View dialog box opens.
Customize the view as needed, and then click OK.
Click Apply View to apply the view, or click Close to close the dialog box without applying the view.
Note
For details on all the options you can configure in the Customize View dialog box, see "Customizing a View’s Settings" below.
You can easily modify, rename, and delete custom views. For example, perhaps you want to apply a filter to a view in the Contacts folder to show only those contacts who work for a particular company. Maybe you want to have Outlook 2007 apply a certain label to appointments that have specified text in the subject.
To modify, rename, or delete a view, follow these steps:
Choose View, Current View, Define Views to open the Define Views dialog box.
In the Views For Folder list, select the view that you want to change, and then do one of the following:
To modify the view, click Modify. Use the options in the Customize View dialog box to apply changes to the view (as explained in the following section).
To rename the view, click Rename, and then type the new name.
To delete the view, click Delete. The Reset button changes to Delete if you select a custom view.
Click Close.
Outlook 2007 gives you considerable control over the appearance and contents of a view. When you define a new view or modify an existing view, you end up in the Customize View dialog box, shown earlier in Figure 27-2. You can open this dialog box in the following ways:
Choose View, Current View, Customize Current View.
Choose View, Current View, Define Views, and then select a view and click Modify.
Choose Customize Current View in the Navigation Pane when viewing the Contacts, Journal, Notes, or Tasks folder.
The options available in the Customize View dialog box change according to the folder selected. For example, the options for the Contacts folder differ in some respects from the options for the Inbox. The same general concepts hold true for each type of folder, however. The following sections explain the various ways you can use these dialog box options to customize a view.
Clicking Fields in the Customize View dialog box in most cases opens the Show Fields dialog box, shown Figure 27-6, in which you can select the fields that you want to include in the view. (Exceptions to this behavior are discussed later.) For example, you might use the Show Fields dialog box to add the Cc or Sensitivity field to the view.

Adding fields in the Show Fields dialog box is easy. The available fields (those not already in the view) appear in the list on the left, and the fields already displayed appear in the list on the right. Select a field in the Available Fields list, and then click Add to add it to the view. To remove a field from the view, select the field in the Show These Fields In This Order list, and then click Remove. Use the Move Up and Move Down buttons to rearrange the order in which the fields are displayed in the view.
Troubleshooting
You need to restore a view to its original settings
You’ve customized a view, and now you’ve decided that you need the old view back again. For the future, remember that you can copy an existing view. Rather than modifying an existing view, you can copy a view and then modify the copy. This way you’ll still have the original view if you need it.
It’s easy to restore a standard view to its previous settings, however. Choose View, Current View, Define Views. Select the view you want to restore, and then click Reset. Click OK when prompted to confirm the action.
Note
You can rearrange the order in which fields are displayed in a table view by dragging the column header for a field to a new location on the column header bar.
Note
You can click New Field in the Show Fields dialog box to create a custom field. For additional information about creating and using custom fields, see Chapter 28, and Article 1, "Programming Forms with VBScript," on the companion CD.
In some cases, clicking Fields in the Customize View dialog box opens a Date/Time Fields dialog box similar to the one shown in Figure 27-7. This occurs when you’re working with a view that shows time duration, such as Day/Week/Month view in the Calendar folder, By Type view in the Journal folder, or Task Timeline view in the Tasks folder—in effect, nontable views that show time duration graphically.
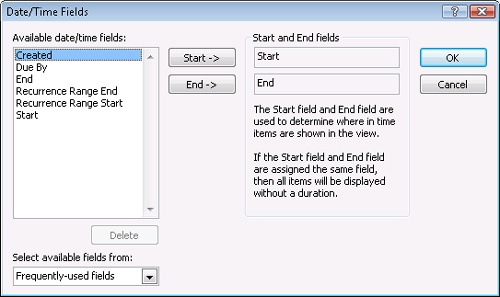
You use the Date/Time Fields dialog box to specify the fields that Outlook 2007 will use to show item duration in the view. The default settings vary but are typically either Start and End or Start Date and Due Date. As an example, you might use the Date/Time Fields dialog box to change the Task Timeline view in the Tasks folder to show the Date Completed field for the task’s end rather than the Due Date field.
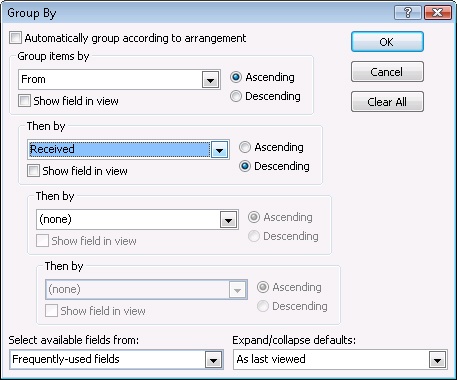
Sometimes it’s helpful to be able to group items in an Outlook 2007 folder based on specific data fields. For example, you might want to group tasks by owner so that you can see at a glance the tasks assigned to specific people. Perhaps you want to organize contacts by country or region. In these and similar cases, you can modify an existing view or create a new one to organize the view based on the most pertinent data. To group data in a view, click Group By in the Customize View dialog box to open the Group By dialog box, shown in Figure 27-8.
Follow these steps to group data in a view:
In the Group By dialog box, clear the Automatically Group According To Arrangement check box.
Select a field type in the Select Available Fields From drop-down list at the bottom of the dialog box. This selection controls the fields that appear in the Group Items By drop-down list.
Select a field in the Group Items By drop-down list, and then select either Ascending or Descending, depending on the sort order you want to use. Select the Show Field In View check box to display the field in the view.
If you want to create subgroups under the main group, select a field in the Then By drop-down list. (The dialog box contains three such lists, providing three additional grouping levels.) For example, you might group tasks by Owner and then by Due Date.
After you’ve specified all the grouping levels you need, use the Expand/Collapse Defaults drop-down list to specify how you want Outlook 2007 to treat the groups. Use the following list as a guide:
As Last Viewed. Collapses or expands the group according to its state in the previous session.
All Expanded. Expands all items in all groups.
All Collapsed. Collapses all items in all groups.
When you’re satisfied with the group settings, click OK to close the Group By dialog box. Then click OK to close the Customize View dialog box.
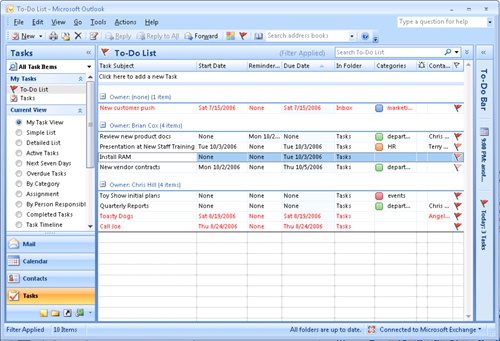
Sorting data in a view is different from grouping data. For example, you might group the Tasks folder by owner. Each group in the view then shows the tasks assigned to a particular person. You can then sort the data within the group as needed. For example, you might sort the tasks based first on due date and then on subject. Figure 27-9 shows the Tasks folder grouped by owner and sorted by due date.
Sorting doesn’t rely on grouping—you can sort a view whether or not it is grouped. For example, you might sort the Inbox based on the Received field to show messages in the order in which you received them.
To create a sort order when you customize or define a view, click Sort in the Customize View dialog box to open the Sort dialog box, shown in Figure 27-10.
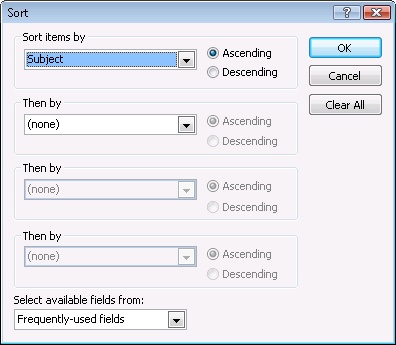
To configure sorting in the Sort dialog box, follow these steps:
In the Select Available Fields From drop-down list, select the type of field the sort should be based on.
In the Sort Items By drop-down list, select the specific field by which you want to sort the view.
Select Ascending or Descending, depending on the type of sort you need.
Use the Then By lists to specify additional sort levels, if necessary.
Click OK to close the Sort dialog box, and then click OK to close the Customize View dialog box.
In Outlook 2007, the ability to filter a view is an extremely powerful feature that gives you considerable control over the data displayed in a given view. For example, you might have hundreds of messages in your Inbox and need to filter the view to show only those messages from a particular sender. You could simply sort the Inbox by the From field and scan the list of messages, but you might want to refine the search a little, perhaps viewing only messages from a specific sender that have an attachment and were sent within the previous week. Filters allow you to do just that.
To configure a filter, click Filter in the Customize View dialog box to open the Filter dialog box, shown in Figure 27-11. This multitabbed dialog box lets you specify multiple conditions to define which items will appear in the view.
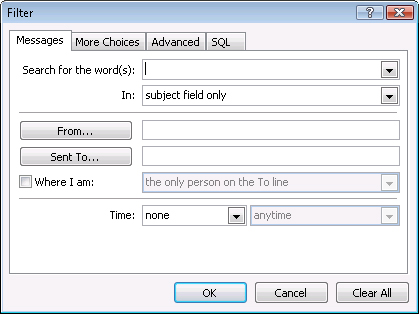
Figure 27-11. Use the Filter dialog box to specify multiple conditions that determine what data appears in the view.
Note that the first tab in the Filter dialog box varies according to the current folder type. For a contacts folder, for example, the first tab is labeled Contacts and offers options for creating filter conditions that apply to contacts. For a message folder, the first tab is labeled Messages and provides options for creating filter conditions specific to messages.
The various tabs in the Filter dialog box include a broad range of options that let you specify multiple conditions for the filter. You can use conditions from more than one tab. For example, you might enter words to search for and a sender on the Messages tab, select categories on the More Choices tab, and specify a particular field and value on the Advanced tab.
Note
The Advanced tab of the Filter dialog box gives you access to all available fields and several criteria (Contains, Doesn’t Contain, and Is Empty, for example), making it the place to go to configure conditions not available on the other tabs. To define filter criteria, select a field in the Field drop-down list, select an option in the Condition drop-down list, type a value, and then click Add. Use the SQL tab to perform Structured Query Language (SQL) queries to retrieve data from the folder to show in the custom view.
When you click Other Settings in the Customize View dialog box, Outlook 2007 opens a dialog box that lets you configure some general settings for the custom view. These options vary from one folder type to another—the Contacts folder, the Inbox, and the Calendar folder, for example, all use different options. You can change such properties as the font used for column headers and row text, the grid style and shading for table views, and a handful of other general options.
Click Automatic Formatting in the Customize View dialog box to display the Automatic Formatting dialog box, similar to the one shown in Figure 27-12. This dialog box lets you create rules that cause Outlook 2007 to automatically format data in the view based on the criteria you specify. For example, you might create an automatic formatting rule that has Outlook 2007 display in blue all tasks that you own and display all other tasks in black. Or perhaps you may create a rule to display in green all contacts from a specific company.
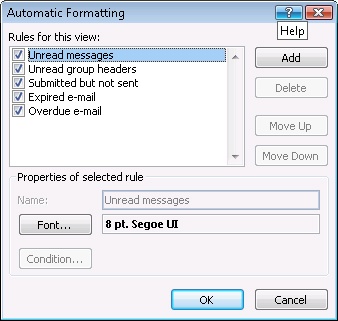
Figure 27-12. Use the Automatic Formatting dialog box to create rules that automatically format text in views based on the conditions you specify.
As you’re working in the Automatic Formatting dialog box, keep in mind that you can’t create task-oriented rules, as you can with the Rules Wizard. For example, you can’t create a rule in this dialog box that moves messages from one folder to another. The rules you create in the Automatic Formatting dialog box control only the appearance (color, font, and font styles) of data in the view.
Note
For information about the Rules Wizard see Chapter 11.
You can’t modify the conditions for predefined rules, but you can specify the font characteristics to use for the rule. You can also create your own rules and change the order in which rules are applied to achieve the results you need.
To set up an automatic formatting rule for text, follow these steps:
Click Add in the Automatic Formatting dialog box to add a new rule named Untitled.
Click Font to open a standard Font dialog box in which you specify the font, font style, and color that will apply to text that meets the rule’s condition.
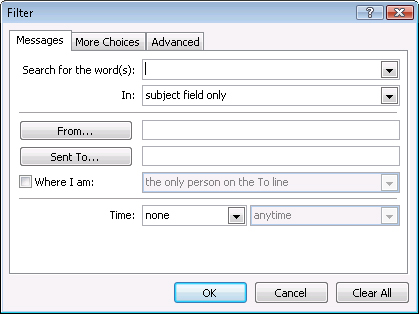
Close the Font dialog box, and then click Condition to open the Filter dialog box, shown in Figure 27-13. This dialog box offers three tabs you can use to specify the condition for the rule. You can specify multiple conditions from multiple tabs, if needed.
Troubleshooting
You need to restrict the available views
In some situations, you might want to restrict the available views to only the custom views you’ve created, hiding the standard views that Outlook 2007 provides. For example, perhaps you created a custom calendar view that you want all employees to use instead of the standard calendar views because your custom view includes additional information that the standard views don’t contain. When you restrict the Outlook 2007 views to only custom views, the standard views no longer appear on the View menu.
You must configure each folder separately. For example, you might restrict the Calendar folder views without restricting the Inbox folder views. This would give users the ability to choose one of the standard Outlook 2007 views in the Inbox folder but would limit their choices to only custom views in the Calendar folder.
Follow these steps to restrict the views that Outlook 2007 provides on the View menu: