
Outlook 2007 provides predefined views for reviewing your contacts list in the Contacts folder. For example, Address Cards view displays names and addresses of contacts in small blocks that look like address labels. This view is a convenient way to look up a contact’s mailing address. In Phone List view, Outlook 2007 displays contact entries in table rows with details such as phone, job title, and department name in columns. This view is helpful for quickly finding a contact’s phone number or job title. You can customize the various standard views to control the amount of detail or to help you organize and analyze information.
The Contacts folder offers several standard formats for viewing contacts. To change views, select a view in the Navigation Pane or click View, Current View, and then select the view that you want to use. Two of the standard formats are card views and the rest are table views, as described in the following list:
Business Cards. This view shows the contacts in a business card format.
Address Cards. This view displays contact entries as individual cards with name, one mailing address, and business and home phone numbers.
Detailed Address Cards. This view also displays individual cards, which show name, business and home addresses, phone numbers, and additional details such as job title, company, and Web address.
Phone List. This table view displays a list with the contact’s name, the company name, business phone number, business fax number, home phone number, mobile phone number, categories, and a check box to enable or disable journaling for the contact.
By Category. This view groups contacts by their assigned categories.
By Company. This view groups contacts by company, which is helpful when you’re trying to find a contact who works for a particular company.
By Location. This view groups contacts by country or region.
Outlook Data Files. This view shows contacts grouped by their storage location.
The methods of customizing the view in Outlook 2007 folders are generally the same for all folders. This section examines some specific ways you might customize the Contacts folder to make it easier to locate and work with contacts. For example, you might use a specific color for contacts who work for a particular company. You can also change the fonts used for the card headings and body, specify card width and height, and automatically format contact entries based on rules.
Note
Chapter 27, covers additional ways to customize views.
You can filter the view in the Contacts folder to show only those contacts that meet the conditions you specify in the filter. For example, you can use a filter to view only those contacts who work for a particular company or who live in a particular city.
Follow these steps to set up a view filter in the Contacts folder:
Open the Contacts folder, click View, Current View, and then Customize Current View.
Click Filter in the Customize View dialog box.
In the Filter dialog box, specify the conditions for the filter. If you don’t see the items you need to specify for the condition, use the Field drop-down list on the More Choices or Advanced tab to select the necessary field.
Click OK to close the Filter dialog box, and then click OK in the Customize View dialog box to apply the filter.
When you want to view the entire contents of the folder again, you can remove the filter, as detailed here:
You can change the font used for card headings and the card body text in the card views (Address Cards view and Detailed Address Cards view). You can also change the font style, size, and script, but not the color.
Follow these steps to change the font for card headings and body text:
Click View, Current View, and then select Customize Current View.
In the Customize View dialog box, click Other Settings to display the Format Card View dialog box, shown in Figure 18-18.
Click Font in the Card Headings or Card Fields area of the dialog box to open a standard Font dialog box in which you can select font characteristics.
Make your font selections, and then click OK.
Specify options according to the following list, and then click OK:
Allow In-Cell Editing. Selecting this check box allows you to modify contact data by clicking a field in the view without opening the contact form.
Show Empty Fields. Select this check box if you want to show all fields for all contacts, even if the fields are empty. Clear this check box to simplify the view of your Contacts folder. Note that when this check box is selected, Outlook 2007 displays all fields defined for the view, not all contact fields.
Card Width. Set the card width (in number of characters) using this option.
Multi-Line Field Height. Use this option to specify the number of lines you want to display on the card for multiline fields.
Click OK to close the Customize View dialog box.

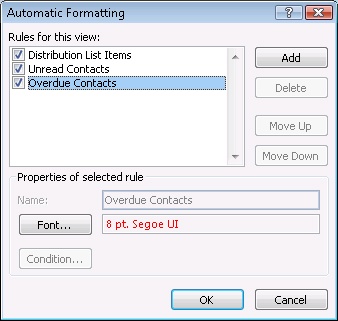
Outlook 2007 performs some limited automatic formatting of data in the Contacts folder. For example, it uses bold for distribution list items, regular font for unread contacts, and red for overdue contacts (contact entries with an overdue follow-up flag). You can make changes to these automatic formatting rules, and you can even create your own rules. For example, you might want to display overdue contacts in blue rather than in red, or you might want to use a particular color for all contacts who work for a certain company.
Follow these steps to modify the formatting for an existing rule or to create a new rule:
Open the Contacts folder. Click View, Current View, and then Customize Current View.
Click Automatic Formatting in the Customize View dialog box to display the Automatic Formatting dialog box, shown in Figure 18-19.
If you want to modify an existing rule, select the rule, and then click Font to change the font characteristics or click Condition to modify the condition for the rule. If you are changing the condition, skip to step 6. Otherwise, skip to step 7.
Click Add if you want to add a new rule. Outlook 2007 creates a new rule named Untitled.
Type a new name in the Name field, click Font and specify font characteristics, and then click Condition to open the Filter dialog box, shown in Figure 18-20.
Specify the criteria to define the rule condition. For example, click Advanced, click Field, click Frequently Used Fields, and click Company. Then select Contains in the Condition drop-down list and type a company name in the Value box. This will automatically format all contacts from the specified company using the font properties you specify in the next step.
Click OK to close the Filter dialog box, click Font in the Automatic Formatting dialog box, specify the font properties, and then click OK.
Close the Automatic Formatting and Customize View dialog boxes to view the effects of the new rule.

Categorizing contacts allows you to organize your contacts into groups that you create. For example, categories provide an easy way to distinguish all of your personal contacts from business contacts. Categorizing also gives you the ability to group people from different companies who are all involved in the same project. Outlook 2007 provides an easy way for you to categorize your contacts, using color coding to distinguish the categories from each other. You can also define custom labels for categories so that you can identify the category by both color and label.
You can define your categories either by using a color category for the first time or by using the Color Categories dialog box. Outlook 2007 offers three ways to open the Color Categories dialog box:
Click the Categorize button on the Standard toolbar, and then click All Categories.
Click Actions, Categorize, and then click All Categories.
Right-click any contact item, and then choose Categorize, All Categories.
Note
When you use a color category for the first time, Outlook 2007 displays a Rename Category dialog box that lets you change the text associated with the category.
To create a new category and assign a color to it, follow these steps:
In the Color Categories dialog box, click New.
Type an appropriate name for the category, and and then select a color in the drop-down color palette.
Click OK.
Note
For quick category assignment, assign a unique shortcut key to each of the categories you use most often. You can assign the shortcut key through the Color Categories dialog box.
You should now see the category you just created in your category list. To assign these categories to your contacts, follow these steps:
In the Contacts folder, right-click any item in the contacts list.
Click Categorize on the shortcut menu.
Select the category you just added in the list.
Now that you have categorized your contacts, it’s time to view them. Outlook 2007 has already provided a filter to show your contacts grouped in the way you selected. To view your contacts by category, use one of the following methods:
In the Navigation Pane, under Current View, select By Category.
In the Navigation Pane, select Customize Current View, and then select Filter. Click More Choices, and then click the Category button. Select the category or categories you want to display, and then click OK. Click OK twice more to exit the dialog boxes.
Note
For more information about categories, see Chapter 5.