
The Connection tab in the Microsoft Exchange dialog box, shown in Figure 41-6, allows you to specify how your computer connects to Exchange Server. You can connect through the local area network (LAN), through dial-up networking, or through a third-party dialer such as the one included with Microsoft Internet Explorer®. The LAN connection option applies if you’re connecting over a hard-wired connection—for example, when your computer is connected to the same network as the server. You should also use the LAN option if you connect to the server over a shared dial-up connection hosted by another computer.

Click Connect Using My Phone Line to use an existing dial-up networking connection or to create a new dial-up connection. Select the desired connection in the drop-down list, and then click Properties if you need to modify the dial-up connection. Click Add if you need to add a dial-up connection.
If you want to connect to the Internet or your remote network using the dialer included in Internet Explorer or a dialer included in a third-party dial-up client, click Connect Using Internet Explorer’s Or A 3rd Party Dialer.
The Outlook Anywhere group of controls lets you configure Outlook 2007 to connect to Exchange Server using HTTP. The capability to use HTTP to connect to a remote computer running Exchange Server provides an additional connection option for Outlook 2007 users and can drastically reduce administrative overhead. Administrators no longer need to provide virtual private network (VPN) access to the network or configure VPN client software for users to access the computer running Exchange Server from remote locations. HTTP access also provides native access to the computer running Exchange Server as an alternative to Outlook Web Access (OWA) for users.
The Connect To Microsoft Exchange Using HTTP check box, if selected, causes Outlook 2007 to connect to the Exchange Server computer using the HTTP protocol. To configure additional settings, click Exchange Proxy Settings to open the Microsoft Exchange Proxy Settings dialog box, shown in Figure 41-7.
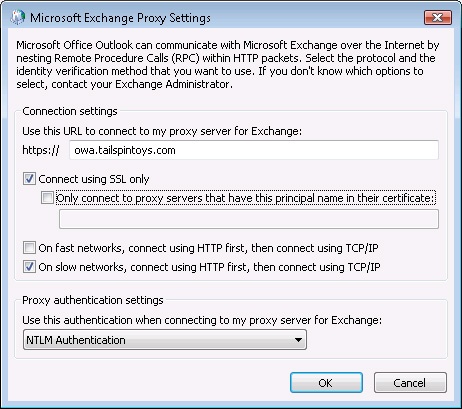
Figure 41-7. Specify settings for the HTTP connection in the Microsoft Exchange Proxy Settings dialog box.
Configure settings in this dialog box using the following list as a guide:
Use This URL To Connect To My Proxy Server For Exchange. Specify the URL that serves as the access point for the server. The default is <server>/RPC, where <server> is the Web address of the Exchange front-end server. An example is httpmail.boyce.us/rpc. Omit the https:// prefix.
Connect Using SSL Only. Select this check box to connect to the server using Secure Sockets Layer (SSL). Note that Outlook 2007 changes the URL prefix to https:// for the URL. (See the preceding option.)
Only Connect To Proxy Servers That Have This Principal Name In Their Certificate. Specify the principal name for the remote proxy server for SSL authentication.
On Fast Networks, Connect Using HTTP First, Then Connect Using TCP/IP. When Outlook 2007 senses a fast connection to the server, attempt HTTP first and then fall back to TCP/IP if HTTP fails.
On Slow Networks, Connect Using HTTP First, Then Connect Using TCP/IP. When Outlook 2007 senses a slow connection to the server, attempt HTTP first and then fall back to TCP/IP if HTTP fails.
Use This Authentication When Connecting To My Proxy Server For Exchange. Select the authentication method to use to authenticate on the remote computer running Exchange Server. Choose the type of authentication required by the front-end server.
After you have finished configuring Outlook 2007 to use RPC over HTTP to connect to your computer running Exchange Server, you can verify the type of connection it is using. Hold down the Ctrl key, right-click the Outlook 2007 icon in the system tray, and then choose Connection Status to open the Microsoft Exchange Connection Status dialog box, shown in Figure 41-8.

Outlook 2007 supports automatic account configuration, which means that Outlook 2007 can attempt to determine your account settings automatically. With Exchange Server 2007, Outlook 2007 relies on being able to identify and communicate with the autodiscover host for your domain, such as autodiscover.tailspintoys.com. This host corresponds to a virtual server hosted on the computer running Exchange Server. With earlier versions of Exchange Server, you must specify your name, e-mail address, and account password, and then Outlook 2007 attempts to identify the appropriate server based on that information.
To be able to resolve the fully qualified autodiscover host name, your client computer must be pointed to a DNS server that hosts the records for the autodiscover host or that can forward a query to the appropriate DNS server(s).
After your client computer is appropriately configured to resolve the autodiscover host, you can use a feature in Outlook 2007 to test the capability to discover account information. If you are having difficulties viewing free/busy information or using the Out Of Office Assistant, the inability of the client to contact the autodiscover host could be the problem.
To test the connection, create an Outlook 2007 profile, with or without a valid e-mail account. Start Outlook 2007, hold down the Ctrl key, and right-click the Outlook 2007 icon in the system tray. Choose Test E-Mail AutoConfiguration to open the Test E-Mail AutoConfiguration dialog box, shown in Figure 41-9.

Type the e-mail address for your Exchange Server account in the E-Mail Address field, type your e-mail account password in the Password field, and then click Test. If AutoConfigure succeeds, the dialog box will display information similar to that shown in Figure 41-9. If AutoConfigure fails, the dialog box will display an error message indicating that it was unable to determine the correct settings. If you receive the error, verify that the client is configured for the appropriate DNS server(s) and retest.