
In Outlook 2007, you can create either client-side or server-side rules. Outlook 2007 stores client-side rules locally on your computer and uses them to process messages that come to your local folders, although you also can use client-side rules to process messages on computers running Exchange Server. A client-side rule is needed when you’re moving messages to a local folder instead of to a folder on the computer running Exchange Server. For example, if messages from a specific sender that arrive in your Exchange Server Inbox must be moved to one of your personal folders, the rule must function as a client-side rule, because the computer running Exchange Server is not able to access your personal folders.
Server-side rules reside on the computer running Exchange Server instead of on your local computer, and they can usually process messages in your Exchange Server mailbox whether or not you’re logged on and running Outlook 2007. The Out Of Office Assistant is a good example of how server-side rules can be used. It processes messages that come into your Inbox on the server even when your computer is turned off and you’re a thousand miles away. As long as Exchange Server is up and functioning, the server-side rules can perform their intended function.
When you create a rule, Outlook 2007 examines the rule’s logic to determine whether it can function as a server-side rule or a client-side rule. If it can function as a server-side rule, Outlook 2007 stores the rule on the computer running Exchange Server and treats it as a server-side rule. If the rule must function as a client-side rule, Outlook 2007 stores it locally and appends (client-only) after the rule name to designate it as a client-side rule. Figure 11-2 shows two rules in Outlook 2007, one of which functions as a client-side rule and another that functions as a server-side rule.

Troubleshooting
Your server-side rules don’t execute
Server-side rules, which process messages arriving in your Exchange Server Inbox, usually can execute when Outlook 2007 isn’t running. In some cases, however, server-side rules can’t function unless Outlook 2007 is running and you’re connected to the server.
When a server-side rule is unable to process a message because Outlook 2007 is offline (or for other reasons), the computer running Exchange Server generates a deferred action message (DAM), which it uses to process the message when Outlook 2007 comes back online. When Outlook 2007 goes online, it receives the DAM, performs the action, and deletes the DAM.
Note
For information about how to apply client-side rules to specific folders or to all accounts, see "Applying Rules to Specific Folders or All Folders" later in this chapter.
When you create a message rule, you must first specify whether you want to create the rule from a predefined template or from scratch. Because the templates address common message processing tasks, using a template can save you a few steps. When you create a rule from scratch, you set up all the conditions for the rule as you create it. You can use many different conditions to define the actions the rule performs, all of which are available in the Rules Wizard. With or without a template, you have full control over the completed rule and can modify it to suit your needs. The Outlook 2007 templates are a great way to get started, however, if you’re new to using Outlook 2007 or message rules.
Let’s look first at the general procedure for creating rules and then at more specific steps. The general process is as follows:
Select the Inbox in which the rule will apply. For example, if you have an Exchange Server account and an Internet Message Access Protocol (IMAP) account, you must choose the Inbox to which the rule will apply.
Note
If you have only one account, or an Exchange Server account and one or more POP3 accounts, you have only one Inbox to choose as the target for the rule. IMAP accounts, however, use their own Inbox folders, meaning that you can apply rules to these accounts separately from your Exchange Server and POP3 accounts. For example, if you have an Exchange Server account, two POP3 accounts, and an IMAP account in the same profile, you’ll see two Inboxes listed as possible targets for the rule: one for the Exchange Server and POP3 accounts and one for the IMAP account.
Specify when the rule applies—that is, when a message is received or when it is sent.
Specify the conditions that define which messages are processed—for example, account, sender, priority, or content.
Specify the action to take for messages that meet the specified conditions—for example, move, copy, or delete the message; change its priority; flag it for follow-up; or generate a reply.
Create other message rules to accomplish other tasks as needed, including possibly working in conjunction with other rules.
Set the order of rules as needed.
Troubleshooting
You have conflicting message rules
Outlook 2007 support for multiple accounts, combined with the ability to use both client-side and server-side rules, can pose certain problems. For example, assume that you have a POP3 account that delivers messages to your Exchange Server mailbox rather than to a local store. Also assume that you create a client-side rule to process certain POP3 messages but that you also have a server-side rule for processing messages. The server-side rule takes precedence because the client-side rule doesn’t execute until the message arrives in the Inbox, even though the message came through your computer before it was placed in your Exchange Server mailbox. Thus the message is processed by the server-side rule, potentially bypassing the local rule. If the server-side rule deletes the message, for example, the message will never make it to your personal folders to allow the client-side rule to act on it.
The order of rule precedence is important for the same reason—two rules, even on the same side, can perform conflicting actions. Keep this in mind when you’re creating rules and working with non–Exchange Server accounts that store messages in your Exchange Server mailbox.
Note
When you specify multiple conditions for a rule, the rule combines these conditions in a logical AND operation—that is, the message must meet all of the conditions to be considered subject to the rule. You also can create rules that use a logical OR operation, meaning that the message is subject to the rule if it meets any one of the conditions. For details, see "Creating Rules That Use OR Logic" later in this chapter.
The following steps guide you through the more specific process of creating a message rule:
In Outlook 2007, choose Tools, Rules And Alerts to display the Rules And Alerts dialog box.
In the Apply Changes To This Folder drop-down list, select the folder to which you want to apply the rule. If you have only one Inbox, you don’t need to make a selection.
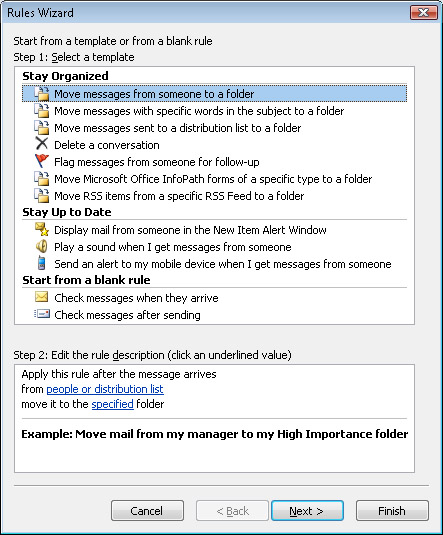
Click New Rule to display the wizard page shown in Figure 11-3.
If you want to use a template to create the rule, select the template from the list, and then click Next. To create a rule from scratch, choose Check Messages When They Arrive or Check Messages After Sending, and then click Next.
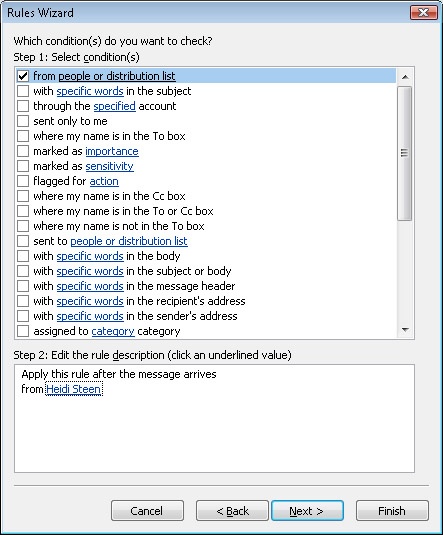
In the Step 1: Select Condition(s) list in the top half of the wizard page shown in Figure 11-4, select the conditions that define the messages to which the rule should apply. For template-based rules, a condition is already selected, but you can change the condition and add others as necessary.
In the Step 2: Edit The Rule Description area of the wizard page (see Figure 11-4), click the underlined words that specify the data for the conditions. For example, if you’re creating a rule to process messages from a specific account, click the word specified, which is underlined, and then select the account in the Account dialog box. Click OK, and then click Next.
In the Step 1: Select Action(s) area of the new wizard page, select the actions that you want Outlook 2007 to apply to messages that satisfy the specified conditions. For example, Figure 11-5 shows a rule that moves messages to a specified folder if they meet the rule condition.
In the Step 2: Edit The Rule Description area of the wizard page, click each underlined value needed to define the action, and then specify the data in the resulting dialog box. Click OK to close the dialog box, and then click Next.
In the Step 1: Select Exception(s) (If Necessary) area of the wizard page, select exceptions to the rule if needed, and specify the data for the exception conditions, as shown in Figure 11-6. Click Next.
On the final page of the Rules Wizard, shown in Figure 11-7, specify a name for the rule as you want it to appear in Outlook 2007.
Select options according to the following list, and then click Finish:
Run This Rule Now On Messages Already In "Inbox". Select this check box if you want Outlook 2007 to apply the rule to messages that you have already received and that currently reside in the Inbox folder in which the rule applies. For example, if you have created a rule to delete messages from a specific recipient, any existing messages from the recipient are deleted after you select this check box and click Finish to create the rule.
Turn On This Rule. Select this check box to begin applying the rule you have created.
Create This Rule On All Accounts. Select this check box to apply the rule to all applicable folders. For example, if you have three folders listed in the Apply Changes To This Folder drop-down list at the top of the initial Rules Wizard page, selecting this check box causes Outlook 2007 to apply the rule to all three folders instead of only the selected folder.


Note
For more details on using rules in various folders, see the following section, "Applying Rules to Specific Folders or All Folders."
When you first open the Rules And Alerts dialog box, it displays the rules that have already been defined for your profile, both client-side and server-side, as shown earlier in Figure 11-2. You might recall that you use the Apply Changes To This Folder drop-down list at the top of the dialog box to select the folder for which you want to create or modify a rule.
Regardless of the folder you select, the rules list in the dialog box always displays your server-side rules. The client-side rules that appear in the list depend on the folder you select. The list for a selected folder contains only the client-side rules for that particular folder, unless you’ve copied a rule to multiple folders or created a rule expressly for all folders.
To apply a rule to a specific folder, select that folder in the Apply Changes To This Folder drop-down list when you begin creating the rule. To apply a rule to all folders, select the Create This Rule On All Accounts option at the completion of the wizard (as explained in the preceding section).
By default, Outlook 2007 doesn’t create rules for all folders; instead, it creates the rule only for the selected folder. If you have created a rule for one folder but want to use it in a different folder, you can copy the rule to the other folder.
Follow these steps to do so:
Choose Tools, Rules And Alerts to open the Rules And Alerts dialog box.
Select the rule that you want to copy, and then click Copy.
When you’re prompted in the Copy Rules To dialog box, select the destination folder for the rule, and then click OK.
Note
For details on sharing rules with other Outlook 2007 users, see "Sharing Rules with Others" later in this chapter.
In some situations, it’s easier to create rules from specific messages. For example, if you frequently receive unwanted messages from a particular sender, you might want to delete the messages without downloading them. You can specify the address when you begin to create a rule in the Rules Wizard, but in this case, it would be easier to create the rule from the message instead, saving you the trouble of typing the sender’s name or address. Or perhaps the subject of a particular group of messages always contains a unique string of text, and you want to build the rule around that text. Rather than typing the text yourself, you can create the rule from one of the messages.
Here’s how to create a rule from a specific message:
In Outlook 2007, open the folder containing the message.
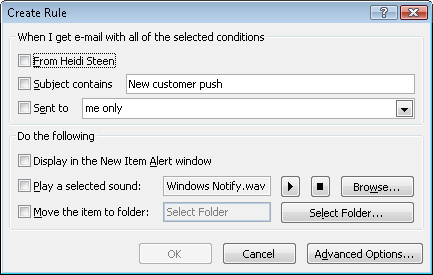
Right-click the message header, and then choose Create Rule.
Outlook 2007 displays a Create Rule dialog box that reflects the properties of the selected message—sender and subject, for example—as shown in Figure 11-8. Select an action from the Do The Following area in the dialog box. Or click Advanced Options to open the Rules Wizard to choose additional actions. Select a condition, and then complete the rule as you normally would if you were creating it from a template or from scratch.
Note
Remember that HTTP accounts don’t support Outlook 2007 rules. If you right-click a message stored in a folder for an HTTP-based mail account, you’ll see that the Create Rule command is not available. Also, rules are always created in the Inbox, not in other folders. You can, however, run rules manually in other folders.
Up to now, you’ve explored relatively simple rules that function based on a single condition or on multiple AND conditions. In the latter case, the rule specifies multiple conditions and applies only to messages that meet all the conditions. If a rule is defined by three AND conditions, for example, Outlook 2007 uses it only on messages that meet condition 1, condition 2, and condition 3.
You also can create rules that follow OR logic. In this case, a rule specifies a single condition but multiple criteria for that condition. The rule will then act on any message that meets at least one of the criteria for the condition. For example, you might create a rule that deletes a message if the subject of the message contains any one of three words. If one of the conditions is met (that is, if the subject of a message contains at least one of the three words), Outlook 2007 deletes that message.
With Outlook 2007, you can create several rules that use OR logic within a single condition, but you can’t create a single rule that uses OR logic on multiple conditions. For example, you might create a rule that deletes a message if the message contains the phrase MLM, Free Money, or Guaranteed Results. However, you can’t create a message rule that deletes the message if the subject of the message contains the words Free Money (condition 1), or if the message is from a specific sender (condition 2), or if the message is larger than a given size (condition 3). OR must operate within a single condition. When you create a rule with multiple conditions, Outlook 2007 always treats multiple conditions in the same rule using AND logic. You would have to create three separate rules to accommodate the latter example.
If you have a situation where you need to check for more than one piece of data in a single condition, you can do so easily enough; however, when you create the rule and define the condition, specify multiple items. For example, if you need a rule that processes messages based on four possible strings in the subject of the messages, click Specific Words in the rule description area of the Rules Wizard, where you specify rule conditions. In the Search Text dialog box, enter the strings separately. As you can see in Figure 11-9, the search list includes the word or to indicate that the rule applies if any one of the words appears in the subject.

Although you can’t create a single rule with OR logic operating on multiple conditions in Outlook 2007, you can create rules that combine AND and OR logic. For example, you might create a rule that applied if the message arrived at a specific account and the subject contained the words Free Money or Guaranteed Results. Keep in mind that you must specify two conditions—not one—to build the rule. The first condition would check for the account, and the second would check for the words Free Money or Guaranteed Results.
Consider the following example:
Choose Tools, Rules And Alerts.
In the Rules And Alerts dialog box, click New Rule.
Click Check Messages When They Arrive, and then click Next.
Select Through The Specified Account.
Select With Specific Words In The Subject Or Body.
At the bottom of the dialog box, click Specified, and then in the Account dialog box, select the e-mail account and click OK.
Click Specific Words at the bottom of the dialog box to open the Search Text dialog box.
Type Free Money, and then click Add.
Type Guaranteed Results, click Add, and then click OK.
Look at the rule conditions in the Step 2 area of the dialog box. The rule indicates that it will act on messages that are from the specified account and that have the text Free Money or Guaranteed Results in the message.
You can modify a rule at any time after you create it. Modifying a rule is much like creating one. To modify a rule, choose Tools, Rules And Alerts to open the Rules And Alerts dialog box. Select the rule that you want to modify, and then click Change Rule to display a menu of editing options. If you choose Edit Rule Settings on the menu, Outlook 2007 presents the same options you saw when you created the rule, and you can work with them the same way. Click Rename Rule to change the name of the rule, or click an action to add the selected action to the rule (retaining any existing actions).