
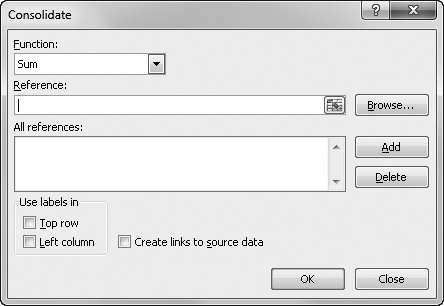
You can use the Consolidate button on the Data tab to combine the values from a set of worksheets in the same workbook or from different workbooks. The Consolidate command lets you assemble information from as many as 255 supporting worksheets in a single master worksheet and displays the Consolidate dialog box shown in Figure 8-71.
For example, if you have data for each month in separate worksheets or financial data for several divisions in separate workbooks, you can use the Consolidate command to create a master worksheet that comprises the totals for the corresponding items in each location. You can use the Consolidate command in a number of ways:
Link the consolidated data to the supporting data so that subsequent changes in the supporting worksheets are reflected in the consolidation worksheet.
Consolidate the source data on an ad hoc basis, without creating a link.
Consolidate by position, where Excel gathers information from the same cell location in each supporting worksheet.
Consolidate by category, where Excel uses column or row labels as the basis for associating worksheets. Consolidating by category gives you more flexibility in the way you set up your supporting worksheets. For example, if your January column is column B in one worksheet and column D in another, you can still gather the correct January numbers when you consolidate by category.
Use any of the functions listed in the Function list in the Consolidate dialog box, including Count (which corresponds to the COUNTA function), Average, Max, Min, Product, Count Nums (which corresponds to the COUNT function), StdDev, StdDevp, Var, and Varp. As shown in Figure 8-71, the default function is Sum.
Note
For more information about functions, see Chapter 13 and Chapter 14.
Consolidate worksheets in workbooks that are currently open or in workbooks that are stored on disk. The workbook containing the worksheet that receives the consolidated data must be open, but supporting workbooks can be closed—provided Excel has the correct locations at which to find each workbook file. (This should not be a problem unless you moved them since you last opened them in Excel.) You must save all supporting workbooks before you begin consolidation.
Note
You can also use PivotTable reports to consolidate worksheets. For information, see Chapter 23
When you consolidate by position, Excel applies the consolidation function (Sum, Average, or whatever else you select) to the same cell references in each supporting worksheet. By Position is the simplest way to consolidate, but your supporting worksheets must have exactly the same layout.
Figure 8-72 shows a simple example of a workbook containing a master worksheet—Consolidated—that matches the layout of 12 supporting monthly worksheets. These worksheets can be consolidated by position because each contains identically structured data.
Note
You’ll find the Pacific Brass Sales 2011.xlsx file with the other examples on the companion Web site.
To consolidate the monthly worksheets in Figure 8-72 into the worksheet named Consolidated, follow these steps:
Open the consolidation worksheet, and select the block of cells that will receive the consolidated data. In Figure 8-72, the destination area is the range B5:I10.
Click Data, Consolidate.
Select the source range in the first worksheet using the mouse. In this example, we selected B5:I10 in the Jan worksheet.
Click Add in the Consolidate dialog box. Excel transfers the reference from the Reference text box to the All References list. Repeat for each worksheet you want to consolidate.
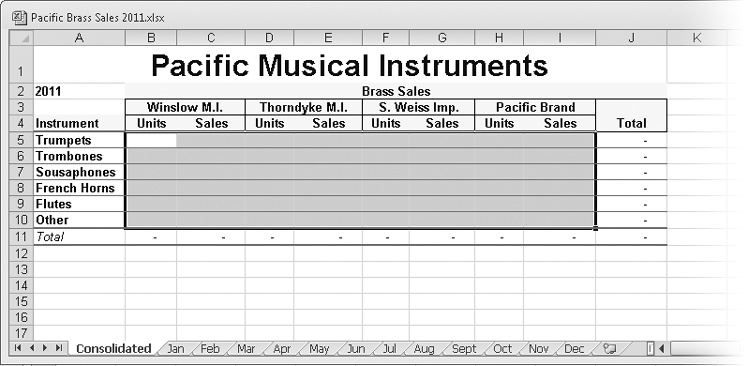
Figure 8-72. All the worksheets in this workbook are identical, which is necessary when you are consolidating by position.
Note
Be sure all supporting workbooks are open when you are building your consolidation worksheet to make it easier to type references. (If a workbook is closed, you must manually type references to it, and you really don’t want that.) After you have the consolidation set up and save the workbook, supporting workbooks can stay closed during future consolidations. If you do have to type a reference, you must use the form [File Name]Sheetname!Reference. If the reference is in the same workbook, the file name (and its surrounding brackets) is unnecessary. If you have assigned the source range a name, you can use this name in place of Reference (highly recommended). For more information, see Naming Cells and Cell Ranges on page 483.
After you add the first range—$B$5:$I$10 in the Jan worksheet—Excel selects the same range in each worksheet when you click its tab. Just click a worksheet tab, and then click Add to add references. Figure 8-73 shows the completed dialog box. Figure 8-74 shows the resulting consolidation.

Figure 8-73. The Consolidate command uses the references in the All References list to create the consolidated totals.

Now let’s look at a more complex example. The Pacific Sales Staff workbook contains monthly sales totals for each salesperson, but each monthly worksheet has a few different salespeople and a different number of salespeople, as shown in Figure 8-75.
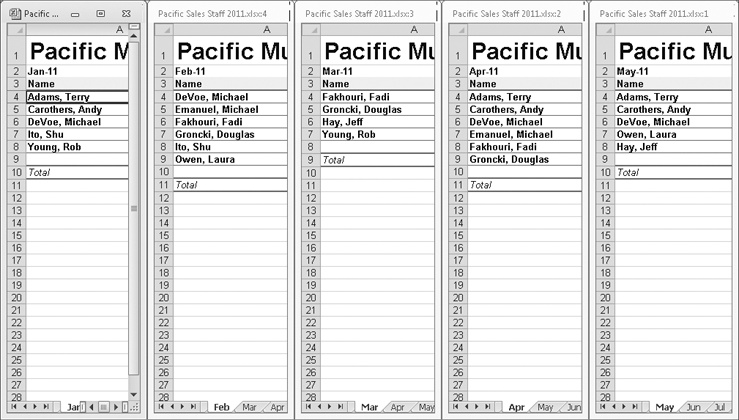
Figure 8-75. Use the categories in the left column of each source worksheet as the basis for this consolidation.
Note
You’ll find the Pacific Sales Staff 2011.xlsx file with the other examples on the companion Web site.
The consolidation worksheet we’ll use for our example has columns for Units and Sales—each worksheet is the same in this respect. When performing a consolidation by category, your consolidation sheet cannot include row categories. The cells for these categories (salespeople’s names) must start out blank on the consolidation sheet. Excel collects the categories (names) and lists them as part of the consolidation process. The names are not consistently arranged in the source worksheets, which is why we must use consolidation by category rather than consolidation by position in this example.
To consolidate by category, follow these steps:
Select the destination area. This time the destination area must include the row headings—but how many rows? To answer that, you can look at each source worksheet and determine how many unique line items you have. An easier way, however, is to select a single cell—in this case, cell A4—as the destination area. When you specify a single cell as your destination area, the Consolidate command fills in the area below and to the right of that cell as needed. In the example, to preserve the formatting, we inserted more than enough rows to accommodate the data.
Click Data, Consolidate.
To consolidate by row categories in this example, select the Left Column check box in the Use Labels In area. Click the default Sum function in the Function drop-down list. (The consolidation worksheet already has column labels.)
Each source reference must include the Name, Units, and Sales data. Select these ranges on each monthly worksheet. For example, on the Jan worksheet, we selected $A$4:$C$8. Unlike when consolidating by position, you have to manually select the ranges in each supporting worksheet because Excel selects the last range you added, which will not necessarily be what you need in each worksheet.
Click OK, and Excel fills out the Consolidated worksheet, as shown in Figure 8-76.
Note
It’s important that your categories—in our example, the names of salespeople—are spelled identically on each supporting worksheet. Otherwise, Excel creates a separate line and consolidation for each spelling variation.

Figure 8-76. The Consolidate command created a separate line item in the consolidation worksheet for each unique item in the source worksheets.
The previous examples consolidated numbers with the Sum function, resulting in a range of consolidated constants. Subsequent changes to the source worksheets do not affect the consolidation worksheet until you repeat the consolidation.
You can also use the Consolidate command to create links between the consolidation and source worksheets. To do so, select the Create Links To Source Data check box in the Consolidate dialog box and then consolidate using the same techniques. When you consolidate with links, Excel actually creates an outline in the consolidation worksheet, as shown in Figure 8-77. Each source item is linked separately to the consolidation worksheet, and Excel creates the appropriate summary items. Excel creates additional columns and rows as necessary for each category—one for each unique entry in each worksheet, as shown in rows 35 to 41. Figure 8-77 also shows, in the formula bar, the linking formula for the December units figure in cell C36.
Note that when you create links, any rows or columns you subsequently add to the source worksheets are not included in the consolidation. However, it is easy to modify the consolidation references. Open the Consolidate dialog box, select the reference you want to change, and click Delete. Then select the modified range, and click Add.

Figure 8-77. When you create links to the source worksheets, the consolidation worksheet is outlined and linking formulas are created in subordinate outline levels.
Note
For more information about outlining worksheets, see Outlining Worksheets on page 274.